I apologize beforehand about the heavy use of screenshots, I did not load the network drivers for DOS, nor am I even sure there are any that will work with VMWare. So rather than double up on the typing, I captured the screens as I typed them. If you are not familiar with Assembly or the 8086 Instruction set, I would recommend doing a little background reading since a full tutorial is outside of the scope of this article. http://www.xs4all.nl/~smit/asm01001.htm has a brief overview, and you can do a search for “The Art of Assembly”. There are numerous books on the subject as well.
Here are the details on the program I will write. The program will have a blue background, with a small white border with black background with the word Hello in white. I will not use any of the DOS interrupts to output text, with the exception of the DOS exit program interrupt (AX set to 4c00 and calling Interrupt 21h), so I will be writing directly to memory.
For reference in this article, the base memory address for the video memory is at B800:0.
The steps for this program are as follows. I will set the background to a spotted box using the ASCII code for a lightly shaded box, then draw the box, then put the text into the box. For reference, the ASCII code for the shaded box is 176 (Hex B0), and the color byte will be set to 18. The ASCII codes for drawing the box are as follows:
DEC – HEX – What does this code do?
205 - CD - Horizontal Lines
200 - C8 - Bottom Left Corner
201 - C9 - Top Left Corner
188 - BC - Bottom Right Corner
187 - BB - Top Right Corner
186 - BA - Vertical Lines
And of course, the ASCII codes for the word HELLO. For both the text and the border, the color byte will be set to 07, which is a black background and white foreground. The program will be split into two programs and merged. The first program, screen.com, will draw the background. The second program, screen2.com, will draw the box and the text. I did this to split the tasks up and to save myself some sanity while writing this.
Lets start. From the MS-DOS prompt, type debug.

Once inside of debug, I type in the A then enter and this will put me into the assembler. I type in the below program:
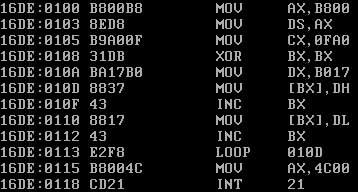
I will go through each section and explain what it is doing. On the left hand side displays the location of each instruction. Next to that is the encoded instruction that the CPU actually processes. On the right are the instructions and registers, memory locations, and literals we are working with. All literals and memory locations are done in HEX. So starting from the first line:
mov ax, b800
mov ds, ax
Here I am moving the memory address of video memory into general purpose register AX. Then I move that value into the data segment register. The reason I take the extra step of moving into register AX then move into DS is because I cannot move a value directly into the data segment register. I can only move data from one of the 4 general-purpose registers, AX, BX, CX, or DX, into one of the segment registers. The next portion is:
mov cx, 0fa0
xor bx, bx
mov dx, b017
Here I am preparing my registers for my loop to set the memory to the correct characters and color codes. The first line is setting CX to the number of memory locations I will need to set, which is 80x25x2, or 4000 (FA0 in HEX). The reason I multiply this by two is because video memory stores characters in two byte combinations, the ASCII code of whatever character, then the attribute byte. Next, I clear my base register BX. XOR two registers together is the standard way to do this, but using the MOV instruction with a value of 0 will work just as well. BX will be used as an offset from the memory location stored in DS. I move the two-byte combination of the background ASCII code and its color attribute byte into register DX. The next sections is:
:010D mov [bx], dh
inc bx
mov [bx], dl
inc bx
loop 10D
I included the address of the start of my loop in the above code as a reference. Most Assemblers are nice enough to allow labels for jumps and loops, however debug is not. What I am doing on the first line here is moving the ASCII value into the proper memory address pointed to by the DS:BX combination. Next I increment BX to move one byte up. Then I move the attribute byte into the new location. The reason I do this one byte at a time is due to some issues with moving the whole DX register at once. I will not go into details about it, suffice to say logically it is easier to understand moving the two bytes separately. After that, I loop back to the start location at 010Dh. The Loop instruction will automatically decrement the value in the CX register by 1. Once the CX register is 0, it will continue on with the next segment of code. Once the loop is complete, I am ready to exit the program with the following code:
mov AX, 4C00
int 21
This will exit the program. Hit enter one extra time to exit the assembler and go back to debug. Looking at the above screenshot of the completed code, I can see that this program ends at 11A, which means it is 1A, or 26 in decimal, bytes big so far. I want to write this to disk and give it a try. I type in the following commands to do so:
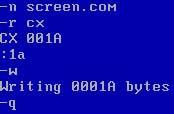
Now I can type screen at the DOS prompt to see the results.

The above is just a small snippet of the screen. I am ready to type in the second portion of the program, the part that draws the box and writes HELLO inside. I will need to reference the ASCII codes mentioned earlier here for drawing my box. I want my box to start roughly in the middle of the screen and across. After doing some math, I find my memory offset at 1600 decimal, or 640 hex, and add 6 to that to move over just a tad. Now that I have what I need, I create a new file (just for testing). This new program will draw my box with the text HELLO in it. I type in the following code:
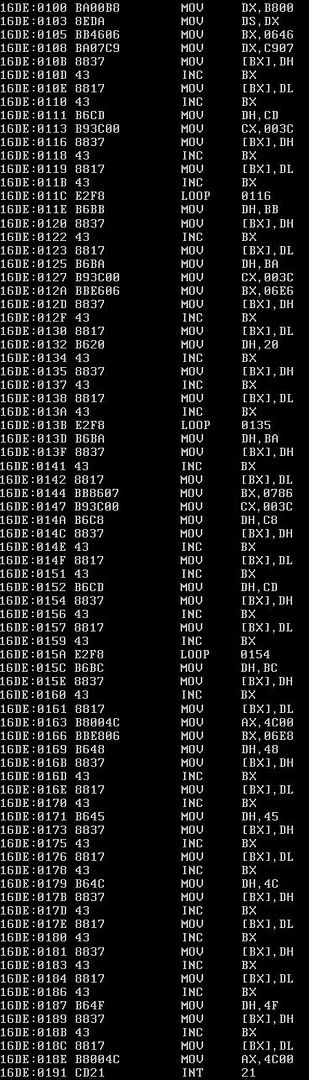
Once I am done typing, I set up debug to save my file using the file size of 93h:

Now I run the screen2.com file to see what it looks like:

I am lazy so I do not want to have to retype all that to combine the two files. So I will do append the files together to create my final output. First thing I need to do is go into screen.com, and modify it so that I am not making my call to exit. To do this, I type:
debug screen.com
Once inside of debug, I type U to see the contents of the file:

I look for the instructions just before my DOS exit code. I can see that this is at 115. So I type in r cx. I enter in 115.

Once done, I type w then enter to save my file.
I quit out of debug and now I am ready to join my files. To do this I type the following command:
type screen2.com >> screen.com
And that’s it. The two files are now joined. Below is a screenshot of the final results.

It’s amazing what 168 bytes can accomplish. Although there are numerous ways I could have accomplished this same task, such as keeping the text string in memory and doing a simple loop and byte copy, I chose to do it manually to illustrate how much work goes into something as simple as outputting text to the screen. We can see just how easy we have it with high-level languages. I plan on doing future articles with some hardware interactions to kind of pick up on some of my old electronics hobbies.


No comments:
Post a Comment