Tuesday, December 26, 2006

Java: RCP Article 2

While not necessarily my intention, I have neglected to write the later few articles in my RCP tutorial. Holiday duties in conjunction with new job responsibilities have eaten away at my free time. Here I am, sitting with the Gamecube version of Zelda, Twilight Princess (no Wii here, I’m sitting that one out until the villainous holiday mobs quit snatching every shipment up 10 minutes after store opening, but I’m not complaining, this is by far one of the most beautiful GC games, if not last gen game on any platform, and some next-gen games, I have ever laid eyes on), Final Fantasy XII (by far, one of the most boring story lines I have ever played, but I will stick it out since it is a Final Fantasy damnit), and Metal Gear Solid: Portable Ops (one of the best friggin hand-held games I have every played in my life, too bad it is marred with the horrid control schema that comes from the poor ergonomic design that is the PSP, but strangely addicting) being largely unplayed due to this lack of leisure time.

So, here is part two of my RCP tutorial. Last time I build a small RCP application that grabbed a list of all my files on the root of my drive (in my case, C:/) and displayed them in a tree. While I had intended to build a JAR file to incorporate with my app that used the Google web API to query Google, wouldn’t you know it, Google went and dropped their web API. THE MODEL for web services, and they drop it. Others believe that this is a signal of the end of the web-services bubble. Personally, I think it’s a sign that Google is become less of the good guy and more like “Evil” shit-heads more concerned with the bottom line. Regardless of motive, I have to change course here…

So as a substitute to the formerly awesome Google web service, I had to build my own simple web service using Tomcat. For this article, I will build a simple web service that returns the string “My Test Webservice” in Eclipse. Nothing fancy, I just didn’t feel like going with Hello World.

First thing first, make sure you have the Eclipse Web Tools project installed. For me, I am using the BIRT All-In-One install of Eclipse 3.2 Catalina, with WTP installed separately via the update manager. The WTP also has a separate All-in-One package. Make sure you also have configured a Server and Server Runtime for testing and debugging. Certain aspects of the application development did not work properly without them. So here, I will walk through the process of creating the server.

First, I went up to File/New and chose Other. I chose the Server category, and chose a Server project. Since I am using Apache Tomcat 4.1 (which I keep around for other projects compatibility) I choose Tomcat 4.1 as my server type. The next screen sets up the server runtime, so I need to set the install directory for Tomcat 4.1, and I set up the JRE location to where my JDK is installed. I am using Java 1.5.09, which when I set the directory, the JRE Name and JRE Libraries automatically filled themselves out. Once setup, I just click Next, and then Finish to complete the setup. Now, I can start and stop this server configuration by going up to Window, Show View, Other, and choose server. A server tab opens up in the same area where the Console tab and the Properties tab are.
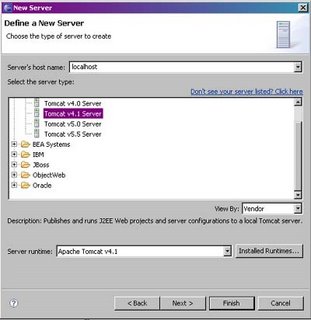

Figure 1. Server Configuration


Figure 2. Servers Tab

With that installed, I created a new Dynamic Web Project called MyWebService. I make sure that my Target Runtime is set to the Runtime configured in my server project configuration. On the next screen, I do not set any other configurations and keep things default (Dynamic Web Module and Java are checked, JavaServer faces is not). I keep the Context Root set to MyWebService and the content directory to default. Once done I click Finish.
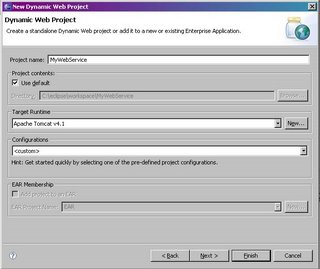

Figure 3. New Dynamic Web Project

With my project created, I create a new Java class in my project called MyWebService in the com.digiassn.blogspot package. I write the following code for this class:

package com.digiassn.blogspot;

public class MyWebService
{
public String outputResponse()
{
return "My Test Webservice";
}
}
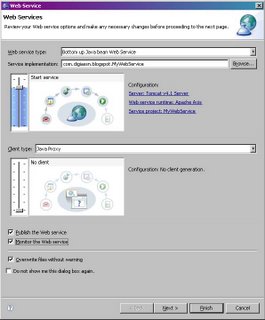
Once done, I save the file, then in the Project Explorer, I right-mouse click on the MyWebService.java file, go to Web Services, and choose Create Web Service. I use the following settings:


Figure 4. Web Service Configuration

I also choose to create a WSDL file to for other future programs to consume this service, which will include the finalization of the RCP application. On the next few screens, I have to start the Server in order to proceed, which publishes the project. I also choose not to publish to a UDDI registry.

Now, I want to test my installation, so I go to the following URL:

http://localhost:8080/MyWebService/services/MyWebService

And the WSDL file is located here:

http://localhost:8080/MyWebService/wsdl/MyWebService.wsdl

So now I want to test my web service to make sure it works. This is actually incredibly easy in Eclipse with WTP, a lot easier than I would have thought. One way I can test is to right-mouse click on the MyWebService.java file, choose web service, and select Generate Sample JSP. I get a Web Services Test Client page with some buttons and some panes with the example outputs. I can also go to the WebContent/wsdl/MyWebService.wsdl file and choose “Test with Web Services Explorer”. From here, I can launch various test pages and view the SOAP envelope messages that get sent back and forth.

Now I can publish to the server and I have my web service to consume in the RCP application.
Tuesday, December 12, 2006

Windows: Command Line From Here

I can't remember where exactly I found this at, but below is a useful little registry hack that will add a "DOS Prompt From Here" option in Explorer whenever you right-mouse click on a folder.

REGEDIT4
BLANK LINE GOES HERE
[HKEY_CLASSES_ROOT\Directory\shell\DosHere]
@="Command &Prompt:"
BLANK LINE GOES HERE
[HKEY_CLASSES_ROOT\Directory\shell\DosHere\command]
@="C:\\WINNT\\SYSTEM32\\cmd.exe /k cd \"%1\""
BLANK LINE GOES HERE
[HKEY_CLASSES_ROOT\Drive\shell\DosHere]
@="DOS &Prompt Here"
BLANK LINE GOES HERE
[HKEY_CLASSES_ROOT\Drive\shell\DosHere\command]
@="C:\\WINNT\\SYSTEM32\\cmd.exe /k cd \"%1\""

Monday, December 11, 2006

Java: JaxB Part 3 - Implementing JaxB Classes In Java

The third and final part of the JaxB article is here. Previously, I had created an XML schema using Eclipse Web Tools XML Schema Designer, then I used JaxB to create a set of Java classes for use inside of a Java project. So now comes the final part, the project itself…

Few things to note, then I will post the code. First, Eclipse, for some “odd” reason, would not recognize the JaxB generated files in my project folder until I Right-Mouse Clicked on the project, chose Go-Into, and then refreshed. Not sure what the deal was with that. Also, I had to add all the JAR files under the following directories:
C:\Sun\jwsdp-2.0\jwsdp-shared\lib
C:\Sun\jwsdp-2.0\jaxb\lib
C:\Sun\jwsdp-2.0\sjsxp\lib

But with that out of the way, I created a new Java Class called CreateXMLFileFromSystem in a package called com.digiassn.blogspot.filestructure.
The code is below:
package com.digiassn.blogspot.filestructure;

import java.io.File;
import java.io.FileNotFoundException;
import java.io.FileOutputStream;
import java.util.GregorianCalendar;

import javax.xml.bind.JAXBContext;
import javax.xml.bind.JAXBElement;
import javax.xml.bind.JAXBException;
import javax.xml.bind.Marshaller;
import javax.xml.datatype.DatatypeConfigurationException;
import javax.xml.datatype.DatatypeFactory;

public class CreateXMLFileFromSystem {

private static void populateFiles(final ObjectFactory factory, final Lfile parent) {
// Get the list of files in the current folder, and store in
// the files variable
final String[] files = new File(parent.getPath()).list();

// For each of the files, check if it is a directory, and add
// to the tree object
for (final String temp : files)
// Try statement added. Reason being, if the current file has
// special access permissions, Java does not handle correctly
// and causes a runtime exception and causes a stop in processing
try {
// Get current file
final File f = new File(parent.getPath() + "/" + temp);

// Create the local file based on our current file
final Lfile t = factory.createLfile();

// Set all attributes for the file
t.setName(f.getName());
t.setIsDirectory(f.isDirectory());
t.setPath(f.getPath());
t.setSize(f.length());

// Setting the time requires the use of the XMLGregorianCalendar
// object
// so here we will create a temporary gregoriancalendar
// and set up the XMLGregorian using the constructor that
// supports
// Gregorian calendar
final GregorianCalendar tempDate = new GregorianCalendar();
tempDate.setTimeInMillis(f.lastModified());

t.setDateLastUpdate(DatatypeFactory.newInstance()
.newXMLGregorianCalendar(tempDate));

// Check if it is a directory
if (f.isDirectory()) {
// If this is a directory, it will have
// sub directories, so add a new
// FilesInFolder object
t.subFiles = factory.createFilesInFolder();

// Make a recursive call, populating LFile with
// all child directories
populateFiles(factory, t);
}

// Go ahead and add to the parent
parent.getSubFiles().getFiles().add(t);
} catch (final DatatypeConfigurationException e) {
// TODO Auto-generated catch block
e.printStackTrace();
} catch (final RuntimeException e) {
// Do nothing
}
}

public static void main(final String[] args) {
try {
// Setup the JAXBContent and Marshaller
final JAXBContext jcontext = JAXBContext
.newInstance("com.digiassn.blogspot.filestructure");
final Marshaller m = jcontext.createMarshaller();

// Setup the file objects for outputting to our XML file
final File xmlOutput = new File("fileList.xml");
final FileOutputStream outputFile = new FileOutputStream(xmlOutput);

// Create the factory object that will instantiate the JAXB created
// XML handler objects
final ObjectFactory factory = new ObjectFactory();

// Create the JAXB generated classes
final FilesInFolder root = factory.createFilesInFolder();
final Lfile currentFile = factory.createLfile();

// Set our current file to the root of C and add a new FilesInFolder
// object to the subfiles variable since we will "always" have
// subfiles
// and folders in the root of C
currentFile.setName("C:/");
currentFile.setPath("C:/");
currentFile.setIsDirectory(Boolean.TRUE);
currentFile.setReadOnly(Boolean.FALSE);
currentFile.setSize(0);
currentFile.subFiles = factory.createFilesInFolder();

// Start the recursive function calls on our current file. Once complete,
//The currentfile will have all child entries populated in the object
populateFiles(factory, currentFile);

// Add the C:/ file entry and all subsequent child nodes to the
// root element FilesInFolder object in the JaxB class
root.getFiles().add(currentFile);

// Create the JAXB handler and put the Root file as the initial
// constructingg XML element. Since it has already been built, we
// do not need to do anything else
final JAXBElement<FilesInFolder> ds = factory
.createDirectoryStructure(root);

// Set the Formatted Output option to true (trust me, after sitting
// for over an hour and having to increase the JVM heap to over a
// gig just
// to get Eclipses XML editor to even open this file, its easier to
// set formatted output and open in the much less memory hungry VI
// to confirm
// propert output
//
// Once that property is set, write out the file.
m.setProperty(Marshaller.JAXB_FORMATTED_OUTPUT, Boolean.TRUE);
m.marshal(ds, outputFile);
} catch (final FileNotFoundException e) {
// TODO Auto-generated catch block
e.printStackTrace();
} catch (final JAXBException e) {
// TODO Auto-generated catch block
e.printStackTrace();
}
}
}


As you can see, using JaxB is incredibly easy. For an example like this, however, the resulting file was huge, in the area of 80 Megs to list my file structure. Perhaps XML is not the best format to store that information, but since it is structured it does provide a good example. Opening the resulting file in Eclipse, however, crashed Eclipse with a Out of Heap error, which caused me to have to up the heap space in Eclipse to view the file using the XML viewer. Notice I use the JAXB_FORMATTED_OUTPUT option in the marshaller. The reason being, opening that file in VI proved to be a better option than using Eclipse, and without the Formatted Output option, I ended up with a huge XML file all run together on one line.

Sunday, December 10, 2006

Java: JaxB Part 2 - Using JaxB to Create Java Classes from an XML Schema

Last article I created a XML Schema to use in my example program. I created an XML file that would represent the file structure. My next step in developing my example application is to run JaxB to create a series of Java classes to create the XML file.

The JaxB implementation I used was part of the Java Web Services Developer Pack 2.0, which I installed to directory C:\Sun\jwsdp-2.0

Once installed, I set the following environment variables:

JAVA_HOME=C:\Program Files\Java\jdk1.5.0_09
ANT_HOME=C:\Sun\jwsdp-2.0\apache-ant
ANT_OPTS=-Djava.endorsed.dirs=C:\Sun\jwsdp-2.0\jaxp\lib\endorsed;C:\Sun\jwsdp-2.0\jaxp\lib
JWSDP_HOME=C:\Sun\jwsdp-2.0
PATH= (Added) C:\Sun\jwsdp-2.0\jwsdp-shared\bin; C:\Sun\jwsdp-2.0\jaxb\bin\

Now, I can compile XML schemas from the command line by using the XJC.BAT command. Since I had created a Java project already containing the schema, I needed to use a command prompt to change to that directory and run XJC against the resulting .XSD file created by the Web Tools Project XML Schema designer. In order to do that and create the Java classes, I run the following commands, where C:\WTP is the location of my Eclipse installation, C:\WTP\WORKSPACE is the location of my workspace and project files.

cd c:\WTP\workspace\FileStructureXML
xjc.bat –p com.digiassn.blogspot.filestructure FileStructure.xsd

That’s it, the following files were created from the above commands:
C:\wtp\workspace\FileStructureXML\com\digiassn\blogspot\filestructure\
C:\wtp\workspace\FileStructureXML\com\digiassn\blogspot\filestructure\FilesInFolder.java
C:\wtp\workspace\FileStructureXML\com\digiassn\blogspot\filestructure\Lfile.java
C:\wtp\workspace\FileStructureXML\com\digiassn\blogspot\filestructure\ObjectFactory.java
C:\wtp\workspace\FileStructureXML\com\digiassn\blogspot\filestructure\package-info.java

And next article, I will wrap this up and show the completed application.

Saturday, December 09, 2006

Eclipse: Graphical XML Schema Building using WTP also known as JaxB Article Part 1

While I know I said I was going to have a second article about adding onto my RCP application, but I got sidetracked. My boss got me interested in working with JaxB (Java Architecture for XML Binding) to build Java code to marshal (handle writing to) and unmarshal (reading from) XML files. The basic theory is this, you write an XML schema, run JaxB against said schema, and it will generate the code you need to handle information in said data structure. So, over the next few articles, I will discuss how to do so, which may benefit the RCP application as well as I may incorporate some example of that into the final product to save results or something.

Now, I personally don’t really care to write out tons of ridiculous XML structures by hand. I had read several suggestions, such as using commercial products like XMLSpy, but the best solution was suggested in a conversation with Scott Rosenbaum of the BIRT PMC. His suggestion, why not build the schema using the schema designer in the Eclipse Web Tools Project. Lo and behold, this solution works like a charm.

The idea behind the following example will build off of the Java recursive file system retrieval code I showed in my last article, get relevant information (name, path, size, date last modified) from the local file system (using Windows C:\ as my example), and build an XML data file using JaxB generated code to marshal the building of that file. For this example, I used the Web Tools Project All-in-One distribution of Eclipse, available here. I got that, extracted into a local folder (C:\WTP), and was ready to go.While I could have just installed WTP into my existing Eclipse instance, considering the problems I have had in the past with Eclipse plug-ins, and how the BIRT All-in-One saved me from hours of headaches with the Callisto release, I decided to stick with a formula that works.

The design of my file is like so. I want a key element called LFile, which is built like:

Name : String
Path: String
File_date: Date
Size: long
Read-Only : Boolean
IsDirectory : Boolean
SubFiles: FilesInFolder

On top of that is the structure FilesInFolder, which is basically a List of LFiles. I called my structre Lfile so as to not have to worry about naming convention conflicts between my structure and the java.io.File object.

My first step is to create my Eclipse Project. I open up Eclipse in the Java perspective. I go to File / New /Project, choose new Java project, and follow the wizard. I call my project FileStructureXML. Once my new project is created, I go to File/New/Other/XML/XML Schema. This will create a new XSD document. I called my file FileStructure.XSD. I choose to open my newly created in the XML Schema Editor.

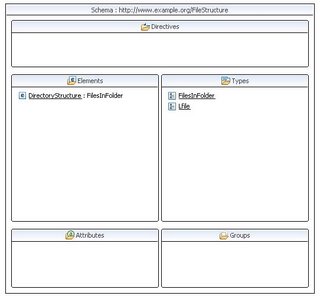
Once open, the XML Schema Editor is a graphical schema design tool, which in my opinion is much easier than writing code by hand. So, the first thing I need to do is create my custom types. I go over to the Types section, Right-mouse click and choose Add Complex Type. I call my new Type Lfile, and add Elements (add elements, not attributes) as indicated above, with the exception of the SubFiles element. Once completed, I save my design, click on the little square in the upper left hand corner of the XML designer to go up to my top-most design, and create a type called FilesInFolder. I create a single element, called Files, and specify the type to be Lfile. In order to do this, I had to select the files element, and in the property editor, choose browse, and select Lfile from the list of types. I hit OK. Back in the editor for the FilesInFolder type, I select the files element. I then specify the min occurance to be 0, and the max to be unbounded. This will create a List of Files when I generate the Java code. Now, I go back to my top most design, select the Lfile type, double-click to go into its, and add an element called subFiles. I specify the type to be Lfile and set the min and max elements appropriately. I go back to my top-most design again, and create a single element called DirectoryStructure and set the type to be FilesInFolder. I probably could have just as easily create an element called RootFile and specified it to be a Sequence of Files, but I always seem to have problems with that. So, although this will generate an extra invocation in my resulting Java class, I will live with the DirectoryStructure element instead. Since this is just a demonstration, this will work just file. I save this as my design schema. Once complete, my resulting XML Schema Design looks like so:


Figure 1. The Schema Designer

And the actual Schemas XML is in Figure 2.


<?xml version="1.0" encoding="UTF-8"?>
<schema xmlns="http://www.w3.org/2001/XMLSchema" targetNamespace="http://www.example.org/FileStructure" xmlns:tns="http://www.example.org/FileStructure" elementFormDefault="qualified">
<complexType name="Lfile">
<sequence>
<element name="name" type="string"></element>
<element name="size" type="long"></element>
<element name="path" type="string"></element>
<element name="date_last_update" type="date"></element>
<element name="isDirectory" type="boolean"></element>
<element name="readOnly" type="boolean"></element>
<element name="subFiles" type="tns:FilesInFolder"></element>
</sequence>
</complexType>

<complexType name="FilesInFolder">
<sequence>
<element name="files" type="tns:Lfile" minOccurs="0" maxOccurs="unbounded"></element>
</sequence>
</complexType>

<element name="DirectoryStructure" type="tns:FilesInFolder"></element>
</schema>
Figure 2. XML Schema Code

Of course, the above illustrates why having some sort of Class Diagram or high-level design becomes necessary. Especially when the data structures get more complicated, and you are dealing with a system with lots of complex data structures of this type.

Next step will be to generate the Java classes from this schema, which I will discuss in my next article.

Wednesday, December 06, 2006

Java: How to Create a Basic RCP Application

So, at the gentle nudging of my new boss, I have been looking into building applications with RCP. In theory, it seems like a sound framework. In practice, I have run into quite a few pitfalls. Much of it is a major philosophy shift on my part, or rather the difficulty dealing with the Eclipse plug-in paradigm. So, over the next few articles, I will share my experiences in building what I hope is a simple RCP application.

The application I will build here is a simple web service communication program that will use the Google web service to query Google and retrieve the results. I decided to build this application for several reasons. First, it somewhat mirrors the application I am currently building for work, in terms of getting information, using a web service, and using JAR files external to the RCP framework. I will use Apache Axis to generate proxy classes to use with Google. Requirements for this series are Eclipse, Java 5, and Apache Axis. As an added bonus, for no apparent reason, I will also have a Tree List that displays all files in the root of the drive. So in this article, I will demonstrate a few things. First, I will demonstrate how to create an RCP application in Eclipse. I will also demonstrate how to modify a view, add visual components, and I will demonstrate how to retrieve a file list and directory listing in Java, using a recursive function to populate an SWT Tree component.

The first step is to create the RCP project itself. Here are the steps.

First, open Eclipe. Once Eclipse is open, open the Java Perspective. You do this by going up to Window / Open Perspective /Java (Or if Java is not there, go to Other / Java). Now, we need to start a new Plug-in Project. Go to File / New / Project. When the wizard opens up, choose Plug-In Development / Plug-In Project.


Figure 1. New Plug-In project.

On the next screen of the wizard, enter in a project name (in my case, I am naming it com.digiassn.blogspot.RCPTutorial). Make sure the Create a Java Project option is checked, and set the Eclipse version you are targeting. I set mine to version 3.2.

On the next screen, be sure to check the option to create a Rich Client Platform Application. Enter the other parameters (I left mine default). On the next screen there is a series of templates. I chose the RCP Application with a View template. Once done, I just hit Finish, and my initial project has been created.

That’s all there is to it to create an RCP application. Now, I can test run the application by clicking on the Launch an Eclipse Application item in the editors Overview tab, under Testing.


Figure 2. Project Editor


Now, with the new project created, I want to modify it to provide the interface I want to use. Since I used the above template, I can modify the src/com.digiassn.RCPTutorial/View.java file. What I want is to clean up some of the junk that the Eclipse wizard threw in, remove the wizard generated objects in the view since they do not coincide with my goal for this program, and add the necessary components to my view. I also need to put in the code to initialize my TreeView object with my file listing. For run-times sake, I choose to just display a list of directories. In order to do this, I use the Java File object, and create a recursive function that will populate the list for me. The way it works, is it gets a list of files, if the current file is a directory, it creates a new tree item, and then recalls itself using itself as the root value. I was kind of stoked; I haven’t had to write a recursive function since high school. The code for the View.Java file is below.


View.java
package com.digiassn.blogspot.rcptutorial;

//Necessary imports for SWT components
import org.eclipse.swt.SWT;
import org.eclipse.swt.events.MouseAdapter;
import org.eclipse.swt.events.MouseEvent;
import org.eclipse.swt.events.SelectionAdapter;
import org.eclipse.swt.events.SelectionEvent;
import org.eclipse.swt.layout.FillLayout;
import org.eclipse.swt.widgets.Composite;
import org.eclipse.swt.widgets.Group;
import org.eclipse.swt.widgets.Tree;
import org.eclipse.swt.widgets.TreeItem;
import org.eclipse.ui.part.ViewPart;
import org.eclipse.swt.widgets.MessageBox;
import org.eclipse.swt.widgets.Shell;
import java.util.Date;

import java.io.File;

public class View extends ViewPart {
//The tree list displaying files
private Tree treFileList;
//String generated by wizard to identify the component
public static final String ID = "com.digiassn.blogspot.RCPTutorial.view";
private Shell this_shell;

private void populateTargetTree(Tree parent, File root)
{
File []listOfFile = root.listFiles();

//For each of the files, check if it is a directory, and add
//to the tree object
for (File f : listOfFile)
{
//Try statement added. Reason being, if the current file has
//special access permissions, Java does not handle correctly
//and causes a runtime exception and causes a stop in processing
try {
//Check if it is a directory
if (f.isDirectory())
{
//create new tree item, setting the data to the current file for
//later use
TreeItem t = new TreeItem(parent, SWT.NULL);
t.setText(f.getName());
t.setData(f);

//Make a recursive call, populating TreeItem with
//all child directories
populateTargetTree(t, f);
}
} catch (RuntimeException e) {
//Do nothing
}
}
}

/**
* populateTargetTree
*
* @param parent (The Main treeItem)
* @param root (The Root folderr in the file system
*
* A recursive call, similar to the populateSourceTree function, but
* populataes with the local file system instead of the Actuate encyclopedia
*/
private void populateTargetTree(TreeItem parent, File root)
{
File[] listOfFile = root.listFiles();

for (File f : listOfFile)
{
try {
if (f.isDirectory())
{
TreeItem t = new TreeItem(parent, SWT.NULL);
t.setText(f.getName());
t.setData(f);

populateTargetTree(t, f);
}
} catch (RuntimeException e) {
// TODO Auto-generated catch block
e.printStackTrace();
}
}
}

/**
* This is a callback that will allow us to create the viewer and initialize
* it.
*/
public void createPartControl(Composite parent) {
this_shell = parent.getShell();

//Create a group component, this will house the components related to the
//Google portion of the program. Use the veritcle layout Fill for layout management
final Group grpGoogle = new Group(parent, SWT.NONE);
grpGoogle.setText("Google Stuff");
grpGoogle.setLayout(new FillLayout(SWT.VERTICAL));

//Now create the group for the file system component
final Group grpFileSystem = new Group(parent, SWT.NONE);
grpFileSystem.setText("File System");
grpFileSystem.setLayout(new FillLayout(SWT.VERTICAL));

//Add the tree list that will display the files on the hard drive
treFileList = new Tree(grpFileSystem, SWT.BORDER);

//Add a listener to the tree that will display the information about the directory
//stored
treFileList.addSelectionListener(new SelectionAdapter() {
public void widgetSelected(SelectionEvent e) {
MessageBox m = new MessageBox(this_shell, SWT.OK);
String message_to_display = "File: " + ((File) treFileList.getSelection()[0].getData()).getName() + '\n' +
"Path: " + ((File) treFileList.getSelection()[0].getData()).getPath() + '\n' +
"Last Modified: " + new Date(((File) treFileList.getSelection()[0].getData()).lastModified()).toString() + '\n' +
"Number of Subs: " + String.valueOf(((File) treFileList.getSelection()[0].getData()).list().length);
m.setMessage(message_to_display);
m.setText("File Selected");

m.open();
}
});

this.populateTargetTree(treFileList, new File("C:/"));
}

/**
* Passing the focus request to the viewer's control.
*/
public void setFocus() {
}
}

Next article I will create the proxy classes for Googles web services, then show how to import them into the project. This can be a problem, as I found, since Eclipse RCP projects require that JAR files be part of a plug-in. I will show a workaround for this.

Having worked with this for a little bit, I can say this had suprisingly a lot of pitfalls. Documentation was incredibly sparse, and I had a lot of difficulty finding solutions to issue, such as the external JAR issue I mentioned. Most answers I found were in news group posts. This, to me, is not good, especially for younger programmers who are learning. Shame on Eclipse for not having better documentation on these kinds of things. While I do like the RCP framework, I think it has a long way to go. I did come across the RCP Developer from Instantiations that provides some better wizards, and a decent visual designer.

Friday, December 01, 2006

Hypeless Launch: Windows Vista

I had absolutely no idea that Windows Vista had launched. Really. With XP it was all press covereage and articles galore. I couldn't turn around without hearing the hype about XP in its media blitz. With Vista, I can hear the crickets chirping. Thats says alot coming from someone who remains pretty much oblivious and desensitized to advertising. In fact, when I did some fact checking for this article, I only found one article on BusinessWeek with a launch date. I was only reminded of its launch by reading an article by Taosecurity. Does anyone even care that Vista has launched?