Thursday, August 23, 2007

BIRT: Writing an Emitter

Another article I have had on the back burner for the past few months is for writing emitters using BIRT. Emitters are one of the many extension points in BIRT. Emitters are the output rendering mechanism in BIRT. When you run a BIRT report and get the HTML output from the Report Engine, that HTML is created using the BIRT HTML Emitter. Ditto for the PDF output. There are even Office emitters out there.

The way that I typically look at Emitters is that they are a mechanism for getting BIRT report output to some output mechanism. That output can be a file, a stream, and an IPC listener, whatever. This gives BIRT the ability to serve as more than just a Report Engine, but possibly as a middleware also. Why would you do this? Despite the added bloat, it allows you take advantage of the BIRT internal mechanisms for sorting, aggregating, formatting, and a filtering data. Of course, more often than not, you will just use an Emitter to output file formats.

So how do emitters work? An emitter is an Eclipse Plug-in, and when writing one, you need to set up as an Eclipse Plug-In project. Since it is an Eclipse Plug-in, it requires that you set up the proper entries in the plug-in.xml and Manifest.MF files. This can be a bit tedious to do, and in past experiences required a bit of trial and error on my part.

Since it is an Eclipse Plugin, there are two classes that need to be created. The Activator, which is usually automatically created when you create a new plug-in project, and the actual emitter. The Activator extends the org.eclipse.core.runtime.Plugin class. The code for this is automatically generated upon project creation. You will only need to be sure that the plug-in.xml file is pointing to the correct Activator.

The Emitter class itself is an extension of the org.eclipse.birt.report.engine.emitter.ContentEmitterAdapter class. This is where all the magic happens. The emitter class will simply implement certain methods based on the requirements of the emitter. In the following example emitter code, I wrote an emitter that will generate a very generic XML file using JaxB.

package com.        .birt.emitter;

import java.io.OutputStream;

import javax.xml.bind.JAXBContext;
import javax.xml.bind.JAXBException;
import javax.xml.bind.Marshaller;
import javax.xml.bind.PropertyException;

import org.eclipse.birt.report.engine.content.IBandContent;
import org.eclipse.birt.report.engine.content.IReportContent;
import org.eclipse.birt.report.engine.content.IRowContent;
import org.eclipse.birt.report.engine.content.ITextContent;
import org.eclipse.birt.report.engine.emitter.ContentEmitterAdapter;
import org.eclipse.birt.report.engine.emitter.IEmitterServices;

import com. .birt.emitter.xml.ObjectFactory;
import com. .birt.emitter.xml.Root;
import com. .birt.emitter.xml.Root.Office;
import com. .birt.emitter.xml.Root.Office.Employees;

public class XMLEmitter extends ContentEmitterAdapter {
private ObjectFactory xmlObjectFactory;
private Root xml;
private Office currentOffice;
private OutputStream reportOutputStream;

@Override
public void initialize(IEmitterServices service) {
super.initialize(service);

//initialize my object factory for the XML file and create a root element in the XML file
this.xmlObjectFactory = new ObjectFactory();
this.xml = xmlObjectFactory.createRoot();

//create an OutputStream to output to the console
reportOutputStream = service.getRenderOption().getOutputStream();
}

@Override
public void startRow(IRowContent row) {
super.startRow(row);

//When we encounter a new row, and it is a HEADER for a group, we need
//to create a new office element
if (row.getBand().getBandType() == IBandContent.BAND_GROUP_HEADER)
{
this.currentOffice = xmlObjectFactory.createRootOffice();
}
}

@Override
public void endRow(IRowContent row) {
super.endRow(row);

//Once we encounter the end row and this is a HEADER row, we need to add
//this to our XML structure under the Office sections
if (row.getBand().getBandType() == IBandContent.BAND_GROUP_HEADER)
{
xml.getOffice().add(currentOffice);
}
}

@Override
public void end(IReportContent report) {
super.end(report);

//At the end of our report generation, create a new JaxB Marshaller object, and output the
//formatted output to the console
try {
JAXBContext jaxContext = JAXBContext.newInstance("com. .birt.emitter.xml", Root.class.getClassLoader()) ;
Marshaller xmlOutputWriter = jaxContext.createMarshaller();
xmlOutputWriter.setProperty(Marshaller.JAXB_FORMATTED_OUTPUT, true);

xmlOutputWriter.marshal(xml, reportOutputStream);
} catch (PropertyException e) {
// TODO Auto-generated catch block
e.printStackTrace();
} catch (JAXBException e) {
// TODO Auto-generated catch block
e.printStackTrace();
}
}

@Override
public void startText(ITextContent text) {
super.startText(text);

//If this is a new text element (data in a row), then we need
//to go ahead and add this as our current office name if this is a header.
//If this is not a header, then we know it is employee information, and we
//need to add this to our list of office employees
IRowContent row = (IRowContent)text.getParent().getParent();
if (row.getBand().getBandType() == IBandContent.BAND_GROUP_HEADER)
{
currentOffice.setName(text.getText());
}
else
{
Employees currentEmployee = xmlObjectFactory.createRootOfficeEmployees();

currentEmployee.setName(text.getText());
currentOffice.getEmployees().add(currentEmployee);
}
}
}


You will notice it uses a very SAX type of processing, where each element gets a Start and End method. Each of these element equates to a type of designer element. In the above example, we are only looking for new rows, and new text elements. This emitter makes the following assumptions:

-That the report design file is a single table

-That the table is grouped by an Office ID

-That the data element in the Detail row only contains the Employees name.

So in other words, this particular emitter is not a general purpose emitter, it is designed with a specific report design file in mind.

Setting up the Emitter is another task in itself. I used the Eclipse 3.3 Plug-In configuration editor to set mine up, however, you can manually edit yours by hand. The first thing I did was to configure the general purpose things, such as name and ID, and maek sure the activator was correct.

Figure 1. Emitter configuration

Next I need to configure the Dependencies. In this case, the BIRT Report Engine and the Eclipse Core.

Figure 2. Dependencies

Next, I specified the packages to export during build needed for Runtime. I specified the 3 packages I need to export in my Emitter, the package with the Activator, the package with the emitter itself, and the package with the JaxB generated classes. In the classpath, I specify the jars I need for JaxB to work properly.

Figure 3. Runtime Exported Classes and Jars

Next, I specify how to configure my extensions. I create a new emitter extension, specify the class to use, the format, which is important when I specify the output format for BIRT to use, I will use this string. I specify a generic MIME type to use, and specify an ID, in which I used my package name. I also specify no-pagination, which is important if you are building a BIRT emitter that will support multiple pages, such as the PDF emitter. This will influence the behavior of the document generator inside of BIRT, and will add more legwork to the emitter.

Figure 4. Extension configuration

That’s pretty much it. Now, when I want to test this, I right-mouse click on my project and specify Export, and Deployable Plug-Ins and Fragments. I usually export to my BIRT Runtime folder for testing, and will write a few Unit Tests to test the execution of the emitter. Below is an example of the output I get from my emitter.


<?xml version="1.0" encoding="UTF-8" standalone="yes"?>
<Root xmlns="http://www.example.org/OfficeLayout">
<Office>
<name>1</name>
<Employees>
<name>Murphy, Diane</name>
</Employees>
<Employees>
<name>Patterson, Mary</name>
</Employees>
<Employees>
<name>Firrelli, Jeff</name>
</Employees>
<Employees>
<name>Bow, Anthony</name>
</Employees>
<Employees>
<name>Jennings, Leslie</name>
</Employees>
<Employees>
<name>Thompson, Leslie</name>
</Employees>
</Office>
<Office>
<name>2</name>
<Employees>
<name>Firrelli, Julie</name>
</Employees>
<Employees>
<name>Patterson, Steve</name>
</Employees>
</Office>
<Office>
<name>3</name>
<Employees>
<name>Tseng, Foon Yue</name>
</Employees>
<Employees>
<name>Vanauf, George</name>
</Employees>
</Office>
<Office>
<name>4</name>
<Employees>
<name>Bondur, Gerard</name>
</Employees>
<Employees>
<name>Bondur, Loui</name>
</Employees>
<Employees>
<name>Hernandez, Gerard</name>
</Employees>
<Employees>
<name>Castillo, Pamela</name>
</Employees>
<Employees>
<name>Gerard, Martin</name>
</Employees>
</Office>
<Office>
<name>5</name>
<Employees>
<name>Nishi, Mami</name>
</Employees>
<Employees>
<name>Kato, Yoshimi</name>
</Employees>
</Office>
<Office>
<name>6</name>
<Employees>
<name>Patterson, William</name>
</Employees>
<Employees>
<name>Fixter, Andy</name>
</Employees>
<Employees>
<name>Marsh, Peter</name>
</Employees>
<Employees>
<name>King, Tom</name>
</Employees>
</Office>
<Office>
<name>7</name>
<Employees>
<name>Bott, Larry</name>
</Employees>
<Employees>
<name>Jones, Barry</name>
</Employees>
</Office>
</Root>

IT Field: Following the Money...

I read the following article over at Richard Bejtlichs Taosecurity blog. I haven’t commented on his articles in a while, so I figured he was due for some feedback, only this time I agree with his sentiments 100 percent.

One of the comments that really struck the whole heart of the issue in my eyes was from a reader who commented that he had struck up a conversation with a guy while at the mall. The guy basically went on to state that he was getting into network security to get one of those “6 figure salaries” that he hears so much about.

This is not a problem that is inherent to network security, but to the IT industry as a whole. This was really prevalent during the dotcom bust of the late 90’s and early 2000’s. I remember reading articles in magazines talking about developers being lured away from jobs the way that NBA superstars are. Now, we have the same type of talk about Network Security. I thought it was ridiculous then, I still do.

What is the result of sensationalist talk like this? Unmotivated, rushed to get educated, and unqualified individuals filling sensitive positions that are merely money chasers and are only willing to put in their 9-5. What is the result, a large surplus of unqualified workers filling job slots. What’s in store for the network security field? If what has happened to the development community is any indication, these “menial” and entry level positions of Network Administrator will get outsourced to save costs, blocking promising and talented administrators from the field. Those that get the jobs out of trade school will be unqualified, creating poor network infrastructures, and larger holes. Just like menial coding jobs get outsourced or offshored, and create bugs and security holes get created in software. Thus the cycle will continue.

What businesses fail to understand is that it’s not the money that makes personnel good, but their understanding and dedication to the job. When people ask me how I got involved in development work, I tell them I got involved with it when I was young, fell in love with the work, and I’d be doing it for free. My degree was a result of my dedication to the work, not as a result of my desire to earn money. Everything else just fell into place. I don’t chase the money (although getting paid is nice), but I’d still do this for fun even if I wasn’t getting paid. That’s the kind of dedication network security folks are facing, hackers who love to hack, and programmers who love to program.

So lets compare and contrast. The dedicated hackers who do it for the love of hacking, oh and they just so happen to sometimes get paid by organized crime for their skills, or the 6 figure 9-5’ers who have a 2 year degree from a trade school, or a business degree with IT emphasis? I agree with Richs statements, and I weep for the future of the network security field. So when does the flood of clueless articles in business magazines talking about the failure of network security begin?

BIRT: Using the Design Engine API and Open Libraries

Recently I gave a presentation on BIRT at the Actuate International Users Conference. One of the things I discussed was embedding the BIRT Design Engine API into an application. This is an often overlooked aspect of BIRT, since most discussions center around report creation using the Eclipse editor and the BIRT Report Engine. I figured it would be cool to do something with the design engine as well. This is useful if your users would like to create their own simple, custom reports and you would like to give them that functionality. There are already products out there that are built on this concept.

The BIRT Design engine is actually a fairly simple API to use. It is part of the org.eclipse.birt.report.model.api package. The steps for creating a report using the API are illustrated below.

Figure 1. Creating a BIRT Report using the Design Engine API

In the above sequence, the user is presented with a list of data sets that are available in a report Library, the user selects a data set to build their own custom report off of, and a new report is created. I just recycled this diagram from my presentation since I am lazy, but the steps are illustrated in the third section, Create New Report.

Its fairly simple, the program instantiates a Report Design Engine object, and creates a new Design Session, the session creates a new report design, data sets are added to the new report design, and a table is built off of the data sets. Then the report design file is saved.

Below is sample code for using the BIRT Report Design engine. The below example will create a simple report in a temporary folder, add a simple report footer, add a grid component, and inside of the grid, add a label that says Hello World. Nothing too fancy with this one.

import java.io.IOException;

import org.eclipse.birt.core.exception.BirtException;
import org.eclipse.birt.core.framework.Platform;
import org.eclipse.birt.report.model.api.CellHandle;
import org.eclipse.birt.report.model.api.DesignConfig;
import org.eclipse.birt.report.model.api.DesignElementHandle;
import org.eclipse.birt.report.model.api.ElementFactory;
import org.eclipse.birt.report.model.api.GridHandle;
import org.eclipse.birt.report.model.api.IDesignEngine;
import org.eclipse.birt.report.model.api.IDesignEngineFactory;
import org.eclipse.birt.report.model.api.LabelHandle;
import org.eclipse.birt.report.model.api.ReportDesignHandle;
import org.eclipse.birt.report.model.api.RowHandle;
import org.eclipse.birt.report.model.api.SessionHandle;
import org.eclipse.birt.report.model.api.SimpleMasterPageHandle;
import org.eclipse.birt.report.model.api.activity.SemanticException;
import org.eclipse.birt.report.model.api.command.ContentException;
import org.eclipse.birt.report.model.api.command.NameException;

import com.ibm.icu.util.ULocale;

public class DesignTest {

/**
* @param args
*/
public static void main(String[] args) {
try {
//create the report design engine configuration pointing to the BIRT runtime
DesignConfig dconfig = new DesignConfig();
dconfig.setBIRTHome("C:/BIRT_RUNTIME_2_2/birt-runtime-2_2_0/ReportEngine");
IDesignEngine engine = null;

//try to start up the eclipse platform to load any plugins and create
//a new design engine
Platform.startup( dconfig );
IDesignEngineFactory factory = (IDesignEngineFactory) Platform.createFactoryObject( IDesignEngineFactory.EXTENSION_DESIGN_ENGINE_FACTORY );
engine = factory.createDesignEngine( dconfig );

//create a new session
SessionHandle session = engine.newSessionHandle( ULocale.ENGLISH ) ;

// create a design or a template. Then create a report element factory
ReportDesignHandle design = session.createDesign();
ElementFactory efactory = design.getElementFactory();

//set my initial properties
design.setDisplayName("my Test Report");
design.setDescription("test");
design.setIconFile("/templates/blank_report.gif");
design.setFileName("c:/TEMP/sample.rptdesign");
design.setDefaultUnits("in");
design.setProperty("comments", "what not and what have you");

SimpleMasterPageHandle element = efactory.newSimpleMasterPage( "Page Master" );
DesignElementHandle footerText = efactory.newTextItem("test");
footerText.setProperty("contentType", "html");
footerText.setStringProperty("content", "MyTest");

//Add in a simple page footer to our master page
element.getPageFooter().add(footerText);

//try to add the footer to the Master Page
try {
design.getMasterPages( ).add( element );
} catch (ContentException e) {
// TODO Auto-generated catch block
e.printStackTrace();
} catch (NameException e) {
// TODO Auto-generated catch block
e.printStackTrace();
}

//create a new grid element, and set the width to 100 percent of the page design
GridHandle grid = efactory.newGridItem( null, 1, 1);
grid.setWidth( "100%" );

//Add the grid to the report body
design.getBody( ).add( grid );

//create a new row
RowHandle row = (RowHandle) grid.getRows( ).get( 0 );

// Create a label and add it to the first cell.
LabelHandle label = efactory.newLabel( "Hello, world!" );
label.setText("Hello, World!");
CellHandle cell = (CellHandle) row.getCells( ).get( 0 );
cell.getContent( ).add( label );

//save the report design
design.saveAs( "c:/TEMP/sample.rptdesign" );
design.close( );
System.out.println("Finished");
} catch (ContentException e) {
e.printStackTrace();
} catch (NameException e) {
e.printStackTrace();
} catch (SemanticException e) {
e.printStackTrace();
} catch (BirtException e) {
e.printStackTrace();
} catch (IOException e) {
e.printStackTrace();
}

}
}

That is a simple example. So what happens when we want to put some real data in? Well thats when things get fun, due to having to bind the data to the output elements. So while adding elements is easy, data binding is a bit tricky. If you remember from the old days of using the BIRT report designer, you had to bind data sets and tables/lists in order for data to show up. This is done for us automatically nowadays, however if you are writing a program that utilizes the Design Engine API, you will need to do this step for your users. The binding is done by adding a ComputedColumn to the Table/List ColumnBindings property. Then you can add your element to the column. Below is the code that implements the functionality in Figure 1. Not only does it demonstrate how to create a report design in BIRT, it also demonstrates how to open a Report Library, which also has to be done using the BIRT Design Engine API. It will open a report library using code and retrieve the data set that matches the name of the string passed into the method. (Note: for my example, I used a contains comparison instead of the equals comparison. This isn’t necessary, and I only used this since I was working around another issue related and copied and pasted the code I had used). You can only add in a data set once, hence the use of the hasDataSetAlready variable. If you try to add in the same data set multiple times, you will get an error. And since the DataSet method does not allow for the clone method, creating a copy would have taken too much effort to demonstrate this simple concept.

public boolean createReport(String reportName, List dataSetNames) {
try {
DesignConfig dconfig = new DesignConfig();
DataSetHandle dataSetHandleToUse = null;
DataSourceHandle dataSourceHandle = null;
dconfig.setBIRTHome("C:/BIRT_RUNTIME_2_2/birt-runtime-2_2_0/ReportEngine");
IDesignEngine dengine = null;

//try to start up the eclipse platform
IDesignEngineFactory factory = (IDesignEngineFactory) Platform.createFactoryObject( IDesignEngineFactory.EXTENSION_DESIGN_ENGINE_FACTORY );
dengine = factory.createDesignEngine( dconfig );

//create a new session, open the library, and retrieve the first data source since it is uniform in our library
SessionHandle session = dengine.newSessionHandle( ULocale.ENGLISH ) ;
LibraryHandle design = session.openLibrary("C:/eclipse/GWTBirt/BIRTGwt/src/reports/DataSets.rptlibrary");
dataSourceHandle = (DataSourceHandle) design.getDataSources().get(0);

//create a new report
ReportDesignHandle reportDesign = session.createDesign();
reportDesign.getDataSources().add(dataSourceHandle);


//find the correct data set based on dateSetName
int dataSetCount = 0;
for (Iterator dataSetIterator = dataSetNames.iterator(); dataSetIterator.hasNext();)
{
dataSetCount++;
String dataSetName = (String) dataSetIterator.next();

for (Iterator i = design.getDataSets().iterator(); i.hasNext(); )
{
DataSetHandle dataSetHandle = (DataSetHandle) i.next();

if (dataSetHandle.getName().contains(dataSetName))
{

dataSetHandleToUse = dataSetHandle;
dataSetHandleToUse.setName(dataSetHandle.getName());
}
}

//Add the current data set to the report design
boolean hasDataSetAlready = false;
for (Iterator i = reportDesign.getDataSets().iterator(); i.hasNext();)
{
DataSetHandle dataSetInReport = (DataSetHandle) i.next();

if (dataSetInReport.getName().equalsIgnoreCase(dataSetHandleToUse.getName()))
{
hasDataSetAlready = true;
}
}
if (hasDataSetAlready == false)
reportDesign.getDataSets().add(dataSetHandleToUse);

//get the columns from the selected dataset
List columnList = new ArrayList();
for (Iterator i = dataSetHandleToUse.getCachedMetaDataHandle().getResultSet().iterator(); i.hasNext(); )
{
ResultSetColumnHandle colInfo = (ResultSetColumnHandle)i.next();

columnList.add(colInfo.getColumnName());
}

//create new table, set the data set
TableHandle reportTable = reportDesign.getElementFactory().newTableItem("testTable" + dataSetHandleToUse.getName(), columnList.size());
reportTable.setWidth("100%");
reportTable.setDataSet(dataSetHandleToUse);

//create a new detail row and add to the report
RowHandle detailRow = (RowHandle) reportTable.getDetail().get(0);
int x = 0; //used to mark current column position

//go through column list and create a new column binding, otherwise data will not be populated into the report
//Then add a new column to our row
for (Iterator i = columnList.iterator(); i.hasNext();)
{
String columnName = (String) i.next();

ComputedColumn computedColumn = StructureFactory.createComputedColumn();
computedColumn.setName(columnName);
computedColumn.setExpression("dataSetRow[\"" + columnName +"\"]");
PropertyHandle computedSet = reportTable.getColumnBindings( );
reportTable.getColumnBindings().addItem(computedColumn);

//add new data item and cell
DataItemHandle data = reportDesign.getElementFactory().newDataItem(columnName);
data.setResultSetColumn(columnName);
CellHandle cell = (CellHandle)detailRow.getCells().get(x);
cell.getContent().add(data);
x++; //advance position
}

//add the table to my report
reportDesign.getBody().add(reportTable);
}
//set my initial properties for the new report
reportDesign.setDisplayName(reportName);
reportDesign.setDescription(reportName);
reportDesign.setIconFile("/templates/blank_report.gif");
reportDesign.setFileName("C:/eclipse/GWTBirt/BIRTGwt/src/reports/" + reportName + ".rptdesign");
reportDesign.setDefaultUnits("in");
reportDesign.setProperty("comments", reportName);
reportDesign.setProperty(IReportRunnable.TITLE, reportName);

//save report design
reportDesign.saveAs("C:/eclipse/GWTBirt/BIRTGwt/src/reports/" + reportName + ".rptdesign");

return true;
} catch (ContentException e) {
// TODO Auto-generated catch block
e.printStackTrace();
} catch (NameException e) {
// TODO Auto-generated catch block
e.printStackTrace();
} catch (DesignFileException e) {
// TODO Auto-generated catch block
e.printStackTrace();
} catch (SemanticException e) {
// TODO Auto-generated catch block
e.printStackTrace();
} catch (IOException e) {
// TODO Auto-generated catch block
e.printStackTrace();
}

return false;
}

Tuesday, August 21, 2007

ETL: Kettle

For several months now I have been meaning to take a more in depth look at Kettle, an open source ETL tool that is part of the Pentaho project. I was first turned on to Kettle back in January while attending a product introduction for a commercial partner of the company I work for. It caught my attention mainly because at the time they recommended it, but also because I remembered the horrible times I had having to deal with large number of data loads in different formats. So, as a test of the ETL capabilities of Kettle, I decided to give a simple run of loading data from BIRT’s Classic Cars Derby database and exporting that data to a Microsoft Access database.

Since Kettle is a Java based tool, I need JDBC drivers for each of my tools. I decided to try this in a two step process just to make things interesting. First, I will export the data from Classic Cars to a series of text files. Then I will import those text files into Access. Nothing is stopping me from going directly into the Access database, I just wanted to simulate the process that I usually encounter more often than not, which is database-to-text-to-database.

Kettle 2.5.0 comes distributed as a single zip file, and installation is as simple as extracting the zip to a given location. Not wanting to be to terrible original, I just unzipped the file into C:\Kettle. Kettle is broken up into 4 versions. I only needed 1, Spoon, which designs Transformations and Jobs. I’m only concerned with Transformations for my experiment. So I launch Spoon.


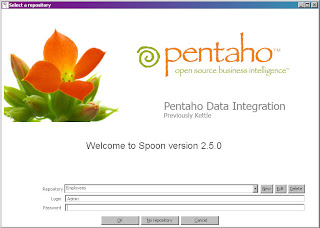
Figure 1. Kettle Start Up Screen

When starting the program, I tried to set up a repository. The repository is a database of transformation and jobs. I thought this would be useful, however, I only had Derby handy. The derby driver that came with Kettle did not want to work with my database, and copying over the Derby drivers into the C:\Kettle\libext\JDBC folder. Long story shot, the repository didn’t quite work, so I skipped it, and went with No Repository to continue on.

Now, since I use the Classic Cars database for other things that are not part of the Embedded distribution of BIRT, I have extracted the sample databases JAR file to a folder at C:\ClassicCarsDatabase. So the first step is to research what the JDBC URL will be. In my case, the JDBC URL is jdbc:derby:C:/eclipse/GWTBirt/BIRTGwt/src/CCDataBase, and the driver I will use is org.apache.derby.jdbc.EmbeddedDriver. I know these since I use them with Hibernate, so I know these will work.

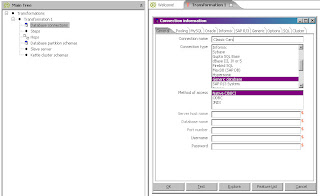
So, now that I am in Spoon, I go up to File, New, and Transformation. Under the Main Tree pane, I double-click on Database Connections. Now, since I had issues with Kettles Derby driver, I have to select Generic database, which will allow me to specify a JDBC URL and driver to use. So under the Generic Tab, I use the JDBC information I mentioned above.


Figure 2. Database Connection

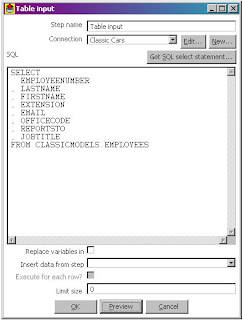
Now that I have specified a database connection, I can drag and drop the Classic Cars database connection over to the Transformations tab. This will automatically create a new Table Input step for me. It will also bring up the edit dialog for the Table Input step. From the dialog I click on Get SQL Statement, which brings up a graphical browser of the database schemas and tables. Having had issues with schema namespacing with Hibernate using this driver and JDBC URL in the past, I actually browse to the full Schemas.Schema Name.tables path. Now, since I am simulating a data export of the database, I need to create a straight full select statement for each table. So, starting with my Employees table, I browse to the Schemas.CLASSICMODELS.EMPLOYEES entry in the browser and double-click. When asked if I want to include the field names, I say yes. I click on the Preview button to make sure it works. Once done, I hit OK. I repeat the step for all tables under the ClassicModels schema.


Figure 3. The Table Input Editor

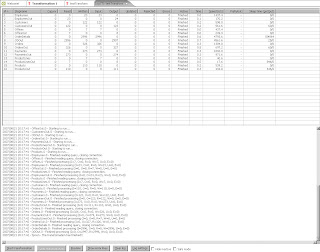
Once I have all of my input tables created, I now need to specify my output text files. So, Under the Core Objects pane on the left hand side, I select the Output drop down, and drag over the Text File Output object. Once I drag it over, I actually need to double click on the object in order to bring up the editor. But before I do, I need to link which Table Input will go with it. I want to create a text file based on Employees. So in order to create the hop, I need to hold down the left shift key, and then try to drag and drop the Employees table Input object to the text output. This will create an arrow that points from the Employees Table Input to the Text Output. Now I Double Click on the Table Output object. For the filename I specify Employees since this will represent the Employees table. I then go over to the Fields tab and click on the Get Fields button. This will take care of retrieving all the fields to be outputted. I hit OK, then repeat the same steps for all the tables. Once done, I click on the execute button to actually execute. Of course, running the processes created would be useless if they could only be run from within Spoon. Fortunately, that’s what Pan is for. Read the documentation for more information on using Pan. (Note, due to the binary field in the ProductLines tabe, I did not export that field to the text files.)


Figure 4. The Stats Screen After Running the Transformation

Going into Access is the exact opposite. However, I did run into a few issues. I needed either a JDBC driver, or to set up an ODBC connection. I went with the later since I couldn’t find a free JDBC driver for access. Once I had that, I was all set. With the transformations, I can easily script the entire process using Pan or Kitchen. The scenario I used to picture was a large data transfer of employee certificates to sell insurance. Since this list would come in as SSN, I could have used Kettle to read in the text file, run the transform to replace the SSN’s with employee ID’s, and load into a database. I think I will keep this tool in mind for the future.

Thursday, August 09, 2007

XBox: Hacked the Old Xbox to make a Media Center

Since the Xbox 360 gave me the infamous “Red Ring of Death”, my apparent addiction to its media center capabilities became frightingly apparent. So 4 weeks without it seemed a little painful. My solution, why not hack my original Xbox?

I’ve heard that the media capabilities of the original Xbox with XBMC are incredibly potent. Its capable of playing a large variety of audio and video formats, streaming content from a variety of different sources, and unlocks the DVD player that you would normally need to get the Xbox DVD Playback Kit to use (pretty shady deal Microsoft). Plus, it will upscale content to whatever resolution (in my case, 720P), so that’s a nice bonus.

First, I read tons of content on how to actually perform a SoftMod on the Xbox since I had no real desire to tear open the Xbox hardware and put in a mod chip. I found tons of confusing information, bad and broken links, and all sorts of annoying obstacles, but in the end, I found two sites to be incredibly useful for my information gathering tactics. First, Xbox Scene provided tons of general purpose information on Xbox modding. Second was this tutorial on how to perform a Save Game Exploit. Also, having access to download actual Xbox Software via Torrents or Usenet is useful, since most sites won’t put binaries of homebrew up due to some legal technicality with the Xbox SDK, otherwise, you will be compiling code yourself.

OK, so now onto my experiences. First, I obtained a copy of Splinter Cell via my local Gamestop for a whopping total of $1.99. This was actually a little tricky to track down, three different stores didn’t have it. I ended up with a Greatest Hits copy, which was still exploitable.

Next, I needed some method of transferring the save games downloaded from the SID tutorial above to a Xbox memory card. It is recommended that you use an Action Replay for some other device, however, I didn’t want to mail order one, and I couldn’t track down one at any local stores. That meant I needed another solution. Fortunately, I came across this tutorial that told me how to make USB connector for the Xbox Controller, which would allow me to copy save games onto an Xbox memory card through the Xbox Controller. My end result for the USB Connector wasn’t pretty, but that was OK, I only needed it for one step of the process, just to copy the SID files to the memory card.

Once in place, I ran the save game exploit and followed the steps from the tutorial. In less than 10 minutes I was up and running a SoftModded Xbox with Evolution X as the dashboard. Of course, this dashboard wasn’t as intuitive as I would have liked, and since my end goal was to put XBMC on there anyway, I still had a little bit more to do.

So I assigned my Xbox and IP Address, and was ready to install XBMC. Installation was simple, I picked a folder (in my case E:\Apps\XBMC), FTP’ed the files there, and copied the Shortcut link under E:\DASH in order to override Evolution X from loading by default. Once done, I was all set with my modded Xbox.

While this is definitely a great media center device, I have to admit that editing XML files by downloading them from the Xbox, changing, then re-uploading is a huge PITA. So I basically just got a set configuration and have left the rest alone. Plus, I was hoping to find a good distribution DVD with XBMC already ready to go with tons of extra goodies, however the ones I found were so horribly outdated it wasn’t even work the effort. I just chose to stick with the stock XBMC and get the apps I wanted piecemeal. But with the Xbox being considered an obsolete piece of hardware now, one of these can be had and hacked for under a $100, and will give you a full fledged media center, upscaling DVD player, and gaming consoles (with emulation, that’s several gaming consoles). Plus, if you already have an old one floating around, this will breath new life into it.

So to sum it up, this is now the third device that I’ve had to go back and hack (the PSP and my Razr being the first two) in order to get some real potential out of something. It’s so bizarre that companies try to lock down and prevent this sort of thing, considering the value added potential. If someone would smack some sense into these guys and get them to adapt a decent business model to support homebrew on devices, than we might really see something from the Next-Gen consoles.