Monday, February 27, 2006
RSS Feeds Added
I went ahead and added a separate menu for RSS feeds and changed the padding on the top section of the site. I noticed that for some odd reason, CSS tags are not handled the same in IE and Mozilla based browsers. Both the XML link and a Feed Burner link have been added for the newsreader inclined.
Friday, February 24, 2006
ASM Using Debug to Find Video Card Manufacturer
I had someone point out this little tip to me. If you starting a machine from scratch and you need to find the model of the video card, you can use Debug to view the video bios to get the information you need. Simply run the following command from within Debug:
d c000:0
The manufacturer may not be evident on the first group that comes up. In that case, keep typing d and hit enter, eventually you will scroll down to the find manufacturer. Useful trick if you are on a Microsoft platform and you need to search for drivers. However, in the past I usually just throw in a bootable Linux Live-CD and view the /proc files to find the video card manufacturer, however that does not always work (although I have pretty good success using Knoppix).
ASM Hello World
I decided to do some more work with Assembly, and since I haven’t shown how to do a basic “Hello World” application, I decided I would (the graphical one I showed previously was a little too complex to qualify as Hello World). I will demonstrate two versions, one that uses DOS Interrupt 09, and another that will write directly to video memory (which I feel is much cooler than calling interrupts).
First, the easy one:
0BD0:0100 mov ah, 09
0BD0:0102 mov dx, 010C
0BD0:0105 int 21
0BD0:0107 mov ax, 4c00
0BD0:010A int 21
0BD0:010C db 'Hello World', '$'
This one is pretty basic. All it does is call the DOS interrupt with the memory address of the “Hello World” string in register DX. Then it exits back to DOS. The next program is a little more interesting:
0BD0:0100 mov si, 0119
0BD0:0103 mov di, 140
0BD0:0106 mov ax, b800
0BD0:0109 mov es, ax
0BD0:010B mov ah, 07
0BD0:010D mov cx, B
0BD0:0110 lodsb
0BD0:0111 stosw
0BD0:0112 loop 110
0BD0:0114 mov AX, 4c00
0BD0:0117 int 21
0BD0:0119 db 'Hello World'
First, we set the Source Index register with the location of the Hello World string, in this case at DS:0119 (remember, in Debug COM files, the Code Segment and Data Segment are set initially to the same location). We then set DI to 140h, which is a few lines down on the screen.
0BD0:0106 mov ax, b800
0BD0:0109 mov es, ax
Next we are setting AX to the location of the video memory. We then copy register AX to ES. The reason for this is because we cannot access register ES directly, so we have to do it through one of the general purpose registers first, in this case AX.
0BD0:010B mov ah, 07
Here we set AH to the value of our character attribute information, which is a white text on a black background. Remember that in video memory, character information is stored in two bytes, the first being the character value, and the second being the attribute information. I stored the attribute information in the high order register since I will do a word move, and word moves reverse bytes. In other words, if AX is set to 0765, when I copy it to video memory, it gets copied as 6507.
0BD0:010D mov cx, B
This is setting up a loop that will run 11 times. 11 are the size of the string “Hello World”.
0BD0:0110 lodsb
0BD0:0111 stosw
0BD0:0112 loop 110
The first command loads a byte at location DS:SI into register AL. Now I have the word combination I will copy to video memory, so I use stosw to copy the entire AX register to the memory location pointed to by ES:DI. I then loop this from address 110. This loop will repeat 10 more times.
0BD0:0114 mov AX, 4c00
0BD0:0117 int 21
Exit to DOS.
0BD0:0119 db 'Hello World'
This defines the string “Hello World” starting at address 119.
The only drawback to this program is that the string prints in the same location on the screen every time you run it. I would recommend clearing the screen with the DOS Clear Screen command (cls). There are other options internal to the program itself, such as retrieving the cursor location, or clearing the screen itself. But this demonstrates how you can use lodsb/lodsw and stosb/stosw to quickly copy memory chunks between addresses.
Thursday, February 23, 2006
Why do we use Hexadecimal?
Thanks to OSNews.com for pointing out this site aimed at teaching C. While the site is still too new and the number of articles there are too few in number to really indicate if the authors efforts are worthwhile, but I enjoyed reading the articles and I feel he is heading in the right direction. However, whenever I come across a programming tutorial, I always find one thing glaringly omitted when talking about hexadecimal numbers. So much time is spent on how to work with them, but very rarely does anyone ever say why. And I find that strange. Its almost like your just expected to accept it, without any real knowledge as to why your working with a number system that is not the same as the number system that was crammed down your throat almost all your life.
The main reason why we use hexadecimal numbers is because it is much easier to express binary number representations in hex than it is in any other base number system. Computers do not actually work in hex (don’t laugh, beginning students do ask that question). Lets look at an example, using a byte. Bytes are typically 8 bits, and can store the values 0 – 255 (0000 0000 – 1111 1111 in binary). For people, expressing numbers in binary is not convenient. I am not going to turn around to my co-worker and tell him that my phone number is 101 101 101 001 010 001 010 for obvious reasons. Imaging having to try and work with that on a daily basis. So a more convenient expression is needed for the human side.
Since a byte is 8 bits, it makes sense to divide that up into two groups, the top 4 bits and the low 4 bits. Since 4 bits gives you the possible range from 0 – 15, a base 16 system is easier to work with, especially if you are only familiar with alphanumeric characters (I don’t know of any languages have 255 letters in their alphabet, but I am naive and not worldly). It’s easier to express a binary value to another person as “A” then it is to express it as “1010”. This way I can simple use 2 hex values to represent a byte and have it work cleanly. This way if I am piss poor at math, I only need to memorize the multiplication tables up to 15. So if I have a hex value of CE, I can easily determine that 12 * 14 = 206 in decimal, and can easily write it out in binary as 1100 1110. Trying to convert from binary would require me to know what each place holder represents, and add all the values together (128 + 64 + 8 + 4 + 2 = 206). It’s much easier to work with binary through hex than any other base system. Further reading available here.
Octal comes into a close second. In octal, you can represent, at most, 3 bits with a single octal digit. So its very easy to say 311 is 11 001 001. The problem with octal, as you can see, is that the 3rd octal digit can only goes as high as 3, so it does not represent a byte as cleanly as hex. Octal is used in Unix for permissions due to its 3-bit nature. If we take the three specific entitlements (read, write, execute) for a file, we find that it coincides very well with octal. That’s why you see those really funky “chmod 744” commands, because they are octal representation of permissions, 111 100 100, or R-W-E, Read, Read for owner, group, world respectively (at least that is how it was explained to me). The leftmost bit represents the read flag, the middle one represents the write flag, and the rightmost flag represents execute. So if you wanted the permission for read-write, it would be 110, or 6. Read and execute would be 101 or 5.
Incidentally, there is such a thing as a binary coded decimal. Binary coded decimals are used more for our convenience than for the machines. I have seen BCD more often in electronic circuits using 7 segment displays, and various encoding methods used in PC’s. In BCD, 4 bit patterns are used to represent one base 10 digit. Once the value 9 is represented, another 4 bits are allocated. To compare, the value 10 in straight binary is 1010, where as in BCD it is 0001 0000. Another example is in straight binary, 29 is represented as 0001 1101. In BCD it is 0010 1001.
Asm: Retrieve 3 Key Strokes And Display The Results
I have always been a big fan of assembly language. I miss the days of DOS where you could code little assembly applications and kind of grin at the prestige of being able to code in Assembler. A lot of people will give you all sorts of arguments as to why ASM is better than high level languages, or that there is no need for ASM anymore due to optimizing compilers, etc. I don’t really have a great technical argument for or against, I have just always liked assembly programming, and that’s not about to change. I have tried assembly programming both under Windows and Linux, but it’s just not the same as the good old days of DOS assembly programming. So I jumped at the chance to take an assembly course, although it is a little outdated material, if for nothing else than to work out the problems.
One of the problems I had to work on asked that we write a program that takes three characters from the keyboard, store them at location DS:200H, then output them using DOS interrupt 09H. They wanted it done in debug, and you would have to go back and edit the memory location at DS:204H to put in the necessary $ to terminate the string for the DOS interrupt. Balls to that I said, I prefer my programs to be standalone and able to be run from the command prompt. Below is the code for that program. To enter it and try it yourself, go to the DOS prompt and type in “debug keybrd1.com”, where keybrd1.com is the name of the COM file we will create for this program. Type in “a” and hit enter. Then enter the following code sequence below:
MOV CX,0003
MOV BX,0200
MOV AH,10
INT 16
MOV [BX],AL
INC BX
LOOP 0106
MOV AL,24
MOV [BX],AL
MOV AH,09
MOV DX,0200
INT 21
MOV AX,4C00
INT 21
Hit enter one more time. Then type in “r cx”. Once the prompt comes up, type “1F”. Then type “W”. You now have an executable COM file called keybrd1.com. Type “Q” to go back to the DOS prompt. Now run keybrd1.com. There are no prompts, so just hit 3 keys. They will be echoed back to you. Lets go through step-by-step how this program works.
MOV CX,0003
MOV BX,0200
These lines are initializing my registers for my internal loop. In this case, CX is storing the number of iterations the loop will run, and BX is storing the offset from DS to store the incoming characters. Since this is a COM program, the Stack Segment, Code Segment, Data Segment, and Extra Segment all reside in the same location, so we do not need to worry about Pushing or Popping those values.
MOV AH,10
INT 16
MOV [BX],AL
This is calling an interrupt to retrieve data from the keyboard. If there is no data ready, it will wait until a key is pressed. Once the interrupt is complete, the value of the key is stored in register AL. We then move that value to the memory location pointed to by register BX (which is why we have brackets around it).
INC BX
LOOP 0106
We are now incrementing the BX register by 1 in order to point to the next memory location. By calling LOOP, we auto decrement CX by 1. If CX is zero, the next line is executed; otherwise we loop to the location indicated (in this case 106, or the MOV AH, 10 line).
MOV AL,24
MOV [BX],AL
This is doing some cleanup after out loop so that we can call the DOS interrupt for screen output. We are moving a “$” (ASCII value 24h) to the memory location just after our 3 stored key presses. BX is already pointing to this since we incremented on the last loop iteration.
MOV AH,09
MOV DX,0200
INT 21
Here, we are calling the DOS interrupt for screen output, using the string at DS:200h as the output, which is terminated by a “$”.
MOV AX,4C00
INT 21
And now we are exiting the program and returning control to DOS. There is a lot going on here for a program that is only 38 Bytes. Although the equivalent program in C or C++ would be easier to understand and take less time and thought to code, there is just something cool about coding in ASM.
Of course, you could alternatively write the same program as follows:
-From DOS, type “debug keybrd1.com”
-Type “e CS:100”
-Enter “B9 03 00 BB 00 02 B4 10 CD 16 88 07 43 E2 F7 B0 24 88 07 B4 09 BA 00 02 CD 21 B8 00 4C CD 21”. Note the spaces between each Bytes. These are necessary. If you hit Enter, you will close out the memory edit mode in debug.
-Hit enter when you are done.
-Type “r CX”
-Type “1F”
-Type “w”
-Type “q”
This demonstrates entering programs as low level as possible without actually doing it in binary. Entering programs in this manner requires quite a bit of knowledge of the internal CPU instructions, how byte orders are swapped between memory and registers (“B8 00 4C” is moving the value of 4C00 to register AX, but is byte swapping 4C and 00).
Thursday, February 16, 2006
Popup Windows Passing Data back to Parent Web Pages
Previously I had discussed building a simple fill in form and having it submit the results to a database using Coldfusion. Well, now I want to take this form one step further and have a lookup for the employees that will auto-fill their information into the form to help insure accuracy. While I can have them follow a wizard type sequence before going to the actual form, I feel that it is easier to have a small pop-up window appear when they click on a button, and have that window populate the parent form when the lookup is complete. It’s amazing that there is an actual legitimate use for pop-up windows besides insulting our consumer intelligence with obnoxious advertising of garbage that any intelligent individuals wouldn’t even consider buying.
Referencing my previous article, I have several fields for user related information. For the sake of this example, we will only focus on a few fields, the first name, last name, employee ID, and their job title. So that means I have a form that looks like so:
<form id="horizontalForm" name="nomformpt1" method="post" action="nomination_form.cfm?Submit=1">
<label for="lookupclass1">
<input name="emp_lookup" type="button" id="emp_lookup" onClick="openWindow('lookup_employee.cfm','','width=425,height=150')" value="Lookup Employee Information">
</label>
Name (First)
<input name="firstname" type="text" class="style3" id="firstname" align="left" />
Name (Last)
<input name="lastname" type="text" class="style3" id="lastname" />
GEID#:
<input name="geid" type="text" class="style3" id="geid" size="10" maxlength="10">
Title/Position:
<input name="positiontitle" type="text" class="style3" id="positiontitle">
<input type="button" class="blue" name="Submit" value="Submit Participant Info" onClick="submit()">
</form>
Notice the button “emp_lookup”. This button is going to open our lookup window, but not submit the form. It calls a Javascript action basically is a interface to the window.open() method. The actual function looks like so:
<script language="JavaScript" type="text/JavaScript">
<!--
function openWindow(theURL,winName,features) {
var w = window.open(theURL,winName,features);
}
//-->
</script>
Now comes the pop-up page. This page is basically a Coldfusion page with a simple input box prompting the user to input their ID number. Once they do, it will perform a quick database lookup for the employee information, and then update the parent windows form with the correct information. This will use a similar mechanism as outlines last time, with the form calling the same page upon submission, but instead of inserting to a database, it will do the employee lookup, then create a small, blank HTML page with the Javascript to insert the returned values into parent pages form. I show the completed pop-up page in the following example. I removed all CSS and formatting tags, and replaced the query with a Coldfusion reference to a page containing the query itself.
<cfif not isdefined("form.no_emp")>
<html>
<head>
<title>RDG National Training Nomination Form</title>
<meta http-equiv="Content-Type" content="text/html; charset=iso-8859-1">
</head>
<body>
<form id="horizontalForm" action="lookup_employee.cfm?Submit=1" method="post">
Look Up Employee Information by SOEID
Enter your SOEID: <input name="no_emp" type="text" class="style3" id="employeeinfo">
<input name="Submit" type="submit" class="blue2" value="Submit">
</form>
</body>
</html>
<cfelse>
<cfinclude template="qry_getEmployeeInfo.cfm">
<html>
<body>
<cfif getEmployeeInfo.recordcount gt 0>
<cfoutput query="getEmployeeInfo">
<script>
window.opener.document.getElementById("firstname").value = '#fname#';
window.opener.document.getElementById("lastname").value = '#lname#';
window.opener.document.getElementById("geid").value = '#geid#';
window.opener.document.getElementById("positiontitle").value = '#jobtitle#';
window.close();
</script>
</cfoutput>
<cfelse>
No information found under that ID. Please check the ID number and try again.<br>
<a href="##" onClick="javascript:history.go(-1);">Back</a>
</cfif>
</body>
</html>
</cfif>
There is not much to doing the pass back to the parent page. The key is using the window.opener property, which keeps the parent caller for any popup pages. The easiest way to get the data into the form fields is by using the document.getElementByID() method. Interestingly enough, I came across this IBM developerWorks article about AJAX, and they also mention how familiar a web developer should be with the getElementByID() method when working with the AJAX method.
With the lookup page completed, the user can click on the Lookup button, and have a quick means of filling out the form without having to type in the information. The full form has a lot more fields, which are prone to error, and the lookup for available classes is done in this manner as well. Being able to pass back data to a parent window from a pop-up window demonstrates that there are legitimate uses for those annoying pop-ups. Pop-up blockers do sometimes prevent this functionality from working. I’m going to look into using AJAX to have the form fill in automatically when the user puts in their ID on the form itself as opposed to the pop-up window.
Tuesday, February 14, 2006
ADO Data Control and Oracle Sequences
I came across an interesting problem that Google didn’t find a solution for. I have a small Visual Basic application that manages a small table that maps Perception Questionmark exams to Course Codes in Training Server 4.8. Very small table, however I need for the Exam Manager to manage this table since I don’t have the resources or time to dedicate to making changes for her. So I wrote this real small Visual Basic application to manage the table for her. The problem came when the OleDB Oracle driver began to mangle the large numbers used in one of the fields used to map to the Perception Session ID. Changing from the Oracle OleDB driver to an ODBC connection corrected that issue, however I had to manually create a primary key field based off of an auto-generating sequence. This really wouldn’t be an issue, except for two little problems. First, I am using the ADO Data Control, which does not auto-generate a new primary key, and second is that I cannot create a trigger to reside on the server due to policy restrictions set up by the DBA.
The solution I used is not necessarily elegant, but it did do the job without having to scrap what I had, keeping the same interface the user was already used to using, and solved the problem. Basically what I had to do is modify the ADO Data Controls WillMove and WillChangeRecord functions to call the Oracle Sequence and store in a hidden bound text control on the form.
The logic works like this. When the ADODC creates a new record, it will call the WillChangeRecord function, passing in the variable adReason set to adRsnAddNew. When the user fills in the bound text fields with the appropriate data, they can either hit the update button or use the ADODB to move, and the record will insert into the database. If they click on the Update button, this calls WillChangeRecord with adReason set to adRsnUpdate. If they click move, the function I want to focus on is the WillMove function. Both scenarios will do the same thing, have a custom code based ADO call to Oracles sequence to generate the next value and save it into the hidden text control for the key. However, I do not want to have this happen when update is called to modify an existing record. So what I do is create a global Boolean value that gets set when WillChangeRecord is called with adReason is set to adRsnAddNew. Once the update is complete, this flag gets set back to false. Below is the code demonstrating this.
'Crappy module wide flag determining if we are adding a new record
'if set, certain if branches will execute updateKeyValue function
'Module Scope within Form1
Dim needtoupdate As Boolean
‘Procedure to update the Form1.txtKey value to the next sequence value.
‘This textbox is bound to the primary key of the test map table
Private Sub updateKeyValue()
'Store the new key generated from Oracle
Dim mintNewKey As Integer
'The three ADO components
Dim com As ADODB.Command
Dim con As ADODB.Connection
Dim rs As ADODB.Recordset
On Error GoTo ErrOnUpdate
'Create new objects for the command and connection
Set con = New ADODB.Connection
Set com = New ADODB.Command
'Use the same connection string as the ADO Data Control and open
'the connection
con.ConnectionString = Adodc1.ConnectionString
con.CursorLocation = adUseClient
con.Mode = adModeRead
con.Open
'Set up the active connection
Set com.ActiveConnection = con
com.CommandType = adCmdText
com.CommandText = "select SEQ_TESTMAP.nextval from dual"
'Execute the command and get the recordset
Set rs = com.Execute
'Store the new key value into the mintNewKey variable
mintNewKey = rs("nextval").Value
'Save this to the hidden bound text control on Form1
Form1.txtKey.Text = mintNewKey
'Reset the update flag to false
needtoupdate = False
'Free objects
If Not (rs Is Nothing) Then
Set rs = Nothing
End If
If Not (com Is Nothing) Then
Set com = Nothing
End If
If Not (con Is Nothing) Then
If con.State = ADODB.adStateOpen Then
con.Close
End If
Set con = Nothing
End If
Exit Sub
ErrOnUpdate:
If Not (rs Is Nothing) Then
Set rs = Nothing
End If
If Not (com Is Nothing) Then
Set com = Nothing
End If
If Not (con Is Nothing) Then
If con.State = ADODB.adStateOpen Then
con.Close
End If
Set con = Nothing
End If
MsgBox "There was an error updating the database: " & vbNewLine & Err.Number & " - " & Err.Description, vbCritical, "Error"
End Sub
Private Sub Adodc1_WillChangeRecord(ByVal adReason As ADODB.EventReasonEnum, ByVal cRecords As Long, adStatus As ADODB.EventStatusEnum, ByVal pRecordset As ADODB.Recordset)
'If the new record has already been inserted, this function was called
'to issue and update, and the update flag is set, then call the
'update key value function
If (adReason = adRsnUpdate) And (needtoupdate) Then
updateKeyValue
End If
'If we are creating a new record, set the need to update flag to true
If (adReason = adRsnAddNew) Then
needtoupdate = True
End If
End Sub
Private Sub Adodc1_WillMove(ByVal adReason As ADODB.EventReasonEnum, adStatus As ADODB.EventStatusEnum, ByVal pRecordset As ADODB.Recordset)
If (needtoupdate) Then
updateKeyValue
End If
End Sub
Typically I never use the ADO Data Control for this very reason, however time constraints and drive prevented me from hand coding all the controls for navigating through he recordset, and despite this one hurdle, using the ADO Data Control was relatively painless. While I have worked with similar components in Delphi in the past, which were much more robust in my opinion, for the task at hand this was sufficient. Had triggers been allowed, this would have been a simple matter to address on the backend. However the constraints of the operating environment did not allow for this, so I had to adapt the solution to the client side. I had to admit surprise at not finding a solution online. Perhaps it was on a VB forum somewhere and the thread has been depreciated and archived. Once .Net gets pushed out as SOE here, I can finally retire VB6, and I hate to admit it, but I will be sad to see it go. I will have to do more research into why the Oracle OleDB driver mangled those large numbers, that seems really strange.
Wednesday, February 08, 2006
Actuate e-Spreadsheet Report
I talk a lot about Actuate, but I haven’t ever demonstrated any of their products outside of BIRT. We use the Actuate suite religiously because they are, in my opinion, the best of breed Business Intelligence tools out there. In this article I will demonstrate how to build a simple Excel report using Actuates e-Spreadsheet product.
The requirements are for a simple Excel spreadsheet report that gives a list of all employees who meet simple criteria, and drill down from top-most level of the hierarchy to the lower level. Level numbers are down in the query itself. I prefer the Pivot table as a report format since it allows report recipients to perform some basic analysis on certain aspects without having to re-run the entire report. For example, if they are looking at the top most portion, it will give a grand total of all lower levels, however when they drill-down, the totals will automatically update to reflect the new view. They can also drag grouping categories around and have the numbers update as well. I will demonstrate this at the end of the article.
I will skip the query creation part, so for this example just know that I have already created a query that will return my list of people. The way to plug this into e-Spreadsheet is pretty straightforward. You will need to have either a JDBC or ODBC connection to your data source (note: if you want to post the report to Actuates I-Server, you will have to use JDBC, and the JDBC drivers will need to be setup on the server). I will use JDBC for this example since I already have the JDBC data sources ready to go, and I will end up posting this to I-Server.
The first step is to open e-Spreadsheet. Once open, you will see an interface very similar to just about every other spreadsheet program in existence, so there are no real surprises. The first step is to create the data source and insert the query. First, go up to Data, and then select Data Manager.
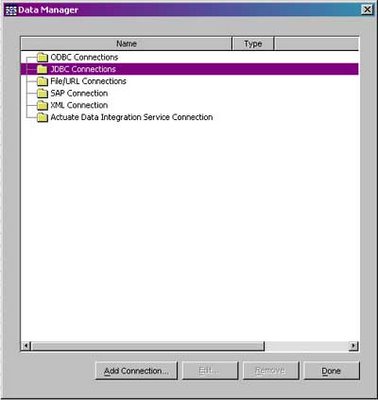
Figure 1. The Data Manager
Once inside of the Data Manager, Select JDBC Connections and click on the Add Connection button. A dialog pops up for you to fill out the JDBC URL. Below is an example I use for the Oracle JDBC driver. If this is the first time e-Spreadsheet is run, this will be blank. However, once you put in a JDBC connection, e-Spreadsheet will remember it for future use.
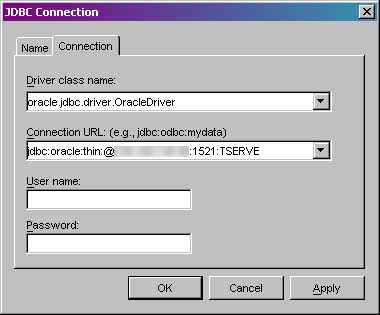
Figure 2. JDBC Connection Dialog
Once the data source is setup, now you need to create the query. Click on the newly created connection, and click on the “Add Query Button”. You will be given a dialog box with a large text field to type in the query. Put your respective query in. At this point, you can change the appearance of field names using the fields tab, change the query name (helpful if you have a large number of queries in your reports), or even preview the returned results. If the query is not valid, you will receive an error if you try to change tabs, or hit close. There is also an additional graphical query editor, however I never use it myself since typically my queries are not simplistic enough for it. You can also add parameters to the query to make things a little more dynamic.

Figure 3: Query Editor
Once complete, I am now ready to put the Pivot Table into the report itself. To do this, Go up to the menu, and click on the Pivot Range Wizard. Choose External Data Source on the first prompt, as illustrated in Figure 4.
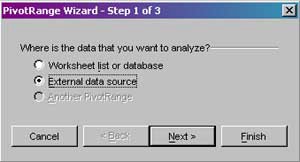
Figure 4: Pivot Range Source
The next prompt asks you to pick your external data source. Choose the query you just created and click Next. On the next screen it will ask you for the target for the pivot table to be inserted. I will keep the default range, and I will keep the options default. However, using the options dialog, you can remove grand total rows, insert values for cells with null or invalid data, disable the drilldown capabilities, and various other formatting options.
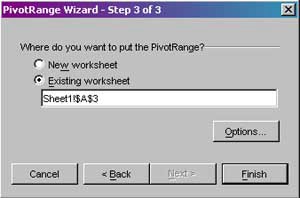
Figure 5: Target for Pivot Range
Once the wizard is complete, you will have a blank pivot table as indicated in Figure 6. To add to the pivot table, simply drag fields into it, in order of drill down hierarchy. In this example, I want to create a horizontal drill down with no vertical categories, so I will drag the levels of drill down over to the far left. The detail will be based on the individual employees, so I drag the ID number field to the main data field.

Figure 6: Empty Pivot Table
Now that the report is built, I can either run it by going up to the Data Menu, and clicking on Run Report, or posting to Actuate I-Server and retrieving from there. The advantage to I-Server is I can now schedule this report to run on regular intervals, save each report iteration using I-Servers CMS versioning scheme, and use custom URL’s to expose the report to users outside of the Active Portal and integrate it into my custom portal. The report will run from I-Server and display a Microsoft Excel spreadsheet, whereas if you run the report in the report designer, you will have to do a Save As to save as an Excel formatted file.

Figure 7: Completed Pivot Table
Figure 7 shows the completed report in Excel. As you can see I have drilled down on the 4th row. There are sub-totals for each level of the drill down. If I were to double click on the numbers in the total column, I would open up a separate worksheet detailing all of the employees represented by that number. This provides a quick and easy way for managers to quickly narrow down particular populations while still getting an accurate representation of the whole. The can also click on the drop down arrow on each column and remove items that they do not wish to view. Of course, using trickery with Actuate Active Portal, I-Server, and some custom programming, you can have a manger authenticate into a web portal, click on the report, and use their user id or granted roles to generate a custom report limiting the information they see. Of course, this is a little easier to accomplish in Actuate flagship product, Enterprise Report Designer, however you pay for the power in terms of ease of use.
Overall, I would about 95 percent of my current report generation is done using Actuates e-Spreadsheet and I-Server products. These are very powerful products to consider for any MIS manager whose target audience prefers reports in Excel format.
The requirements are for a simple Excel spreadsheet report that gives a list of all employees who meet simple criteria, and drill down from top-most level of the hierarchy to the lower level. Level numbers are down in the query itself. I prefer the Pivot table as a report format since it allows report recipients to perform some basic analysis on certain aspects without having to re-run the entire report. For example, if they are looking at the top most portion, it will give a grand total of all lower levels, however when they drill-down, the totals will automatically update to reflect the new view. They can also drag grouping categories around and have the numbers update as well. I will demonstrate this at the end of the article.
I will skip the query creation part, so for this example just know that I have already created a query that will return my list of people. The way to plug this into e-Spreadsheet is pretty straightforward. You will need to have either a JDBC or ODBC connection to your data source (note: if you want to post the report to Actuates I-Server, you will have to use JDBC, and the JDBC drivers will need to be setup on the server). I will use JDBC for this example since I already have the JDBC data sources ready to go, and I will end up posting this to I-Server.
The first step is to open e-Spreadsheet. Once open, you will see an interface very similar to just about every other spreadsheet program in existence, so there are no real surprises. The first step is to create the data source and insert the query. First, go up to Data, and then select Data Manager.
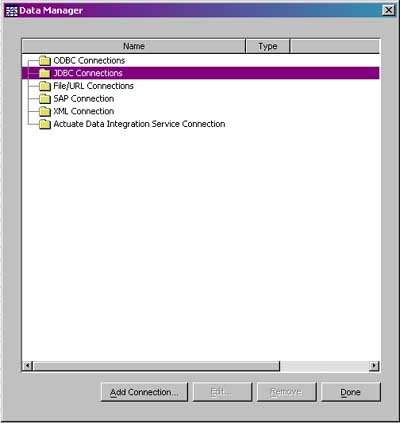
Figure 1. The Data Manager
Once inside of the Data Manager, Select JDBC Connections and click on the Add Connection button. A dialog pops up for you to fill out the JDBC URL. Below is an example I use for the Oracle JDBC driver. If this is the first time e-Spreadsheet is run, this will be blank. However, once you put in a JDBC connection, e-Spreadsheet will remember it for future use.

Figure 2. JDBC Connection Dialog
Once the data source is setup, now you need to create the query. Click on the newly created connection, and click on the “Add Query Button”. You will be given a dialog box with a large text field to type in the query. Put your respective query in. At this point, you can change the appearance of field names using the fields tab, change the query name (helpful if you have a large number of queries in your reports), or even preview the returned results. If the query is not valid, you will receive an error if you try to change tabs, or hit close. There is also an additional graphical query editor, however I never use it myself since typically my queries are not simplistic enough for it. You can also add parameters to the query to make things a little more dynamic.

Figure 3: Query Editor
Once complete, I am now ready to put the Pivot Table into the report itself. To do this, Go up to the menu, and click on the Pivot Range Wizard. Choose External Data Source on the first prompt, as illustrated in Figure 4.

Figure 4: Pivot Range Source
The next prompt asks you to pick your external data source. Choose the query you just created and click Next. On the next screen it will ask you for the target for the pivot table to be inserted. I will keep the default range, and I will keep the options default. However, using the options dialog, you can remove grand total rows, insert values for cells with null or invalid data, disable the drilldown capabilities, and various other formatting options.

Figure 5: Target for Pivot Range
Once the wizard is complete, you will have a blank pivot table as indicated in Figure 6. To add to the pivot table, simply drag fields into it, in order of drill down hierarchy. In this example, I want to create a horizontal drill down with no vertical categories, so I will drag the levels of drill down over to the far left. The detail will be based on the individual employees, so I drag the ID number field to the main data field.
Figure 6: Empty Pivot Table
Now that the report is built, I can either run it by going up to the Data Menu, and clicking on Run Report, or posting to Actuate I-Server and retrieving from there. The advantage to I-Server is I can now schedule this report to run on regular intervals, save each report iteration using I-Servers CMS versioning scheme, and use custom URL’s to expose the report to users outside of the Active Portal and integrate it into my custom portal. The report will run from I-Server and display a Microsoft Excel spreadsheet, whereas if you run the report in the report designer, you will have to do a Save As to save as an Excel formatted file.
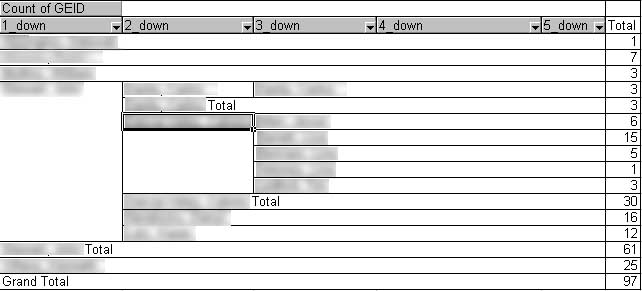
Figure 7: Completed Pivot Table
Figure 7 shows the completed report in Excel. As you can see I have drilled down on the 4th row. There are sub-totals for each level of the drill down. If I were to double click on the numbers in the total column, I would open up a separate worksheet detailing all of the employees represented by that number. This provides a quick and easy way for managers to quickly narrow down particular populations while still getting an accurate representation of the whole. The can also click on the drop down arrow on each column and remove items that they do not wish to view. Of course, using trickery with Actuate Active Portal, I-Server, and some custom programming, you can have a manger authenticate into a web portal, click on the report, and use their user id or granted roles to generate a custom report limiting the information they see. Of course, this is a little easier to accomplish in Actuate flagship product, Enterprise Report Designer, however you pay for the power in terms of ease of use.
Overall, I would about 95 percent of my current report generation is done using Actuates e-Spreadsheet and I-Server products. These are very powerful products to consider for any MIS manager whose target audience prefers reports in Excel format.
Monday, February 06, 2006
VMWare Server Beta Released
According to an article at OsNews.com, VMWare Server Beta is available for free, as previously speculated. This is an interesting move for VMWare, and I hope they generate enough revenue to support this endeavor. I personally like VMWare, and I hope this move doesn’t affect them in a negative way. As one person noted in the OSNews thread, virtualization is becoming a commodity item, with OSS alternatives, so this does provide a way for VMWare to hook companies into the larger ESX product, especially if they require support. I will have to download it and give it a whirl.
Friday, February 03, 2006
VmWare for Free?
Great news in the world of Virtual PC’s. VMWare plans on offering its GSX Server product for free, according to Cnets News.com. This is great news for people who love their legacy OS (old DOS apps anyone?), or who constantly experiment with the Linux distro of the month. In fact, I just recommended VMWare to someone this week when they hosed their XP install while playing around with hard drive encryption software. If they had experimented with the software in a Virtual Machine first, they would have saved themselves the headache of having to restore a disk image, and if it crashed, so what, delete the VM and try again. VMWare is another one of those products I consider to be best of breed, although there are plenty of OSS alternatives, such as Xen and Qemu, but IMHO, they are not nearly as strong as VMWares offerings.
In the past I’ve used VMWare to set up virtual networks to test out exploits and learn what their traffic looks like under Sguil, plus I have used it to set up MySql databases under Linux to test report capabilities with BIRT. Ill also sandbox new software installations to a dummy image first to insure it won’t hose my system and to test for malware and spyware by monitoring traffic coming from the virtual machine pre and post install. I intend on using VMWare to also test boot code I will write for experimentation purposes as indicated in this article (still have not gotten around to doing so, but I will).
I hope there is some truth to this, and not just hype. If so, this follows on the footsteps of VMWare offering the free VMWare Player, and can be a great asset to folks who would like to offer VM Images to students during classes.
Wednesday, February 01, 2006
Coldfusion Development Part 1
I see a lot of negative press towards Coldfusion, especially on web forums such as Slashdot. Truth of the matter is it really doesn’t matter which web platform you use, if you do not practice secure coding techniques in PHP, JSP, or ASP, they will all cause you security headaches just as well. Things such as input validation, leaving default passwords, and leaving default installations with sample applications can cause a world of hurt in Coldfusion and other web platforms, as stated in this Macromedia article about the top 5 Coldfusion securit. My personal feelings is that application servers shouldn’t be exposed to customer facing networks, but implementing solutions where these systems hide in a protected environment is costly and difficult to set up. But despite all this, Coldfusion is a great platform for putting out web applications very quickly, as I will demonstrate in the next few articles.
The application will take a users input for a Nomination Form, which is a request to take a class, and insert it into a table. There will be a separate Coldfusion script that will check for the presence of data in that table, pull it, email it to a predetermined email address, log it, and clear the table. The setup I am developing for is Coldfusion MX 6, using Macromedia Dreamweaver MX 2004 for development. This is in a totally trusted environment (if there is such a thing), so minimum of input validation will be used. The web forms used in this example were put together by a graphic artist, so I will have to modify her form, and based off this form, the fields for the table have already been defined. I will also use a tool called SecureCFM to check the source code afterwards, doing a small, cheap security audit of the source code.
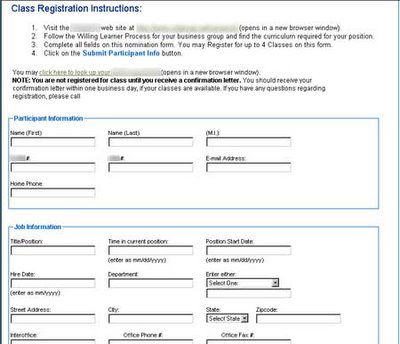
Figure 1: The web form (modified)
Based on the fields in the form, I created this simple table (its flat, but that’s OK, not everything needs to be normalized, especially for something as simple as this).
create table nom_form
(
participant_f_name varchar2(50),
participant_m_name varchar2(50),
participant_l_name varchar2(50),
participant_soeid varchar2(10),
participant_igeid varchar2(15),
participant_e_mail varchar2(100),
participant_home_phone varchar2(30),
participant_job_title varchar2(50),
participant_start_date date,
participant_hire_date date,
participant_department varchar2(100),
participant_cost_number_checked number(1),
participant_cost_number varchar2(100),
participant_address varchar2(150),
participant_city varchar2(150),
participant_state varchar2(50),
participant_zip varchar2(20),
participant_interoffice varchar2(100),
participant_office_phone varchar2(20),
participant_office_Fax varchar2(20),
manager_name varchar2(100),
manager_id1 varchar2(15),
manager_phone varchar2(20),
manager_email varchar2(100),
class1_event_name varchar2(150),
class1_course_code varchar2(20),
class1_class_id number,
class1_class_date date,
class2_event_name varchar2(150),
class2_course_code varchar2(20),
class2_class_id number,
class2_class_date date,
class3_event_name varchar2(150),
class3_course_code varchar2(20),
class3_class_id number,
class3_class_date date,
class4_event_name varchar2(150),
class4_course_code varchar2(20),
class4_class_id number,
class4_class_date date,
date_processed date
);
With the table create, submitting the information into a form is simply a matter of building the appropriate insert statement, and setting the forms submit action. I will set this form to submit to itself, with a small URL variable indicating that the form has been filled out. Alternatively, I can check for the existence of one of the form field using the isdefined() function. A rough skeleton of the code will look like this:
<cfif not IsDefined("URL.Submit")>
<!--- Code to display form page would go here - - ->
<cfelse>
<cftry>
<!--- Data input validation code goes here -- ->
<!--- Insert statement will go here - - ->
<cfcatch type=”any”>
<!--- Error handeling code goes here - - ->
<cfabort>
</cfcatch>
</cftry>
</cfif>
The form page contains all the fields, named something meaningful (thankfully, my graphic artist did all this for me, and I didn’t even have to tell her). The actual cfquery tag with the insert statement will looks like this:
<cfquery name="insertEvent" datasource="datasource">
insert into nom_form
(
participant_f_name,
participant_m_name,
participant_l_name,
participant_soeid,
participant_geid,
participant_e_mail,
participant_home_phone,
participant_job_title,
participant_start_date,
participant_hire_date,
participant_department,
participant_fc_number_checked,
participant_fc_cost_number,
participant_address,
participant_city,
participant_state,
participant_zip,
participant_interoffice,
participant_office_phone,
participant_office_Fax,
manager_name,
manager_soeid,
manager_phone,
manager_email
<!--- Conditional for class, this will be changed later to be mandatory --->
<cfif form.classid1 neq "">
,
class1_event_name,
class1_course_code,
class1_class_id,
class1_class_date
</cfif>
<!--- Conditional for clas, these will be optional --->
<cfif form.classid2 neq "">
,
class2_event_name,
class2_course_code,
class2_class_id,
class2_class_date
</cfif>
<!--- Conditional for class --->
<cfif form.classid3 neq "">
,
class3_event_name,
class3_course_code,
class3_class_id,
class3_class_date
</cfif>
<!--- Conditional for class --->
<cfif form.classid4 neq "">
,
class4_event_name,
class4_course_code,
class4_class_id,
class4_class_date
</cfif>
)
values
(
<cfqueryparam value="#form.firstname#" cfsqltype="CF_SQL_VARCHAR" maxlength="50">,
<cfqueryparam value="#form.mi#" cfsqltype="CF_SQL_VARCHAR" maxlength="50">,
<cfqueryparam value="#form.lastname#" cfsqltype="CF_SQL_VARCHAR" maxlength="50">,
<cfqueryparam value="#form.soeid#" cfsqltype="CF_SQL_VARCHAR" maxlength="10">,
<cfqueryparam value="#form.geid#" cfsqltype="CF_SQL_VARCHAR" maxlength="15">,
<cfqueryparam value="#form.emailaddress#" cfsqltype="CF_SQL_VARCHAR" maxlength="100">,
<cfqueryparam value="#form.hmphone#" cfsqltype="CF_SQL_VARCHAR" maxlength="30">,
<cfqueryparam value="#form.positiontitle#" cfsqltype="CF_SQL_VARCHAR" maxlength="50">,
<cfqueryparam value="#form.positionstart#" cfsqltype="cf_sql_date">,
<cfqueryparam value="#form.hiredate#" cfsqltype="cf_sql_date">,
<cfqueryparam value="#form.department#" cfsqltype="CF_SQL_VARCHAR" maxlength="100">,
<!--- Need to determine if we are using a branch number or a cost center number --->
<cfif form.costfcselect eq "Cost Center Number">
0,
<cfelse>
1,
</cfif>
<cfqueryparam value="#form.costcenter#" cfsqltype="CF_SQL_VARCHAR" maxlength="100">,
<cfqueryparam value="#form.workstreet#" cfsqltype="CF_SQL_VARCHAR" maxlength="150">,
<cfqueryparam value="#form.workcity#" cfsqltype="CF_SQL_VARCHAR" maxlength="150">,
<cfqueryparam value="#form.workstate#" cfsqltype="CF_SQL_VARCHAR" maxlength="50">,
<cfqueryparam value="#form.workzipcode#" cfsqltype="CF_SQL_VARCHAR" maxlength="20">,
<cfqueryparam value="#form.interofc#" cfsqltype="CF_SQL_VARCHAR" maxlength="100">,
<cfqueryparam value="#form.fcphone#" cfsqltype="CF_SQL_VARCHAR" maxlength="20">,
<cfqueryparam value="#form.fcfax#" cfsqltype="CF_SQL_VARCHAR" maxlength="20">,
<cfqueryparam value="#form.mngrname#" cfsqltype="CF_SQL_VARCHAR" maxlength="100">,
<cfqueryparam value="#form.mngrsoeid#" cfsqltype="CF_SQL_VARCHAR" maxlength="15">,
<cfqueryparam value="#form.mngrphone#" cfsqltype="CF_SQL_VARCHAR" maxlength="20">,
<cfqueryparam value="#form.mngremail#" cfsqltype="CF_SQL_VARCHAR" maxlength="100">
<!--- Conditional for class --->
<cfif form.classid1 neq "">
,
<cfqueryparam value="#form.event1name#" cfsqltype="CF_SQL_VARCHAR" maxlength="150">,
<cfqueryparam value="#form.coursecode1#" cfsqltype="CF_SQL_VARCHAR" maxlength="20">,
<cfqueryparam value="#form.classid1#" cfsqltype="cf_sql_numeric">,
<cfqueryparam value="#form.classdate1#" cfsqltype="cf_sql_date">
</cfif>
<!--- Conditional for class --->
<cfif form.classid2 neq "">
,
<cfqueryparam value="#form.event2name#" cfsqltype="CF_SQL_VARCHAR" maxlength="150">,
<cfqueryparam value="#form.coursecode2#" cfsqltype="CF_SQL_VARCHAR" maxlength="20">,
<cfqueryparam value="#form.classid2#" cfsqltype="cf_sql_numeric">,
<cfqueryparam value="#form.classdate2#" cfsqltype="cf_sql_date">
</cfif>
<!--- Conditional for class --->
<cfif form.classid3 neq "">
,
<cfqueryparam value="#form.event3name#" cfsqltype="CF_SQL_VARCHAR" maxlength="150">,
<cfqueryparam value="#form.coursecode3#" cfsqltype="CF_SQL_VARCHAR" maxlength="20">,
<cfqueryparam value="#form.classid3#" cfsqltype="cf_sql_numeric">,
<cfqueryparam value="#form.classdate3#" cfsqltype="cf_sql_date">
</cfif>
<!--- Conditional for class --->
<cfif form.classid3 neq "">
,
<cfqueryparam value="#form.event4name#" cfsqltype="CF_SQL_VARCHAR" maxlength="150">,
<cfqueryparam value="#form.coursecode4#" cfsqltype="CF_SQL_VARCHAR" maxlength="20">,
<cfqueryparam value="#form.classid4#" cfsqltype="cf_sql_numeric">,
<cfqueryparam value="#form.classdate4#" cfsqltype="cf_sql_date">
</cfif>
)
</cfquery>
And that’s basically it for the form. I save this page as “nomination_form.cfm” and with the additional CFML tags inserted as indicated above, set the form action to point to “nomination_form.cfm?Submit=1”, and the main form page is ready to roll. Notice I use cfqueryparam tags instead of in-lining the values to be passed into the database. The main reason for this is that it is a little faster, maybe not in this case, but definitely in cases where the query will be run repetitively. It also forces the correct datatype into the database. So if a user tries to pass alphanumeric data into a numeric field, it will fail. This will provide some basic input validation to help prevent against SQL Injection attacks since parameters are bound as bind variables in Oracle, not parsed as string literals.
Next, since this page is complete, I run SecureCFM to see if there are any vulnerabilities in it (at least that this tool can detect, something like Nessus would probably be appropriate to use here as well). According to it, the page contains no detectable vulnerabilities.

Getting this up and going was incredible simple compared to a language like ASP or and of the .Net languages. I didn’t have to worry about things like object instantiation, creating ADO objects, commands, or recordsets. Coldfusion is great for getting applications up and running in a short amount of time. That is not to say that it is appropriate for all scenarios. Gauge the appropriate platform based on the requirements of the project.
The remainder of tasks for the project are add-ons, with the exception of the scheduled job that will email data to a pre-determined email address. Next article I will add buttons to lookup the employee information from a pop-up window and pass back the results to the main form. The same method will be used to lookup class information. This allows for the automation of as much information as possible, but allows the user to change information that may be incorrect in the employee database, such as phone numbers, or to allow them to use an alternative cost center or FC number.
The application will take a users input for a Nomination Form, which is a request to take a class, and insert it into a table. There will be a separate Coldfusion script that will check for the presence of data in that table, pull it, email it to a predetermined email address, log it, and clear the table. The setup I am developing for is Coldfusion MX 6, using Macromedia Dreamweaver MX 2004 for development. This is in a totally trusted environment (if there is such a thing), so minimum of input validation will be used. The web forms used in this example were put together by a graphic artist, so I will have to modify her form, and based off this form, the fields for the table have already been defined. I will also use a tool called SecureCFM to check the source code afterwards, doing a small, cheap security audit of the source code.

Figure 1: The web form (modified)
Based on the fields in the form, I created this simple table (its flat, but that’s OK, not everything needs to be normalized, especially for something as simple as this).
create table nom_form
(
participant_f_name varchar2(50),
participant_m_name varchar2(50),
participant_l_name varchar2(50),
participant_soeid varchar2(10),
participant_igeid varchar2(15),
participant_e_mail varchar2(100),
participant_home_phone varchar2(30),
participant_job_title varchar2(50),
participant_start_date date,
participant_hire_date date,
participant_department varchar2(100),
participant_cost_number_checked number(1),
participant_cost_number varchar2(100),
participant_address varchar2(150),
participant_city varchar2(150),
participant_state varchar2(50),
participant_zip varchar2(20),
participant_interoffice varchar2(100),
participant_office_phone varchar2(20),
participant_office_Fax varchar2(20),
manager_name varchar2(100),
manager_id1 varchar2(15),
manager_phone varchar2(20),
manager_email varchar2(100),
class1_event_name varchar2(150),
class1_course_code varchar2(20),
class1_class_id number,
class1_class_date date,
class2_event_name varchar2(150),
class2_course_code varchar2(20),
class2_class_id number,
class2_class_date date,
class3_event_name varchar2(150),
class3_course_code varchar2(20),
class3_class_id number,
class3_class_date date,
class4_event_name varchar2(150),
class4_course_code varchar2(20),
class4_class_id number,
class4_class_date date,
date_processed date
);
With the table create, submitting the information into a form is simply a matter of building the appropriate insert statement, and setting the forms submit action. I will set this form to submit to itself, with a small URL variable indicating that the form has been filled out. Alternatively, I can check for the existence of one of the form field using the isdefined() function. A rough skeleton of the code will look like this:
<cfif not IsDefined("URL.Submit")>
<!--- Code to display form page would go here - - ->
<cfelse>
<cftry>
<!--- Data input validation code goes here -- ->
<!--- Insert statement will go here - - ->
<cfcatch type=”any”>
<!--- Error handeling code goes here - - ->
<cfabort>
</cfcatch>
</cftry>
</cfif>
The form page contains all the fields, named something meaningful (thankfully, my graphic artist did all this for me, and I didn’t even have to tell her). The actual cfquery tag with the insert statement will looks like this:
<cfquery name="insertEvent" datasource="datasource">
insert into nom_form
(
participant_f_name,
participant_m_name,
participant_l_name,
participant_soeid,
participant_geid,
participant_e_mail,
participant_home_phone,
participant_job_title,
participant_start_date,
participant_hire_date,
participant_department,
participant_fc_number_checked,
participant_fc_cost_number,
participant_address,
participant_city,
participant_state,
participant_zip,
participant_interoffice,
participant_office_phone,
participant_office_Fax,
manager_name,
manager_soeid,
manager_phone,
manager_email
<!--- Conditional for class, this will be changed later to be mandatory --->
<cfif form.classid1 neq "">
,
class1_event_name,
class1_course_code,
class1_class_id,
class1_class_date
</cfif>
<!--- Conditional for clas, these will be optional --->
<cfif form.classid2 neq "">
,
class2_event_name,
class2_course_code,
class2_class_id,
class2_class_date
</cfif>
<!--- Conditional for class --->
<cfif form.classid3 neq "">
,
class3_event_name,
class3_course_code,
class3_class_id,
class3_class_date
</cfif>
<!--- Conditional for class --->
<cfif form.classid4 neq "">
,
class4_event_name,
class4_course_code,
class4_class_id,
class4_class_date
</cfif>
)
values
(
<cfqueryparam value="#form.firstname#" cfsqltype="CF_SQL_VARCHAR" maxlength="50">,
<cfqueryparam value="#form.mi#" cfsqltype="CF_SQL_VARCHAR" maxlength="50">,
<cfqueryparam value="#form.lastname#" cfsqltype="CF_SQL_VARCHAR" maxlength="50">,
<cfqueryparam value="#form.soeid#" cfsqltype="CF_SQL_VARCHAR" maxlength="10">,
<cfqueryparam value="#form.geid#" cfsqltype="CF_SQL_VARCHAR" maxlength="15">,
<cfqueryparam value="#form.emailaddress#" cfsqltype="CF_SQL_VARCHAR" maxlength="100">,
<cfqueryparam value="#form.hmphone#" cfsqltype="CF_SQL_VARCHAR" maxlength="30">,
<cfqueryparam value="#form.positiontitle#" cfsqltype="CF_SQL_VARCHAR" maxlength="50">,
<cfqueryparam value="#form.positionstart#" cfsqltype="cf_sql_date">,
<cfqueryparam value="#form.hiredate#" cfsqltype="cf_sql_date">,
<cfqueryparam value="#form.department#" cfsqltype="CF_SQL_VARCHAR" maxlength="100">,
<!--- Need to determine if we are using a branch number or a cost center number --->
<cfif form.costfcselect eq "Cost Center Number">
0,
<cfelse>
1,
</cfif>
<cfqueryparam value="#form.costcenter#" cfsqltype="CF_SQL_VARCHAR" maxlength="100">,
<cfqueryparam value="#form.workstreet#" cfsqltype="CF_SQL_VARCHAR" maxlength="150">,
<cfqueryparam value="#form.workcity#" cfsqltype="CF_SQL_VARCHAR" maxlength="150">,
<cfqueryparam value="#form.workstate#" cfsqltype="CF_SQL_VARCHAR" maxlength="50">,
<cfqueryparam value="#form.workzipcode#" cfsqltype="CF_SQL_VARCHAR" maxlength="20">,
<cfqueryparam value="#form.interofc#" cfsqltype="CF_SQL_VARCHAR" maxlength="100">,
<cfqueryparam value="#form.fcphone#" cfsqltype="CF_SQL_VARCHAR" maxlength="20">,
<cfqueryparam value="#form.fcfax#" cfsqltype="CF_SQL_VARCHAR" maxlength="20">,
<cfqueryparam value="#form.mngrname#" cfsqltype="CF_SQL_VARCHAR" maxlength="100">,
<cfqueryparam value="#form.mngrsoeid#" cfsqltype="CF_SQL_VARCHAR" maxlength="15">,
<cfqueryparam value="#form.mngrphone#" cfsqltype="CF_SQL_VARCHAR" maxlength="20">,
<cfqueryparam value="#form.mngremail#" cfsqltype="CF_SQL_VARCHAR" maxlength="100">
<!--- Conditional for class --->
<cfif form.classid1 neq "">
,
<cfqueryparam value="#form.event1name#" cfsqltype="CF_SQL_VARCHAR" maxlength="150">,
<cfqueryparam value="#form.coursecode1#" cfsqltype="CF_SQL_VARCHAR" maxlength="20">,
<cfqueryparam value="#form.classid1#" cfsqltype="cf_sql_numeric">,
<cfqueryparam value="#form.classdate1#" cfsqltype="cf_sql_date">
</cfif>
<!--- Conditional for class --->
<cfif form.classid2 neq "">
,
<cfqueryparam value="#form.event2name#" cfsqltype="CF_SQL_VARCHAR" maxlength="150">,
<cfqueryparam value="#form.coursecode2#" cfsqltype="CF_SQL_VARCHAR" maxlength="20">,
<cfqueryparam value="#form.classid2#" cfsqltype="cf_sql_numeric">,
<cfqueryparam value="#form.classdate2#" cfsqltype="cf_sql_date">
</cfif>
<!--- Conditional for class --->
<cfif form.classid3 neq "">
,
<cfqueryparam value="#form.event3name#" cfsqltype="CF_SQL_VARCHAR" maxlength="150">,
<cfqueryparam value="#form.coursecode3#" cfsqltype="CF_SQL_VARCHAR" maxlength="20">,
<cfqueryparam value="#form.classid3#" cfsqltype="cf_sql_numeric">,
<cfqueryparam value="#form.classdate3#" cfsqltype="cf_sql_date">
</cfif>
<!--- Conditional for class --->
<cfif form.classid3 neq "">
,
<cfqueryparam value="#form.event4name#" cfsqltype="CF_SQL_VARCHAR" maxlength="150">,
<cfqueryparam value="#form.coursecode4#" cfsqltype="CF_SQL_VARCHAR" maxlength="20">,
<cfqueryparam value="#form.classid4#" cfsqltype="cf_sql_numeric">,
<cfqueryparam value="#form.classdate4#" cfsqltype="cf_sql_date">
</cfif>
)
</cfquery>
And that’s basically it for the form. I save this page as “nomination_form.cfm” and with the additional CFML tags inserted as indicated above, set the form action to point to “nomination_form.cfm?Submit=1”, and the main form page is ready to roll. Notice I use cfqueryparam tags instead of in-lining the values to be passed into the database. The main reason for this is that it is a little faster, maybe not in this case, but definitely in cases where the query will be run repetitively. It also forces the correct datatype into the database. So if a user tries to pass alphanumeric data into a numeric field, it will fail. This will provide some basic input validation to help prevent against SQL Injection attacks since parameters are bound as bind variables in Oracle, not parsed as string literals.
Next, since this page is complete, I run SecureCFM to see if there are any vulnerabilities in it (at least that this tool can detect, something like Nessus would probably be appropriate to use here as well). According to it, the page contains no detectable vulnerabilities.
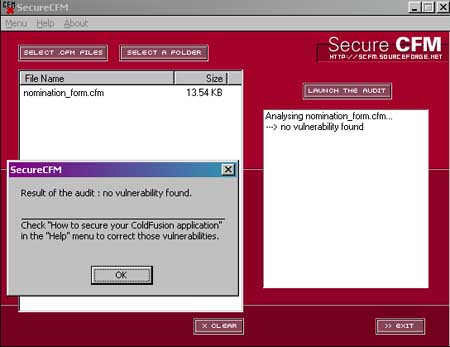
Getting this up and going was incredible simple compared to a language like ASP or and of the .Net languages. I didn’t have to worry about things like object instantiation, creating ADO objects, commands, or recordsets. Coldfusion is great for getting applications up and running in a short amount of time. That is not to say that it is appropriate for all scenarios. Gauge the appropriate platform based on the requirements of the project.
The remainder of tasks for the project are add-ons, with the exception of the scheduled job that will email data to a pre-determined email address. Next article I will add buttons to lookup the employee information from a pop-up window and pass back the results to the main form. The same method will be used to lookup class information. This allows for the automation of as much information as possible, but allows the user to change information that may be incorrect in the employee database, such as phone numbers, or to allow them to use an alternative cost center or FC number.
Subscribe to:
Posts (Atom)

