Sunday, November 07, 2010
Blah
Tuesday, September 21, 2010
Eclipse: WindowBuilder Pro and GWT Designer now free.
Tuesday, September 07, 2010
Review of BIRT 2.6 Data Analysis and Reporting
Wednesday, August 25, 2010
BIRT: All About Crosstabs
So, to help the user understand what these features are, I will discuss them here. Cross Tabs are typically a way to illustrate data in a 3 dimensional, sliceable manner. What does that mean exactly? Well, lets say, for example, that we have the following table:
(City)C1 (State)C2 (Country)C3 Sales Figure(C4)
R4
Now, lets say we want to slice this up in such a way that we take out rows, and we want to slice this up to show sales figures across State. If this were multi country, we might want an output with something like:
There are multiple variations of the above we could slice this into, but that is the basic idea. So the next question is, what is a Data Cube in BIRT? To give a simple answer, a Data Cube is a Data Source for Cross Tabs. Data Cubes define the slice axis used in the above example. A Cross Tab would be the visual representation used in a report to display your slices. In the following examples, we will look at some uses of cross tabs, and show some real world examples of how cross tabs have been used, including the little discussed uses of Attributes for groups.
Lets walk through an example.
- Create a new empty report called CrossTabExample.rptDesign
- Connect to the Classic Models sample database, and use the following query:
select

CUSTOMERS.CITY,

CUSTOMERS.STATE,

CUSTOMERS.COUNTRY,

(ORDERDETAILS.PRICEEACH * ORDERDETAILS.QUANTITYORDERED) salesSum

from

CUSTOMERS,

ORDERDETAILS,

ORDERS

where

ORDERS.ORDERNUMBER = ORDERDETAILS.ORDERNUMBER

and ORDERS.CUSTOMERNUMBER = CUSTOMERS.CUSTOMERNUMBER

- In the data cube, create the following groupings by dragging and dropping fields. For example, in the Available Fields box, drag the City column over to the Groups, where it says Drop a field here to create a group, and call that grouping GroupByCity.

- Drag the newly created Cube to the report designer. This will automatically create a Crosstab Report Item.

- Drag the State grouping to the Column area.

- Delete the City grouping (this will just save space for this example).
- Preview the report.


That is a pretty simplistic example. A more relevant one would be a display of quarter sales per country. So, lets modify the above example.
- Modify the query to the following, adding the date field:
   1. select

CUSTOMERS.CITY,

CUSTOMERS.STATE,

CUSTOMERS.COUNTRY,

(ORDERDETAILS.PRICEEACH * ORDERDETAILS.QUANTITYORDERED) salesSum,

CLASSICMODELS.ORDERS.ORDERDATE

from

CUSTOMERS,

ORDERDETAILS,

ORDERS

where

ORDERS.ORDERNUMBER = ORDERDETAILS.ORDERNUMBER

and ORDERS.CUSTOMERNUMBER = CUSTOMERS.CUSTOMERNUMBER- In the Data Cube, add the ORDERDATE as a group, and set the grouping to Quarter. This prompt is unique to dates.

- Remove the State column from the Crosstab.
- Drag the ORderDate Group to the newly empty Column.

- Preview the report

Now that is a cross tab that is a little more usable. Here we can see sales for each country based on Quarter of the year.
Cross tabs also have some really interesting uses that are not very apparent. For example, lets say you want to display the values of rows as columns. This works just fine. In the following example, lets say we want the names of employees to show as column, with tables below each name showing their customers.
1. Create a new report called EmployeeCustomers.rptDesign.
2. Create a Data Source connecting to the Classic Models example database, and a new data set using the following query:
selectCLASSICMODELS.EMPLOYEES.EMPLOYEENUMBER,
CLASSICMODELS.EMPLOYEES.LASTNAME,
CLASSICMODELS.EMPLOYEES.FIRSTNAME
from
CLASSICMODELS.EMPLOYEES
3. Create a new Data Cube. Drag over the LastName as a grouping.
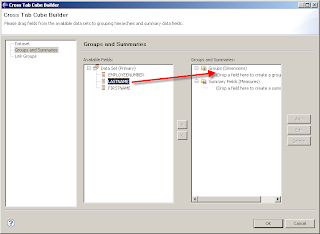
4. Double click on the LastName grouping to open the editor. For the display field use the following expression:

5. Click on the Add for Attributes. Add in the EmployeeNumber. The reason for this is that we will need to be able to access the EmployeeNumber in the crosstab to filter the child tables.

6. Drag the newly created Data Cube to the report designer. Drag the LastName column over to the Column Area. This will display all employee names as columns instead of rows.

7. Create a new Data Set. Use the following query. Be sure to leave the parameter as empty, as it will be set by our Crosstab.
selectCUSTOMERS.CUSTOMERNAME
from
CUSTOMERS
where
CUSTOMERS.SALESREPEMPLOYEENUMBER = ?
8. From the outline view, select the cell that the LastName element is in for the cross tab, right-mouse click, and choose Insert/Table.

9. Create the table as 1 row, 1 column, and Data Set to the employeeCustomers table that was create in step 2.

10. Now, we need to do something a little tricky here to filter this table. Select the table in the Report Editor. In the Property view, select Bindings.

11. Open the Data Set Parameter Binding dialog by clicking on the button.
12. select Param_1, and click Edit.
13. Click on the Function button in the Edit Data Set Parameter Binding dialog
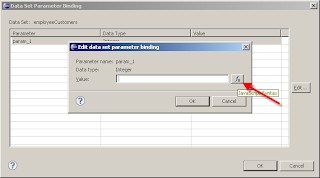
14. We will need to add a new data binding for our cross tab. So Select edit bindings.

15. From the Edit Data Binding dialog, click on Add.
16. Set the name to employeeNumber, type to Integer, and expression to dimension["GroupByLastName"]["LASTNAME"]["EMPLOYEENUMBER"]. You can use the Expression Editor to set this expression. When you go through the navigation, you will notice that EmployeeNumber is listed under the group. The reason being, we added it as an attribute for the LAstName grouping.

17. Now that the crosstab binding has been created, we can hit OK for the dialogs until we get back to the Expression Editor for the Parameter Binding. The employeeNumber field is now available.

18. Now, drag the CustomerName field into the detail section of the table.

And once you apply some formatting, you are set. You are now using the rows of a table as columns, and driving a detail table with that.
- In the Data Cube, add the ORDERDATE as a group, and set the grouping to Quarter. This prompt is unique to dates.


Thursday, August 05, 2010
BIRT: My New Book is Out
https://www.packtpub.com/birt-2-6-data-analysis-and-reporting/book
Right now, they are running a special, 33.74 for the book, 30 for the eBook, and 39 for the pair!!!
Saturday, July 17, 2010
BIRT: Articles Posted
Check out the articles here:
http://www.packtpub.com/article/use-stylesheets-report-designing-using-birt
http://www.packtpub.com/article/creating-reporting-site-birt
Thursday, June 17, 2010
Droid: Using a Wii Controller on an Android Phone
Since I have been doing so much traveling lately, it leaves me with a lot of idle time in places like airports. while I always have my trusty Nintendo Ds with me, there are times where I don't want to lug around the carrying case with all my games. This is where my cell phone, a Motorola Droid, has come into play. Once again, I can't help but marvel at how powerful these devices have become.
I have gotten a interest in retro gaming. I grew up on the old school NES, SNES, and Sega Genesis games. And since the Droid is powerful enough, it can run emulators of these old school systems at full speed. The only problem is the control scheme leaves a little something to be desired. the onscreen controls just suck since you have no tactile feedback that you pushed a button (except for a vibration). the keyboard is awkward, so a gaming controller would be ideal here.
Well, there are a few options. First is the Game Gripper. This looks promising. I ordered one, but it hasn't arrived yet. There are two drawbacks to this. First, it only supports the Droid and the Backflip. Second, since it is basically a plastic insert that just pushes the buttons on your keyboard for you, I wonder if it will eventually wear down the thin plastic cover on the keyboard, or leave indentations.
The second option is the Zeemote. While the Droid is not explicitly listed on their site, there is a app in the marketplace called Gamepro that will interface with it.
The option I am using right now is the Nintendo Wii controller. There is an app in the Market called Wii Controller IME. This interfaces with the Wii controller (and the Wii Remotes Classic Controller) to allow you to use a Wii remote on the Droid. You assign keypresses to keyboard buttons, and your good to go. I tested it with NESoid and it worked flawlessly as long as I had the "Use Input Device" option selected. It even processed two button presses at the same time, something the keyboard had a hard time with. This is important if your playing a game that requires diagonal movement. the only drawback is that I have to carry a Wii remote with me, and that it uses Bluetooth, so battery life is much lower. One thing to keep in mind, it is reported that this app has a hard time with HTC phones, or phones using HTC Sense. So the Incredible, EVO, and Eris might have a hard time with it. Now I just need a phone with video out like the EVO and I'd be all set for when I travel =)
Wednesday, February 17, 2010
BIRT: BIRT Report Item Extensions Released by Innovent Solutions
These extension elements are available at http://code.google.com/p/birt-controls-lib/.
Installation instructions are provided on the above link, but we will cover this real quick. There are two components necessary to install these into the BIRT Report Designer. There is a bb.birt.controls.xxx.jar, and a bb.birt.controler.ui.xxx.jar. The UI component is necessary for the BIRT report designer to show these new elements in the palette. The other jar contains the necessary runtime libraries for BIRT to know how to use these elements in a report.
The easiest installation method is to use the update site. The update site is provided in the instructions.
Once installed, you will have the two new components available on the Palette.

So, lets say I want to demonstrate these. In the following example, I will create a simple report that will show the offices and employee count for the Classic Cars sample database. Assume I already have the above components installed, and I am using BIRT 2.5.1.
1. Create a new report called newComponentTest.rptDesign.
2. Create a new Data Source using the Classic Cars example database.
3. Create a new dataset from the following query:
select
CLASSICMODELS.OFFICES.OFFICECODE,
CLASSICMODELS.OFFICES.CITY,
(select count('1') from employees where officecode = CLASSICMODELS.OFFICES.OFFICECODE) officecount
from
CLASSICMODELS.OFFICES
4. Right-mouse click on the data set, and choose Insert in Layout.

The report will look like so:

5. Now, select the OfficeCount detail data component, and delete it.
6. Insert a DotBar in the OfficeCount detail cell.
7. In the DotBar dialog, use the following details:

8. Now, remove the OfficeCode column (1st column).
9. In the City Detail cell, remove the City data component.
10. Insert a Rotated Text component into the cell.
11. Use the following properties:

The final report will look something like this:

And when you run the report, it should look like so:

The source for these components are available to be extended as well from the above linked Google Code site.
Tuesday, February 09, 2010
VOIP: Set Up Asterisk and LinkSys 3102 to work with SIPDroid.
My most recent project has been to set up a VOIP setup on my Droid so that I can VPN into my home network using either my 3G service or WiFi and use the unused landline that I have so that I don’t burn minutes. As a secondary objective, I’d also like to be able to have calls made to my house ring on my cell phone after a few rings on my house phone.
In order to accomplish this task, I needed 2 things:
A means to connect my landline to my Asterisk server
An old machine to run Asterisk on
The old machine was easy. I have an old Compaq that has been sitting idle since the early 2006 or 2007. It had Ubuntu Dapper Drake. Although I would have liked to have put something newer, it appears that most newer distributions don’t agree with the hardware, and I really don’t have time to mess around with passing in various kernel parameters in a trial and error manner since the error messages were non-existent. Since this was the case, I enabled the universe repository under /etc/apt/sources.list, and ran the following command to get Asterisk running:
apt-get –f install asterisk
I didn’t change any of the configuration files, I want to keep them stock since I will use a special configuration wizard.
Now, the hardware I used to connect the phone was a Linksys 3102 ATA. I also did not do anything in configuration outside of enabling configuration through the outside WAN since this is only connected to my Intranet.
Configuration, despite how confusing all this looked initially, turned out to be a piece of cake, thanks to this handy dandy configuration utility, courtesy of the nice folks at Voxilla. I simply followed the wizard, which automatically configured the 3102 to work with Asterisk. To configure Asterisk, I made a backup of the sip.conf, voicemail.conf, and extensions.conf, removed them, and copy and pasted in the appropriate configuration sections from the wizard into the appropriate files. So, to do that, it looked something like:
root@cloya-desktop:/etc/asterisk# mkdir backup
root@cloya-desktop:/etc/asterisk# cp sip.conf backup/
root@cloya-desktop:/etc/asterisk# cp extensions.conf backup/
root@cloya-desktop:/etc/asterisk# cp voicemail.conf backup/
root@cloya-desktop:/etc/asterisk# rm sip.conf
root@cloya-desktop:/etc/asterisk# nano sip.conf
root@cloya-desktop:/etc/asterisk# rm voicemail.conf
root@cloya-desktop:/etc/asterisk# nano voicemail.conf
root@cloya-desktop:/etc/asterisk# rm extensions.conf
root@cloya-desktop:/etc/asterisk# nano extensions.conf
root@cloya-desktop:/etc/asterisk# cat sip.conf
[digiassn]
type=friend
host=dynamic
context=home
secret=secretPassword
mailbox=digiassn
dtmfmode=rfc2833
disallow=all
allow=ulaw
[pstn]
; If you're using Asterisk, this goes into the Incoming settings
; For your Trunk
type=friend
host=dynamic
; If using Asterisk@home, change the below line to context=from-internal
context=home
secret= secretPassword
dtmfmode=rfc2833
disallow=all
allow=ulaw
insecure=very
[pstn-spa3k]
; If you're using Asterisk, this section goes into the Outgoing Settings
; for your trunk.
type=peer
auth=md5
host=192.168.1.110
port=5061
secret= secretPassword
username=asterisk
fromuser=asterisk
dtmfmode=rfc2833
; If using Asterisk@home, change the below line to context=from-internal
context=home
insecure=very
root@cloya-desktop:/etc/asterisk# cat voicemail.conf
[default]
digiassn => digiassn,John Ward,user.com,user-pager.com,tz=pacific
root@cloya-desktop:/etc/asterisk# cat extensions.conf
[home]
exten => digiassn,1,Ringing
exten => digiassn,2,Dial(SIP/digiassn,20,T)
exten => digiassn,3,Voicemail(udigiassn)
exten => digiassn,4,Hangup
exten => 911,1,Dial(SIP/911@pstn-spa3k,60,)
exten => 911,2,Congestion
exten => _XXXXXXX,1,Dial(SIP/${EXTEN}@pstn-spa3k,60,)
exten => _XXXXXXX,2,Congestion
exten => _1800XXXXXXX,1,Dial(SIP/${EXTEN}@pstn-spa3k,60,)
exten => _1800XXXXXXX,2,Congestion
exten => _1888XXXXXXX,1,Dial(SIP/${EXTEN}@pstn-spa3k,60,)
exten => _1888XXXXXXX,2,Congestion
exten => _1877XXXXXXX,1,Dial(SIP/${EXTEN}@pstn-spa3k,60,)
exten => _1877XXXXXXX,2,Congestion
exten => _1866XXXXXXX,1,Dial(SIP/${EXTEN}@pstn-spa3k,60,)
exten => _1866XXXXXXX,2,Congestion
Then, I need to edit the /etc/default/asterisk file to change the line that says
RUNASTERISK=no
to say
RUNASTERISK=yes
Now, before I actually start this up, I needed to make one final change. When I actually started this up and played with it, the dial in from my land line did not ring the VOIP setup on my Droid the way I wanted. The reason is the extension.conf file was not set up correctly from the script. The way it works by default is that any calls coming in the digiassn extension would ring the digiassn extension for 20 seconds then go to voice mail. This is not what I want. I want calls coming in the pstn extension to ring the pstn extension for 20 seconds (which would be the physical home phone line), then ring my VOIP setup on my cell (digiassn) for 10 seconds, then go to voicemail. Most normal configurations won’t require this, but I included it here to show my final configuration. First, go into the SPA configuration utility, and under Voice/Line 1/Proxy and Registration, change the value of Use Outbound Proxy to true. I don’t know why, but the handset wouldn’t ring without this set. Then change the below configuration for extensions.conf:
[home]
exten => pstn,1,Ringing
exten => pstn,2,Dial(SIP/digiassn,20,T) #ring the handset first
exten => pstn,3,Dial(SIP/pstn,15,T) #then ring the SIPDroid
exten => pstn,4,Voicemail(udigiassn)
exten => pstn,5,Hangup
exten => 911,1,Dial(SIP/911@pstn-spa3k,60,)
exten => 911,2,Congestion
exten => _XXXXXXX,1,Dial(SIP/${EXTEN}@pstn-spa3k,60,)
exten => _XXXXXXX,2,Congestion
exten => _1800XXXXXXX,1,Dial(SIP/${EXTEN}@pstn-spa3k,60,)
exten => _1800XXXXXXX,2,Congestion
exten => _1888XXXXXXX,1,Dial(SIP/${EXTEN}@pstn-spa3k,60,)
exten => _1888XXXXXXX,2,Congestion
exten => _1877XXXXXXX,1,Dial(SIP/${EXTEN}@pstn-spa3k,60,)
exten => _1877XXXXXXX,2,Congestion
exten => _1866XXXXXXX,1,Dial(SIP/${EXTEN}@pstn-spa3k,60,)
exten => _1866XXXXXXX,2,Congestion
Now, I can start up Asterisk by running /etc/init.d/asterisk restart.
Now, I need a VOIP client. I am using SIPDroid to make my connections. To do this, I configure SIPDroid as follows:
Under SIP Account Settings:
Authorization Username: pstn
Password:
Server: 192.168.1.111 (The address of the Asterix box).
Port: 5060
Protocol: UDP
Everything else I leave default. That’s it. When I’m connected to my WiFi network, I can use the VoIP setup to connect directly to my landline.
So, after using this for a day, there were some definite things I wanted to change. The dial plan that is on by default sucked. Since I am using Android and SIPVoice to dial, and by default SIPDroid uses the full number mask stored in contacts (XXX-XXX-XXXX), Asterisk refused to dial. I would see SIPDroid try to dial but hang up immediately without completing the call. Took me a while to figure out what was going on, so some new dial masks needed to be created. Voicemail was not set up correctly. Since I don’t have an answering machine on my landline, I figured Asterisk can play double duty and serve as an answering machine as well. The wizard doesn’t create a workable voicemail password, so that needed to be fixed. Also, after some investigation, it turns out that Asterisk also has a little feature that works just like the Telezapper, and will play the “out of service” tone when you answer a phone so telemarketers and such will register you in the Do Not Call database. This is a feature that I need to have since the National Do Not Call database is such a joke. There are also all sorts of neat scripts you can run to forward telemarketers to annoying endless voice prompt loops, or just hang up on them, but I won’t cover them here.
So, to accomplish what I wanted, I modified all three configuration files like so.
Voicemail.conf:
[default]
digiassn => 1234,John Ward,john@email,tz=pacific
Note the 1234. This is the 4 digit numeric password you need to enter to check and manage your voicemailbox.
Extensions.conf:
[home]
exten => pstn,1,Ringing
#add zapateller
exten => pstn,2,Zapateller(answer)
exten => pstn,3,Dial(SIP/digiassn,15,T)
exten => pstn,4,Dial(SIP/pstn,10,T)
exten => pstn,5,Voicemail(udigiassn)
exten => pstn,6,Hangup
exten => 911,1,Dial(SIP/911@pstn-spa3k,60,)
exten => 911,2,Congestion
#dialing 9999 will get me my voicemail box
exten => 9999,1,VoiceMailMain(digiassn)
#dialmasks, local calls
exten => _XXXXXXX,1,Dial(SIP/${EXTEN}@pstn-spa3k,60,)
exten => _XXXXXXX,2,Congestion
#if coming from cell phone, only take the phone number, minus the 1 and the area code
exten => _1210XXXXXXX,1,Dial(SIP/${EXTEN:-7}@pstn-spa3k,60,)
exten => _1210XXXXXXX,2,Congestion
#same as above, only without the 1. this is for local calls
exten => _210XXXXXXX,1,Dial(SIP/${EXTEN:-7}@pstn-spa3k,60,)
exten => _210XXXXXXX,2,Congestion
#Any other number, with the 1
exten => _1XXXXXXXXXX,1,Dial(SIP/${EXTEN}@pstn-spa3k,60,)
exten => _1XXXXXXXXXX,2,Congestion
#without the 1
exten => _XXXXXXXXXX,1,Dial(SIP/1${EXTEN}@pstn-spa3k,60,)
exten => _XXXXXXXXXX,2,Congestion
#dont believe the rest need to be here, but I will leave them jic
exten => _1800XXXXXXX,1,Dial(SIP/${EXTEN}@pstn-spa3k,60,)
exten => _1800XXXXXXX,2,Congestion
exten => _1888XXXXXXX,1,Dial(SIP/${EXTEN}@pstn-spa3k,60,)
exten => _1888XXXXXXX,2,Congestion
exten => _1877XXXXXXX,1,Dial(SIP/${EXTEN}@pstn-spa3k,60,)
exten => _1877XXXXXXX,2,Congestion
exten => _1866XXXXXXX,1,Dial(SIP/${EXTEN}@pstn-spa3k,60,)
exten => _1866XXXXXXX,2,Congestion
Wednesday, January 27, 2010
BIRT: Get Access to Chart Element and Modify Properties from ReportRunnable in BIRT 2.5
package com.digiassn.blogspot.birt;

import java.util.logging.Level;

import org.eclipse.birt.chart.model.ChartWithoutAxes;
import org.eclipse.birt.chart.model.attribute.ChartDimension;
import org.eclipse.birt.core.exception.BirtException;
import org.eclipse.birt.core.framework.Platform;
import org.eclipse.birt.report.engine.api.EngineConfig;
import org.eclipse.birt.report.engine.api.EngineException;
import org.eclipse.birt.report.engine.api.HTMLRenderOption;
import org.eclipse.birt.report.engine.api.IReportEngine;
import org.eclipse.birt.report.engine.api.IReportEngineFactory;
import org.eclipse.birt.report.engine.api.IReportRunnable;
import org.eclipse.birt.report.engine.api.IRunAndRenderTask;
import org.eclipse.birt.report.model.api.ExtendedItemHandle;
import org.eclipse.birt.report.model.api.extension.ExtendedElementException;

public class ModifyChart {

   /**
    * @param args
    */
   public static void main(String[] args) {
       try {
           IReportEngine engine = null;
           EngineConfig config = null;

           // Configure the Engine and start the Platform
           config = new EngineConfig();
           config
                   .setEngineHome("C:/Libraries/birt-runtime-2_5_1/ReportEngine");
           // set log config using ( null, Level ) if you do not want a log file
           config.setLogConfig("C:/temp", Level.FINE);

           //start birt platform and create factories
           Platform.startup(config);
           IReportEngineFactory factory = (IReportEngineFactory) Platform
                   .createFactoryObject(IReportEngineFactory.EXTENSION_REPORT_ENGINE_FACTORY);
           engine = factory.createReportEngine(config);
           engine.changeLogLevel(Level.WARNING);

           //open report design
           IReportRunnable design = engine
           .openReportDesign("C:/contracts/BirtExamples/BirtReportEngine/PieChart.rptdesign");

           //get chart element handle called "PieChart"
           ExtendedItemHandle eih = (ExtendedItemHandle) design.getDesignHandle()
                   .getDesignHandle().findElement("PieChart");

           //get the actual chart instance since Charts are extended item handles
           ChartWithoutAxes cwa = (ChartWithoutAxes) eih.getReportItem().getProperty(
                   "chart.instance");

           //set title of chart to New Label
           cwa.getTitle().getLabel().getCaption().setValue("New Label");

           //set 2d with depth
           cwa.setDimension(ChartDimension.TWO_DIMENSIONAL_WITH_DEPTH_LITERAL);

           // Create task to run and render the report,
           IRunAndRenderTask task = engine.createRunAndRenderTask(design);

           // Set rendering options - such as file or stream output,
           // output format, whether it is embeddable, etc
           HTMLRenderOption options = new HTMLRenderOption();
           options.setBaseURL("http://localhost/");
           options.setBaseImageURL("http://localhost/myimages");
           options.setImageDirectory("C:/xampplite/htdocs/myimages");
           options.setSupportedImageFormats("JPG;PNG;BMP;SVG");

           options.setOutputStream(System.out);

           // Set output format
           options.setOutputFormat("html");
           task.setRenderOption(options);

           // run the report and destroy the engine
           // Note - If the program stays resident do not shutdown the Platform or
           // the Engine
           task.run();
           task.close();

           task.close();
           Platform.shutdown();
           System.out.println("Finished");
       } catch (ExtendedElementException e) {
           e.printStackTrace();
       } catch (EngineException e) {
           e.printStackTrace();
       } catch (BirtException e) {
           e.printStackTrace();
       }

   }

}
The thing to remember about charts in BIRT reports is that they are Chart types stored withing a ExtendedItemHandler. So you need to find the ExtendedItemHandler first, then get the chart inside of it. Charts can be ChartsWithAxis (bar charts, lines charts), or ChartsWithoutAxis (pie charts). Reference on the chart types can be found here.
ChartWithAxes
ChartWithoutAxes
Musing: Mobile Technology
I am writing this sitting in a Chipotle and using my foldout keyboard on my Motorola Droid. I am using the wireless tether that I hacked previously to connect my iPod Touch online so I can play Scrabble (until there is a native Droid version that is). I am using the GDocs application to write this (although I have a few other text editors that save locally instead of "in the cloud"). Using the Droid Meebo app, I can stay connected to coworkers via IM. Since the Droid multitasks, I can have the IM, email, tether app, and a few other things running simultaneously. The only thing I lack here is VOIP via WiFi, which I suspect will be simplified enough soon enough. I think my next tasks here are to try to run a modified BIRT Designer. Then I can do some rudimentary troubleshooting on BIRT reports when not at my desk.
I couldn't do all this 5 years ago on the Razr, or last year with the Touch/Vogue. The difference between mobile and desktop is closing. I wonder how businesses deal with the security issues with this new found mobility?
Monday, January 25, 2010
Droid: WiFi Tethering/Hotspot on the Droid
Since the announcement of the Pre+ for Verizon would have WiFi hotspot built in, I have been salivating for the wireless hotspot functionality. Of course, I kicked myself because I just bought a Droid. Well, I can hold off my wanting because some clever hackers figured out how to do the same thing with the Droid. That’s right, the Droid is capable of being a WiFi hotspot.
So how is this feat accomplished?
- Root your Droid.
- The instructions say that you will get a blank screen. This is true. Wait a few minutes (I waited about 5, probably way too much), then reboot the device.
- Follow the directions here.
That’s it. Pretty easy. Took me about 20 minutes to do. Although not indicated in the article because it assumes prior understanding, the “ADB” application refered to requires the Android SDK, and is a tool located under the “tools” folder. Also, the step to “flash_image” was actually not needed since this is part of the Android Root Helper application. Also, during the WirelessTetherPather programs final stages, it asks you to “login, and run the tether app”. This actually refers to running the “Wireless tether for Root users” application under your applications menu on the Droid, not running it using Busybox using ADB. That step confused me for some reason.
If your having problems finding the “Droid Root Helper” application, you can use the one I found here. Apparently, it is also in the Marketplace.
That’s it, the last little void from my HTC Touch has been filled. Seriously, how could Verizon NOT want this? This is just so freaking awesome, it should be a standard feature.
Monday, January 18, 2010
Getting HP Foldable Bluetooth Keyboard FA287A Working on Motorola Droid
I’ve had an old Bluetooth keyboard I used to use with my HP Ipaq. It is a model number FA287A. I’ve always had a fondness for this keyboard and using it with my mobile devices. It has a number pad on the top, and it has a nice feel to the keys. I managed to get this keyboard working on my HTC Touch Vogue with some help from this driver.
I am happy to discover that this keyboard, which has served me well for years, lives on with my Motorola Droid. That’s right, this oddball keyboard that was designed specifically for the HP Ipaq, works with my Android based mobile phone. How is this possible? Thanks to a little application called KeyPro available in the Android Marketplace, and at http://www.mymobilegear.com/AndroidKBDriver.php (note, this site was down at the time of this writing, the URL comes from Google).
To get this working, I used the following steps.
- Installed KeyPro from the Marketplace.
- Opened up Droids settings app.
- Went into Language and Keyboard, and clicked on the check next to KeyPro.
- Clicked Back.
- Clicked on Wireless and Networks.
- Turned on Bluetooth.
- Went into Bluetooth Settings
- Clicked on Scan for Devices, it found “BT-FoldableKB”
- Paired with it, and put in Passcode “0000”
- Pushed the Home button
- Opened the apps menu, started KeyPro
- Opened the Settings menu.
- Changed the Keyboard Model to “Freedom Universal”
- Clicked on the Scan next to Keyboard Address textbox.
- It found the “BT-FoldableKB”.
- Scrolled down and clicked on Save.
Keypro then showed status at bottom of app saying “initialized”, then “connecting”, then “connected”. With it connected, I clicked on the Search button. Nothing happened. So I held my finger up to the search text box for a second, and a dialog poped up for Input Method. I clicked on Input Method, and selected KeyPro. And guess what. Now what I typed showed up. I can use my Bluetooth keyboard on my Android. This works out great when I want to take notes in a meeting and I don’t want to bring my laptop with me, and another reason to leave my IPod Touch at home.
Saturday, January 02, 2010
Squid: Watching Hulu on your PS3 using HTTP_HEADER User Agent modification
Fortunately, I found this little gem with a workaround using Squid, one of my favorite tools, to replace the HTTP header en-route, making Hulu think the request is coming from a Windows machine. And old trick, and Firefox even has a plugin that will replace the HTTP header for you, but the PS3 doesn’t have that ability. I remember an article I wrote several years ago talking about using Squid and SSH to get around filtering proxies within a corporate LAN. I’ve also used Squid to simulate slower bandwidth using delay pools for UAT testing. Right up there with Netcat and SSH as useful tools to have on your machine.

