First, lets outline requirements for the server. I need a server that has Apache Tomcat for running the reports (of course). I need the ability to administer the server remotely, so SSH must be running on the server. Because I will need to schedule reports to run at a certain time, Cron must be installed, as well as Wget to retrieve the results and store them. I also want the ability to post my reports to the server, and although I could copy with SSH, using Samba instead will allow my development box to save directly on the server. To configure Samba, I also want SWAT installed; it is my preferred Samba configuration tool.
The environment I have chosen is CentOS version 4.1, mainly because I want a Linux-based setup. It is much easier to script automated tasks in a Linux environment than in a Windows environment. I also wanted an Enterprise class distribution, and since I will not be paying $2,000 for RedHat Enterprise Linux, CentOS was the next logical choice.
 First, I download CentOS from http://www.centos.org/. The install is a 4 CD set. When burning the ISO files, disk 1 is a CD-bootable install disk. Once I reach the first screen, I just hit enter to go into the graphical installer.
If you are familiar with the RedHat or Fedora Core graphical installers, there will be no surprises here. The installer loads a quick console application that prompts you to test the CD media. I choose to skip this step, although normally it is a good idea to scan the CD’s prior to installing.
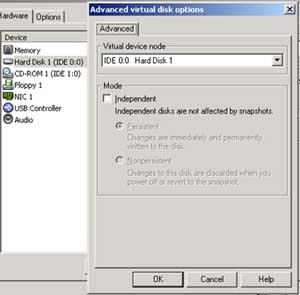
Once I choose skip, I come across an error almost immediately: CentOS did not recognize my SCSI drive under VMWare. So I have to exit out of my virtual machine, delete the SCSI disk drive I had set up, and create an IDE disk drive.
 I restart the virtual machine, and start the install process again. The installer recognizes my hard disk this time, and I am greeted with the CentOS welcome screen.
The rest of the install is a very simple Wizard, so I will just briefly cover what I answered for each step. I click on next, choose English as my language, and US English for my keyboard layout.
When asked what type of install, I choose Custom.

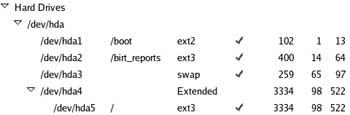
When I get to the disk partition screen, I choose Custom as well. I want to modify this with a separate partition for BIRT reports to reside in. I set up a 100 MB boot partition, a 400 MB BIRT reports partition, a 256 MB swap partition, and the rest is my root partition. However you will likely choose a slightly different partition scheme for a production system based on your home directory setup and applications you intend on installing. More information on possible partition configuration can be found at on the Linux Partition HowTo at http://www.tldp.org/HOWTO/Partition/partition-4.html.

For a boot loader, I opt for the default GRUB. For Network devices, I keep the default of DHCP and continue, although for a dedicated reports server, a static IP address is ideal. On the next screen, I set up the firewall to only allow web traffic and remote control through SSH. (We will fine-tune this setup later.) I also enable SELinux to play around with at a later time.

On the next few screens, I keep English as my only language and set my time zone to the Central time zone, and set my root password.
On the package selection screen, I disable everything. Then I go back and select Windows File Server, Server Configuration tools, Web server, and Text-Based Internet. Here are the packages I selected under each category:
-Text Based Internet
Elinks
-System Configuration Tools
System-config-httpd
System-config-services
-Windows File Server
System-config-samba
-HTTP server
Basically just keep the ssl, php, and perl modules for Apache.
Remove Webalizer, Squid, and Manuals
Once I click on next, dependencies are calculated, and the install begins. After the packages are installed, the following message is displayed informing me that the installaton is complete and the system must be restarted.

Once the machine boots for the first time, I am a little annoyed to find that the printing system, NFS, sendmail, and a few other services I specifically did not select in my install were installed anyway. Normally I would immediately update the system. However, since I am on laptop with no connection to the Internet, I skip this step. For reference, this distribution uses Yum ( http://linux.duke.edu/projects/yum/ ) for its package management. I would consult their home page and the Man/Info pages for more information on using Yum.
Since I will not be updating, I first need to disable the unnecessary services that are running. To see what they are, I run the following command:
chkconfig –list sort
I am interested in what is running for runlevel 3. This is the output (note: I removed the XINETD services for brevity).
acpid 0:off 1:off 2:off 3:on 4:on 5:on 6:off
anacron 0:off 1:off 2:on 3:on 4:on 5:on 6:off
apmd 0:off 1:off 2:on 3:on 4:on 5:on 6:off
atd 0:off 1:off 2:off 3:on 4:on 5:on 6:off
autofs 0:off 1:off 2:off 3:on 4:on 5:on 6:off
bluetooth 0:off 1:off 2:off 3:off 4:off 5:off 6:off
cpuspeed 0:off 1:on 2:on 3:on 4:on 5:on 6:off
crond 0:off 1:off 2:on 3:on 4:on 5:on 6:off
cups 0:off 1:off 2:on 3:on 4:on 5:on 6:off
dc_client 0:off 1:off 2:off 3:off 4:off 5:off 6:off
dc_server 0:off 1:off 2:off 3:off 4:off 5:off 6:off
diskdump 0:off 1:off 2:off 3:off 4:off 5:off 6:off
gpm 0:off 1:off 2:on 3:on 4:on 5:on 6:off
haldaemon 0:off 1:off 2:off 3:on 4:on 5:on 6:off
httpd 0:off 1:off 2:off 3:off 4:off 5:off 6:off
iptables 0:off 1:off 2:on 3:on 4:on 5:on 6:off
irda 0:off 1:off 2:off 3:off 4:off 5:off 6:off
irqbalance 0:off 1:off 2:off 3:on 4:on 5:on 6:off
isdn 0:off 1:off 2:on 3:on 4:on 5:on 6:off
kudzu 0:off 1:off 2:off 3:on 4:on 5:on 6:off
mdmonitor 0:off 1:off 2:on 3:on 4:on 5:on 6:off
mdmpd 0:off 1:off 2:off 3:off 4:off 5:off 6:off
messagebus 0:off 1:off 2:off 3:on 4:on 5:on 6:off
microcode_ctl 0:off 1:off 2:on 3:on 4:on 5:on 6:off
netdump 0:off 1:off 2:off 3:off 4:off 5:off 6:off
netfs 0:off 1:off 2:off 3:on 4:on 5:on 6:off
netplugd 0:off 1:off 2:off 3:off 4:off 5:off 6:off
network 0:off 1:off 2:on 3:on 4:on 5:on 6:off
NetworkManager 0:off 1:off 2:off 3:off 4:off 5:off 6:off
nfs 0:off 1:off 2:off 3:off 4:off 5:off 6:off
nfslock 0:off 1:off 2:off 3:on 4:on 5:on 6:off
nscd 0:off 1:off 2:off 3:off 4:off 5:off 6:off
pcmcia 0:off 1:off 2:on 3:on 4:on 5:on 6:off
portmap 0:off 1:off 2:off 3:on 4:on 5:on 6:off
psacct 0:off 1:off 2:off 3:off 4:off 5:off 6:off
rawdevices 0:off 1:off 2:off 3:on 4:on 5:on 6:off
readahead 0:off 1:off 2:off 3:off 4:off 5:on 6:off
readahead_early 0:off 1:off 2:off 3:off 4:off 5:on 6:off
rhnsd 0:off 1:off 2:off 3:off 4:off 5:off 6:off
rpcgssd 0:off 1:off 2:off 3:on 4:on 5:on 6:off
rpcidmapd 0:off 1:off 2:off 3:on 4:on 5:on 6:off
rpcsvcgssd 0:off 1:off 2:off 3:on 4:on 5:on 6:off
saslauthd 0:off 1:off 2:off 3:off 4:off 5:off 6:off
sendmail 0:off 1:off 2:on 3:on 4:on 5:on 6:off
smartd 0:off 1:off 2:on 3:on 4:on 5:on 6:off
smb 0:off 1:off 2:off 3:off 4:off 5:off 6:off
sshd 0:off 1:off 2:on 3:on 4:on 5:on 6:off
syslog 0:off 1:off 2:on 3:on 4:on 5:on 6:off
tux 0:off 1:off 2:off 3:off 4:off 5:off 6:off
winbind 0:off 1:off 2:off 3:off 4:off 5:off 6:off
xinetd 0:off 1:off 2:off 3:on 4:on 5:on 6:off
ypbind 0:off 1:off 2:off 3:off 4:off 5:off 6:off
yum 0:off 1:off 2:off 3:off 4:off 5:off 6:off
I need to disable all running services except for SSH, and enable Apache httpd. Depending on your environment, the services you will disable will vary. For instance, I do not need the microcode_ctl service running at all on my setup since I will not be using any microcode updates for the processor. The same would hold true for power management services since this is in a virtual machine. I adhere to the minimalist belief: if you do not need it, do not run it. If you are in doubt, consult your Man/Info pages for information on the purpose of a service.
Below are the commands I run to shut down these services:
chkconfig --level 0123456 isdn off
chkconfig --level kudzu isdn off
chkconfig --level 0123456 kudzu off
chkconfig --level 0123456 microcode_ctl off
chkconfig --level 0123456 acpid off
chkconfig --level 0123456 apmd off
chkconfig --level 0123456 atd off
chkconfig --level 0123456 bluetooth off
chkconfig --level 0123456 cpuspeed off
chkconfig --level 0123456 cups off
chkconfig --level 0123456 dc_client off
chkconfig --level 0123456 dc_server off
chkconfig --level 0123456 gpm off
chkconfig --level 0123456 haldaemon off
chkconfig --level 0123456 irda off
chkconfig --level 0123456 mdmonitor off
chkconfig --level 0123456 mdmpd off
chkconfig --level 0123456 netdump off
chkconfig --level 0123456 netfs off
chkconfig --level 0123456 netplugd off
chkconfig --level 0123456 nfs off
chkconfig --level 0123456 nfslock off
chkconfig --level 0123456 nscd off
chkconfig --level 0123456 pcmcia off
chkconfig --level 0123456 portmap off
chkconfig --level 0123456 rawdevices off
chkconfig --level 0123456 readahead off
chkconfig --level 0123456 readahead_early off
chkconfig --level 0123456 rhnsd off
chkconfig --level 0123456 rpcgssd off
chkconfig --level 0123456 rpcidmapd off
chkconfig --level 0123456 rpcsvcgssd off
chkconfig --level 0123456 saslauthd off
chkconfig --level 0123456 sendmail off
chkconfig --level 0123456 smartd off
chkconfig --level 0123456 ypbind off
Then I reboot my server. I check my services again using the following command:
chkconfig –list grep 3:on
irqbalance 0:off 1:off 2:off 3:on 4:on 5:on 6:off
network 0:off 1:off 2:on 3:on 4:on 5:on 6:off
autofs 0:off 1:off 2:off 3:on 4:on 5:on 6:off
sshd 0:off 1:off 2:on 3:on 4:on 5:on 6:off
syslog 0:off 1:off 2:on 3:on 4:on 5:on 6:off
xinetd 0:off 1:off 2:off 3:on 4:on 5:on 6:off
anacron 0:off 1:off 2:on 3:on 4:on 5:on 6:off
messagebus 0:off 1:off 2:off 3:on 4:on 5:on 6:off
iptables 0:off 1:off 2:on 3:on 4:on 5:on 6:off
crond 0:off 1:off 2:on 3:on 4:on 5:on 6:off
Since Samba and Apache are not running, I will turn those services on with:
chkconfig --level 3 httpd on
chkconfig --level 3 smb on
I also check to see what ports are listening.
netstat –natup
Active Internet connections (servers and established)
Proto Recv-Q Send-Q Local Address Foreign Address State PID/Program name
tcp 0 0 0.0.0.0:139 0.0.0.0:* LISTEN 2177/smbd
tcp 0 0 0.0.0.0:445 0.0.0.0:* LISTEN 2177/smbd
tcp 0 0 :::80 :::* LISTEN 2159/httpd
tcp 0 0 :::22 :::* LISTEN 2032/sshd
tcp 0 0 :::443 :::* LISTEN 2159/httpd
udp 0 0 10.10.2.131:137 0.0.0.0:* 2182/nmbd
udp 0 0 0.0.0.0:137 0.0.0.0:* 2182/nmbd
udp 0 0 10.10.2.131:138 0.0.0.0:* 2182/nmbd
udp 0 0 0.0.0.0:138 0.0.0.0:* 2182/nmbd
udp 0 0 0.0.0.0:68 0.0.0.0:* 2132/dhclient
udp 0 0 0.0.0.0:68 0.0.0.0:* 1897/dhclient
I run Nmap from an outside box to see what ports it thinks are listening on the server:
Starting nmap V. 3.00 ( www.insecure.org/nmap )
Warning: OS detection will be MUCH less reliable because we did not find at least 1 open and 1 closed TCP port
Interesting ports on (10.10.2.131):
(The 1599 ports scanned but not shown below are in state: filtered)
Port State Service
22/tcp open ssh
80/tcp open http
Samba is not listed from the outside, meaning that IPTables is not allowing that traffic through. I also would like to configure Samba at this point. So I need to do two things, disable IPTables temporarily, and install SWAT. The Samba-Swat package is on CD 4 of the CentOS installation disks. So I mount the CD drive and install with the following commands:
mount /dev/cdrom /mnt
cd /mnt/centos/rpms
rpm –Uvh samba-swat-3.0.10-1.4e.i386.rpm
Now that SWAT is installed, I need to enable it for configuration. SWAT runs from the XINETD daemon, so we need to configure the xinetd.d file for SWAT to allow connections. My connecting computer will be always be at IP address 10.10.2.1, so I modify the SWAT file under /etc/xinetd.d/swat like so:
# default: off
# description: SWAT is the Samba Web Admin Tool. Use swat \
# to configure your Samba server. To use SWAT, \
# connect to port 901 with your favorite web browser.
service swat
{
port = 901
socket_type = stream
wait = no
only_from = 10.10.2.1
user = root
server = /usr/sbin/swat
log_on_failure += USERID
disable = no
}
And now I reboot the system. This is where I will stop the IPTables service temporarily so that I can get to the configuration of SWAT. I run the following command:
/etc/init.d/iptables stop
I access SWAT from a web browser by connecting to 10.10.2.131:901. I log in as root. Once logged in to SWAT, I will see the page below:

I go over to the globals tab and set the hosts allow entry to 10.10.2.1. I do not want other machines accessing the Samba shares, so I limit it both in the configuration for Samba and will also limit it in IPTables.
I will now need to create a general birt_reports user to access this share and grant them access to it. On the server, run the following commands to create the birt_rpt user, set the home directory to the /birt_reports directory, set the owner and group of the /birt_reports directory to our new user, and change the birt_rpt users password:
adduser birt_rpt –d /birt_reports
chown birt_rpt /birt_reports
chgrp birt_rpt /birt_reports
passwd birt_rpt
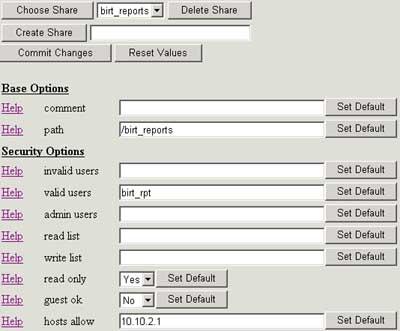
I go to Shares and create the birt_reports share, and set the path to /birt_reports. (Note: I also set read only to No, although it is not shown in this picture)
Then I go to the Status tab, and choose Restart All to restart the Samba services. I now need to get to the shares from my development box. I go into Windows Explorer, choose Map Network Drive, and enter the information below: (Note: be sure to connect as the birt_rpt user using the “Connect using a different user name” link):
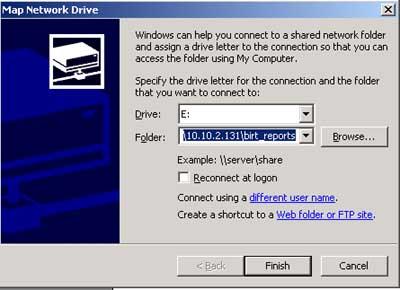
Click Finish. Now the share is mapped to my drive E:.
Since this is all setup, I need to lock down this system. I need to restrict Samba and SWAT access to my development machine at 10.10.2.1. I would like to keep Apache and SSH open to any user, so I go into the /etc/sysconfig/iptables configuration file and modify it:
# Firewall configuration written by system-config-securitylevel
# Manual customization of this file is not recommended.
*filter
:INPUT ACCEPT [0:0]
:FORWARD ACCEPT [0:0]
:OUTPUT ACCEPT [0:0]
:RH-Firewall-1-INPUT - [0:0]
-A INPUT -j RH-Firewall-1-INPUT
-A FORWARD -j RH-Firewall-1-INPUT
-A RH-Firewall-1-INPUT -i lo -j ACCEPT
-A RH-Firewall-1-INPUT -p icmp --icmp-type any -j ACCEPT
-A RH-Firewall-1-INPUT -p 50 -j ACCEPT
-A RH-Firewall-1-INPUT -p 51 -j ACCEPT
-A RH-Firewall-1-INPUT -p udp --dport 5353 -d 224.0.0.251 -j ACCEPT
-A RH-Firewall-1-INPUT -p udp -m udp --dport 631 -j ACCEPT
-A RH-Firewall-1-INPUT -m state --state ESTABLISHED,RELATED -j ACCEPT
-A RH-Firewall-1-INPUT -m state --state NEW -m tcp -p tcp --dport 443 -j ACCEPT
-A RH-Firewall-1-INPUT -m state --state NEW -s 10.10.2.1 -m tcp -p tcp --dport 901 -j ACCEPT
-A RH-Firewall-1-INPUT -m state --state NEW -s 10.10.2.1 -m tcp -p tcp --dport 445 -j ACCEPT
-A RH-Firewall-1-INPUT -m state --state NEW -s 10.10.2.1 -m udp -p udp --dport 137 -j ACCEPT
-A RH-Firewall-1-INPUT -m state --state NEW -s 10.10.2.1 -m udp -p udp --dport 138 -j ACCEPT
-A RH-Firewall-1-INPUT -m state --state NEW -s 10.10.2.1 -m tcp -p tcp --dport 139 -j ACCEPT
-A RH-Firewall-1-INPUT -m state --state NEW -m tcp -p tcp --dport 22 -j ACCEPT
-A RH-Firewall-1-INPUT -m state --state NEW -m tcp -p tcp --dport 80 -j ACCEPT
-A RH-Firewall-1-INPUT -j REJECT --reject-with icmp-host-prohibited
COMMIT
Note the first two lines. The reason I choose to manually edit this file is due to system-config-securitylevel not being as robust a configuration tool as I need. If I run system-config-securitylevel in the future for edits, I will lose these changes. If you intend on using that tool, make a backup of this file. This file really is nothing more than an export of the IPTables rules using Iptables-save.
I reboot, and then need to confirm that I cannot access the services from an unauthorized client. I run Nmap from another IP Address at 10.10.2.128.
Starting nmap V. 3.00 ( www.insecure.org/nmap/ )
Interesting ports on (10.10.2.131):
(The 1598 ports scanned but not shown below are in state: filtered)
Port State Service
22/tcp open ssh
80/tcp open http
443/tcp open https
And to confirm that the development box at 10.10.2.1 can see the services, I run Nmap from it:
Starting nmap V. 3.00 ( www.insecure.org/nmap )
Warning: OS detection will be MUCH less reliable because we did not find at least 1 open and 1 closed TCP port
Interesting ports on BIRT_REPORTS_SE (10.10.2.131):
(The 1595 ports scanned but not shown below are in state: filtered)
Port State Service
22/tcp open ssh
80/tcp open http
139/tcp open netbios-ssn
443/tcp open https
445/tcp open microsoft-ds
901/tcp open samba-swat
I confirm that everything is working by connecting from the development machine to my Samba share and to SWAT. I also confirm that Apache is running by connecting to the server using a web browser. Now my base server setup is complete, I have set up a reports user, set up SWAT for Samba configuration, set up Samba for file serving, and set up IPTables to restrict access to these services to only my development machine. I am now ready to set up Apache Tomcat to serve reports and set up the Cron job to schedule my report generation task. I will cover these in my next article. I have also installed SELinux, which is something I will investigate and write about in the future.


No comments:
Post a Comment