The environment a VMWare virtual network. The Host Operating system is a Windows 2000 Professional box that I will use to scan the network, enumerate services running on the victim machine, and launch the exploit. The victim is an unpatched RedHat Linux 6.2 server. The reason I chose such an old version is because this is an older, obsolete technology with know vulnerabilities, so demonstrating a scenario with it is very easy. Plus I am fairly confident that this technology is not being used in production systems today since a number of exploits for the system are already public. I kept the system install stock using the default options. The IDS sensor used is a Linux system running Snort, and I will use Sguil on the Host as the IDS console to monitor the alerts and fetch transcripts.
The first step is to scan for live systems. If an attacker has a particular target in mind, they will footprint the victim as much as possible. They will query DNS servers to find out what netblocks the victim owns, check news sites for interesting information such as recent corporate acquisitions to find smaller, easier and less protected network to infiltrate and possibly use that as a staging point to infiltrate the target at a later time. For further reading on this I would recommend reading the man pages for nslookup, traceroute, dig, and whois, as well as the “Footprinting” chapter of Hacking Exposed which explains this process in much more detail. These steps are usually done prior to actually scanning, but that is not always the case. In the course of scanning, a potential target might present itself that might provide a better infiltration opportunity than the original target and would require further research. I will skip the Footprinting step here and go straight to scanning the network for live systems. I already know the netblock of my target system to be in the 10.10.4.1/24 range and there is no real intel about the systems owner that would be useful since this is a private network.
The two tools I will demonstrate here are invaluable, Nmap and Netcat. Nmap is a very simple, yet powerful network scanner. Netcat is an all-purpose network tool, capable of all sorts of things such as scanning or making direct connections. The capabilities of both products are well documented in other places, so I will not duplicate them in this article. I would recommend starting with the MAN pages and README files for both utilities.
I will look at Nmap first. I want to run an all-inclusive scan of the netblock to find active systems. I have two options here with Nmap, I can scan using TCP or I can do ICMP scans. ICMP are basic pings sent over a range of addresses. TCP scans can be used in cases where ICMP traffic is either blocked or ignored, for example by a firewall. I will additionally do a port scan of any machines that respond to the pings. This will scan all ports on the machine telling me what services or daemons the victim is offering. The command I will run is
nmap -sS -PI -O -vv -T 0 -oN "C:\tmp\port_scan.log" 10.10.4.1/24
The options I pass to Nmap tell the utility that I want to do a Syn scan on any active hosts, find the hosts using ICMP pings, use the lowest timing setting, identify the operating system if possible, and output the results to a file called port_scan.log. A Syn scan will go through any active system and establish step one of a three-way handshake, only sending the initial Syn packet. If the scanner receives the Syn/Ack, it will know that port is listening for connections. A Syn scan is typically used to prevent log entries of attempted connections to a host server. By using the /24 netmask, this will scan all systems from 10.10.4.1 to 10.10.4.256 and report back any active systems and what active services they are running. The results are below
Host (10.10.4.0) appears to be down, skipping it.
Host (10.10.4.1) appears to be down, skipping it.
Host (10.10.4.2) appears to be down, skipping it.
Host (10.10.4.3) appears to be down, skipping it.
…(remaining down systems skipped for brevity)…
Host (10.10.4.128) appears to be up ... good.
Initiating SYN Stealth Scan against (10.10.4.128)
Adding open port 1024/tcp
Adding open port 111/tcp
Adding open port 98/tcp
Adding open port 113/tcp
Adding open port 21/tcp
Adding open port 514/tcp
Adding open port 79/tcp
Adding open port 515/tcp
Adding open port 938/tcp
Adding open port 25/tcp
Adding open port 23/tcp
Adding open port 513/tcp
The SYN Stealth Scan took 0 seconds to scan 1601 ports.
For OSScan assuming that port 21 is open and port 1 is closed and neither are firewalled
Interesting ports on (10.10.4.128):
(The 1589 ports scanned but not shown below are in state: closed)
Port State Service
21/tcp open ftp
23/tcp open telnet
25/tcp open smtp
79/tcp open finger
98/tcp open linuxconf
111/tcp open sunrpc
113/tcp open auth
513/tcp open login
514/tcp open shell
515/tcp open printer
938/tcp open unknown
1024/tcp open kdm
Remote operating system guess: Linux 2.1.19 - 2.2.20
OS Fingerprint:
TSeq(Class=RI%gcd=1%SI=4D948C%IPID=I%TS=100HZ)
T1(Resp=Y%DF=Y%W=7F53%ACK=S++%Fla
gs=AS%Ops=MENNTNW)
T2(Resp=N)
T3(Resp=Y%DF=Y%W=7F53%ACK=S++%Flags=AS%Ops=MENNTNW)
T4(Resp=Y%DF=N%W=0%ACK=O%Flags=R%Ops=)
T5(Resp=Y%DF=N%W=0%ACK=S++%Flags=AR%Ops=)
T6(Resp=Y%DF=N%W=0%ACK=O%Flags=R%Ops=)
T7(Resp=Y%DF=N%W=0%ACK=S%Flags=AR%Ops=)
PU(Resp=Y%DF=N%TOS=C0%IPLEN=164%RIPTL=148%RIPCK=E%UCK=E%ULEN=134%DAT=E)
Uptime 0.010 days (since Thu Sep 08 09:42:19 2005)
TCP Sequence Prediction: Class=random positive increments
Difficulty=5084300 (Good luck!)
TCP ISN Seq. Numbers: D274202B D351884C D2D1BFC0 D31F4024 D2FE2C73 D2FE9AE5
IPID Sequence Generation: Incremental
Host (10.10.4.129) appears to be down, skipping it.
Host (10.10.4.130) appears to be down, skipping it.
As we can see, there is one host up, 10.10.4.128, with several services running. The same thing can be accomplished with Netcat, although not as gracefully. This can be scripted in Unix, however since my host OS is a Windows 2000 box, automating the scan with Netcat is a little trickier. The command I run to do this is
for /L %i in (1,1,256) do nc -z -n -vv 10.10.4.%i 1-1024
What I am doing here is using the DOS for command to loop through the numbers 1-256 and store this in a variable to pass into our Netcat command. Netcat will do a zero-connection (do not actually do anything on connection, but it does establish a full three way handshake), use numeric IP addresses, be verbose, and scan all systems in the 10.10.4.1/24 netblock, scanning for services running on ports 1 to 1024. While this is not an exact mirror of the Nmap scan, it indicates a similar approach.
Using the Nmap example above, the ports I am now interested in are as follows:
21/tcp open ftp
23/tcp open telnet
25/tcp open smtp
79/tcp open finger
98/tcp open linuxconf
111/tcp open sunrpc
113/tcp open auth
513/tcp open login
514/tcp open shell
515/tcp open printer
938/tcp open unknown
1024/tcp open kdm
What I need to do now is find out what these services are. What I will do is connect to each of these ports using another one of Netcats features, the ability to do raw TCP connection, to try and gather information from banners and system identifiers. Below is a screenshot of the connection to port 21, the FTP port. With the exception of the Telnet session below, I will not show any of the other services since it is outside the scope of my exploit.
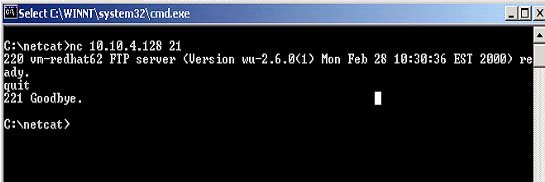
In this example, I have identified the FTP version as being wu-2.6.0(1). Next, I Telnet into the machine, hoping to gather more information. The following banner is displayed:
Red Hat Linux release 6.2 (Zoot)
Kernel 2.2.14-5.0smp on an i686
login:
I have gathered a good amount of information about my target. I now have the following information to aid me during my attack:
- Interesting listening ports.
- The version of the FTP daemon running on the victim. In this case, wu-ftp version 2.6.0(1).
- The version of the Operating System, Red Hat Linux 6.2 running kernel 2.2.14-5.
- The architecture of the machine the victim is running on, in this case an X86 (i686) based machine.
This information allows me to narrow the scope of my vulnerability search. I can now focus on finding vulnerabilities for a particular architecture and service. Knowing the kernel version, I can find rootkits and other utilities that will cover my tracks geared towards this particular kernel. If I cannot find one precompiled, I can duplicate the architecture and compile the tools beforehand, minimizing my exposure time on the victims system.
Knowing this information, I have a few options. As indicated above, I can also attempt to duplicate this environment for testing exploits or to research vulnerabilities more in depth offline. This has a few benefits. First is that I can do a trial and error approach of trying an exploit and not setting off any alarms. The second is allowing me to get the source for the services I will target and attempting to find vulnerabilities in the source code. This can be a long drawn out processes however, but a very educational one. With sites like Metasploit out there, one can easily get the shell code to use as a payload for an attack. I plan on looking into that more in depth in a future article.
Another option is to search a known vulnerability database to see what I can find. I hit pay dirt easily with this approach since the services on this host are pretty dated. Searching on the SecurityFocus website turned up some remote vulnerabilities and exploits for wu-ftp 2.6.0.
This completes the preparation for attack. I have successfully scanned for and found a live system. I have scanned ports to discover what services are running on my target and identified vulnerable processes to take advantage of. From the banners, I gathered intelligence that was used to find vulnerability. And I now have a plan once I infiltrate the target system to cover my tracks and secure my position on there. In the next article, I will demonstrate the actual exploit, create my user account and steal the password files, and show the basic operation of Sguil for investigating this incident.


No comments:
Post a Comment