Monday, April 13, 2009

Programming: Using the Google Java App Engine to Build my Time Warner Cable Petition Site

Google recently announced the Java version of its Google App Engine. Interesting timing because I just so happened to have a need for an app server to host a small application I was looking to build. Despite criticism that it only includes a subset of the Java standard, it turned out to do everything I needed it to do.

The project I was looking to build was an online petition against Time Warner Cables recent announcement of Tiered Pricing based on consumption. Despite their attempts to justify such an action, I wasn’t buying it and saw through the BS. I wont get into the details, its covered much more in depth elsewhere on the net, as well on the petition site.

What made the Google App Engine so attractive is that it supported GWT natively right out of the box, and it supported its own data store, so that I can let visitors sign up, and write reports on the number of sign ups and type of sign ups.

So the first thing I did was download the SDK and install it into Eclipse. The thing I noticed immediately with the Eclipse plugin is that it has the option for two SDK’s, the GWT SDK and the App Engine SDK. These plugins are real nice because they let create these kinds of projects and deploy directly to the App Engine from within Eclipse. This is nice. The GWT project creation is on par with the Instantiations GWT Designer minus one glaring detail, the UI Designer. And I have found, the two don’t exactly play nicely with each other. No big deal, however. I created a separate project to design the layout of my forms in GWT Designer, and copy and pasted into my GWT/App Engine project. While this was a bit of a pain, it allowed me to keep my GUI designer.

The rest was simple. A few static page content, and by setting my RootPanel using the RootPanel.get(elementId) call, I was able to integrate my GWT components right into my static HTML pages. What I did here was something like this. I had a DIV tag in my HTML page called “content”. Instead of using a call like:

RootPanel rootPanel = RootPanel.get();

I did something like:

RootPanel rootPanel = RootPanel.get(“content”);

And my GWT based form is integrated into my static HTML page. And by commenting out the inherits line in the project.gwt.xml file, I was able to not have GWT force its styles onto my form, using the styles available in the static HTML files instead, keeping the form consistent with the rest of the site.

One other difference between the GWT Designers handling and the GWT Plugin of projects is that in the Google plugin, all static content is stored in the project/war directory. With GWT Designer, you get a public folder under the module directory. Threw me for a loop for a second, but I digress.

Next experiment will include a BIRT ODA to report off the data store using the Google Remote_API and trying to integrate the BIRT engine directly into an App Engine based project

Monday, March 30, 2009

Electronics: Pulsing/Breathing LED

A few months ago I was looking to create a “pulsing LED” effect. What I was using this for was for a Halloween effect where I was placing a series of different colored ultra-bright LED’s under some beakers filled with water and dry ice, creating the Mad Scientists lab. One of my stated goals was to do this without using a microcontroller since I hadn’t gotten into microcontrollers yets.

I ended up using this project: http://www.rabidhardware.net/index.php?id=5

This essentially makes a scewed triangle wave, where the rise time is quicker than the fall time, creating a “breathing” effect.

There are a couple of other circuits that do similar things:

http://www.instructables.com/id/How_to_blinkbreathing_style_LED_while_you_are_p/

http://www.cpemma.co.uk/throbber.html

Of course, making a variable duty cycle PWM program with a microcontroller might end up better next time since I can control more LED’s with less.

Saturday, March 14, 2009

Gripe: Nike+ does not work in Firefox with AdBlock

A little aside before we get to the problem and solution.

Since the beginning of the year, I have hit the exercise full throttle again. I seem to do this in year intervals, where I will go nuts, lose a sick amount of weight over the course of 6 - 8 months, then lose steam. Not sure why that is, but the upside is that I haven't gained back any of the weight I've lost since I started this cycle (so far I have lost 70 -75 pounds over the course of 3 years) due to the diet I layed out previously.

One of the exercises I have been doing a lot of is running. While it has played hell on my knees, I have seen tremendous results from this. When I started really running last year, I could barely make a 1/4 of a mile. Now I regularly run anywhere from 3 - 6 miles a day at least 4 times a week. So since I have been so impressed by the results, I just keep at it.

This past weekend I ran in a 5K charity run for Multiple Sclerosis. Its one of the diseases, along with Parkinson's disease, that scares the hell out of me. Since one of my friends was diagnosed with it, I felt obligated to run. Sad how something has to hit home before we actually take action on something.

So to the point. A lot of the people at the run were using those Nike+ Ipod adapters. I had looked into these last year when I started running. But now I figured since we are in a media manufactured recession (its NOT real people, stop listening to the news, and go out, invest and spend) and the economy needs a little cash pumped into it, and I was challenged to join a team to compete on miles, I broke down and bought one.

Now to the problem. So if your reading this, you probably already have a Nike+, use Firefox, and ran into the same exact issue I did. You use Firefox as your default browser, and when Itunes attempts to sync your miles, or even connect to Nike+ site, all you get is a blank page. Chances are pretty good your using Adblock Plus. And thats the problem. Adblock is filtering the Nike+ site in Firefox.

There are two ways around this. You can temporarily disable Adblock. That is a short term fix, and very annoying. Thanks to an offhand comment I found in this thread, I found the long term solution is to add an exception to allow the Nike+ site in.

To do so, do the following:

Under the Tools menu, click on the AdBlock Plus Preferences menu item. If you don't see it, you can go under Tools > Add-Ons > and click on the Options button for Adblock Plus.

Click on the Add Filter button.

Add the following Filter.
@@http://nikeplus.nike.com

Thats it. Click Apply, and now you can use Nike+ inside of Firefox, assuming you have Flash installed.

Sunday, February 15, 2009

Electronics: Microcontrollers and the DIY LED Heart for Valentine's Day

I’d been looking to continue my old hobbies in electronics. I’ve been building small circuits when I have free time to sit at the workbench and fiddle with the old soldering iron and breadboards, but I’ve really wanted to get into the world of microcontrollers. Well, thanks to a “Slashvertisement”, I came across the DIY LED Heart Valentine Card from Nerkits.com.


Figure 1. The Microcontroller based Valentines Card.

Pretty much, most of the details are on their site. The project requires the USB Nerd Kit, wire strippers (I use a set of auto-strippers that I bought several years ago, when you have to strip wires a lot and quickly they are great to have, and it’s a pain to use the old fashion kind), and some basic construction tools. I used a piece of foam/cardboard I picked up from Walmart to build the heart, a Exacto knife to cut the hole for the LED Faceplate, and a drill to drill holes for the LED’s. To hold everything together, I used Gorilla Glue, which had a fortunate side effect of causing the Styrofoam in the board to bubble up before hardening, which worked great to hold all the circuit pieces onto the poster board.

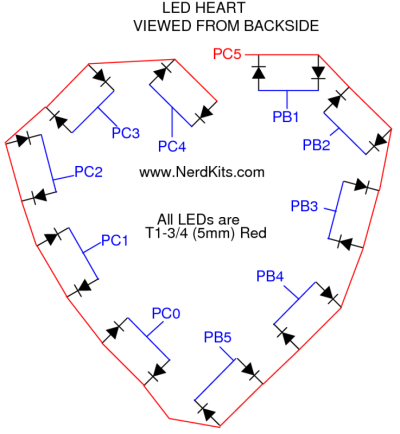
Putting the circuit together was simple. I first followed the directions in the Nerdkit PDF file to build the base circuit (in the Nerdkit PDF, this is all the way up to step 10, which includes building the circuit, attaching the LCD screen, and attaching the programmer, and compiling and installing some test programs). From there, the rest of the project involved wiring up the LED’s as indicated in this template:

A little hint, to do the wiring from LED to LED, I used an old fasion wire wrap tool. This took maybe 15-20 minutes to completely wire the entire common wire run across the back of the template. To do the individual connections, I again, used a wire wrap tool to connect two posts in the LED’s, then I would only need to connect a single wire from the MCU to the pair.


Figure 2. Wire Wrap. Notice the single large white wire connecting to the post at the bottom of the image. Much easier than taking two wires from each post and trying to connect them in the middle. A single wire wrap takes like 5 seconds to complete.

Because this was going into a permanent card, I ended up soldering everything onto a circuit board. I ended up using a simple 6” circuit board from Radio Shack. The reason I chose this board is because it had the two side rails for both +5V coming from the voltage regular and a ground, had a 7mm center divide for the MCU, and to has a layout similar to the breadboard included in the Nerdkits kit, with numbered sides, so I could follow the instructions exactly. I also connected two 16 pin IC sockets back to back in place of the MCU during construction, this way I could solder everything to the board without the microcontroller in place and I wouldn’t have to worry about damaging the chip due to heat from the soldering iron. I could plug in the chip when I was done with construction.

The only modification I made to the circuit was to solder an additional four wires to act as “Posts” for the MCU programmer. I put 1 wire on the +5V rail, 1 on the ground, and 1 wire on each of the appropriate pins for the programmer to work. Then, if I needed or wanted to change anything, I would only need to flip the switch to set the chip into programming mode and attach the USB programmer to the posts using alligator clips (if I had time, I would have used some sort of connectors).

So how did it work? Initially, I ran into some issues. The code provided would cause the MCU to lock up unless I changed the delay timing. Thanks to the excellent support from Nerdkits, I was able to determine this was not a problem with the code, but with the version of AVR (the programming environment) for Windows that I was using. Once I updated to the newest version of AVR, everything worked perfectly.

So how would I rate my experience working with the Nerdkits tools. I am actually very impressed. There are a lot of Microcontroller kits out there (Basic Stamp, Adafruit). I got the USB Nerdkit for 80 dollars. A Basic Stamp kit runs about the same price at Radio Shack, the Adafruit kit run from anywhere from 30 bucks on up, depending on what you need (the equivalent to what I got from Nerdkits is about 65 bucks, minus the LCD screen and guide). So what attracted me to Nerdkits (besides the Slashdot advertisement), and what will keep me going back to them? Most importantly, the excellent support. I sent their support a message around midnight on Saturday. I had a response waiting in my Inbox on Sunday morning when I woke up. I can’t get that kind of support from most big vendors, including ones that I've spent thousands of dollars on server equipment and have "Gold" support with, so to get that from a small shop is incredible. Not only that, I had a follow up message a few hours later with the fix. In the message the guy said he played around with it and figured it out. This wasn't some dope in a call center reading from a script, but an actual guy (according to their site, an MIT engineer) who took the time to replicate and troubleshoot the issue, and on a Sunday. I can’t get that kind of support from people I know personally. I liked the included tools. The IDE used to program is an open source one, so I can play around with it, and maybe try to port the compiler over to something like Eclipse if I want to. The instructional material was easy to follow, and their are tutorial videos on their site. I had my initial kit up and running in less than 2 hours by following their instructions. The example kits are fun, and I like the fact that I can write code in C for the microcontroller. While I know BASIC and could have managed on a BASIC Stamp, I prefer C, especially for doing things like bit-shifting and working with registers on the microcontroller. And the end result is a lot simpler than the BASIC stamp modules bulky modules.

I’ve been wanting to build a few mini-moving lights for a Halloween project, and most of the components are already built in examples on their site (a combination of their Servo-Water gun (using 2 axis instead of 1) and some PWM ultra-bright Red, Blue, and Green LED’s will work for what I want). Overall, I am very impressed and happy with my experience from these guys.

And most importantly, the wife loved it :)

Figure 3. This looks a lot more complicated than it really is. I used ribbon style wire to go to each LED pair, and all green wires to connect to the LCD (hence the bundle of green wires). I lost the batter clip I bought, so I ended up using Duct Tape to hold the battery in place.

Saturday, January 03, 2009

Tech: Fixed TV for Father In-Law (DTD1363-CAR)

I spent the better part of the morning re-kindling an old love of mine, Electronics. I’ve been dabbling with electronics off and on for 15 years now. In fact, Electronics was an early career path for me before I decided to settle on programming. But, just like many other fields that I’ve had hobbies in, I find myself going back to electronics every now and then.

So this morning I tackled something I haven’t done since the early part of the decade, repairing televisions. My father-in-law brought me a television that he bought for his son a couple of years ago. This set is a Disney Cars TV/DVD combo unit (model # DTD1363-CAR). It’s a cute little unit, shaped to look like Lightning McQueen. And much like McQueen in the movie when he’s got no gas, it would run for about 5 minutes, then shut off. Kind of heart breaking for a 6 year old. Having working in a TV/VCR repair shop in college, I agreed to take a look at it for him.

What I ended up finding was some cold solder joints around the flyback/horizontal output transformer. It’s a big ugly unit with a large red cable running from the top into a suction cup in the CRT. I read a lot of silly suggestions on Fixya (http://www.fixya.com/support/p520372-disney_dtd1363_car_13_tv_dvd_combo), but the flyback cold solder joints suggestions led me to the visually inspect the joints. Sure enough, there were dull, porous solder joints around the transformer. To fix this, I removed the old solder using a solder sucker, prepped the area with small amount of solder rosin, and re-soldered the connections. I also re-soldered a few other spots on the board that looked suspect. So, what would have cost him about 70 bucks at a TV repair shop took me about 45 minutes. Hardest part was figuring out how to open up the case on this thing, which involved removing the plastic lugnuts in the tires that were hiding the screws holding the trim pieces in place. Outside of that, there wasn’t much else to fixing this. Keep in mind, this TV is indeed a piece of junk though, as are most TV/DVD combos. This is the problem with electronics manufactured in 3rd world countries where old plants are half-assed retrofitted to mass production, and there are poor QA standards, air quality standards, and so forth. I had a TV that my parents passed on to me that lasted well over 15 years, and we ended up selling it at a garage sale. I bet that thing had the tube zapped, it is still kicking out there.

Be wary of self diagnosis on TV’s. We used to pick up old sets from people who would throw out good sets because the picture on the tube would shrink to a “line in the middle” or a “dot in the middle”. So of course, people would assume the picture tube went bad and it would be too expensive to fix. 9 out of 10 times, however, it was a deflection circuit, and the part would cost about 30 bucks to fix it.

Maybe I should go pick up broken TV’s from Craigs list, fix them, and sell them for a little extra money. Not sure I want that kind of headache again.

Friday, November 07, 2008

Games: Little Big Planet

I try not to blog about gaming too much since there are far better sources for this kind of material, some better, some worse, but thats all a matter of taste. I do have to say though, as an avid gamer, Little Big Planet has knocked my socks off. I picked this game up mainly due to hype, and half expecting to be let down. Truth be told, when I got the game home and couldn't update to the latest version (at this time, 1.03), I was really disappointed since it wouldn't allow me to see user created content. So I was left with the stock levels.

I won't bore you with the details about "Sackboy" since the main character and his possible customizations are covered very well in depth by the many gaming rags on the market. I will say he is cute and clever, as is the control scheme for him. I can't help myself but to have him disco dance ala Saturday Night Fever after every level.

The stock levels showcase the games physics and themes really well. It has a very animatronic theme going, with characters being voiced by little speakers, and movements being done by something right out of a Rube Goldberg invention. They are challenging, with a very silly backstory behind many of the different levels.

Once the gremlins with the network, be in on my end or Sonys end finally cleared up and I was able to update, I got to see where LBP really shines. User created content always ends up enhancing a game, and showcasing possibilities that the developers couldn't imagine. In this case there is no exception. I played around with user levels, some of which were mere mechanisms to earn trophies, but others were clever, challenging platformers that brought me back to the yesteryears of the NES. I had one level where I was doing a mock prison break, another where I was going through the American Gladiators obstacle course, and one where I played basketball while wearing a rocketpack.

So, those are the facts, so whats my opinion. I can openly say this, and all naysayers be damned. This is the first game where I have actually smiled and enjoyed playing. I haven't even gotten into level creation, just playing, and this is easily one of the most enjoyable gaming experiences I have had in a long time. Finally, something that breaks away from the tired first person shooters, dystopian futures, survival horrors, and the getting very thin rhythm games (although I did pick up Gears of War 2, Guitar Hero World Tour, and Rock Band 2, so apparently I still have some demand for these games). Easily the best game for the PS3, and I look forward to seeing what else the community can cook up.