Wednesday, February 08, 2006

Actuate e-Spreadsheet Report

I talk a lot about Actuate, but I haven’t ever demonstrated any of their products outside of BIRT. We use the Actuate suite religiously because they are, in my opinion, the best of breed Business Intelligence tools out there. In this article I will demonstrate how to build a simple Excel report using Actuates e-Spreadsheet product.

The requirements are for a simple Excel spreadsheet report that gives a list of all employees who meet simple criteria, and drill down from top-most level of the hierarchy to the lower level. Level numbers are down in the query itself. I prefer the Pivot table as a report format since it allows report recipients to perform some basic analysis on certain aspects without having to re-run the entire report. For example, if they are looking at the top most portion, it will give a grand total of all lower levels, however when they drill-down, the totals will automatically update to reflect the new view. They can also drag grouping categories around and have the numbers update as well. I will demonstrate this at the end of the article.

I will skip the query creation part, so for this example just know that I have already created a query that will return my list of people. The way to plug this into e-Spreadsheet is pretty straightforward. You will need to have either a JDBC or ODBC connection to your data source (note: if you want to post the report to Actuates I-Server, you will have to use JDBC, and the JDBC drivers will need to be setup on the server). I will use JDBC for this example since I already have the JDBC data sources ready to go, and I will end up posting this to I-Server.

The first step is to open e-Spreadsheet. Once open, you will see an interface very similar to just about every other spreadsheet program in existence, so there are no real surprises. The first step is to create the data source and insert the query. First, go up to Data, and then select Data Manager.
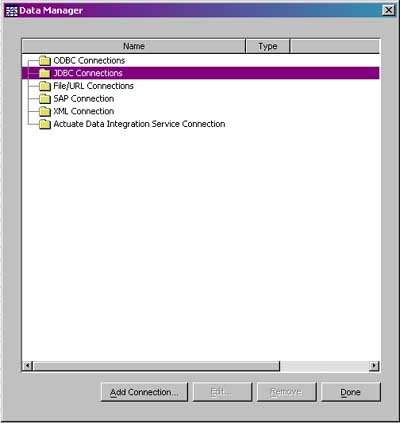

Figure 1. The Data Manager

Once inside of the Data Manager, Select JDBC Connections and click on the Add Connection button. A dialog pops up for you to fill out the JDBC URL. Below is an example I use for the Oracle JDBC driver. If this is the first time e-Spreadsheet is run, this will be blank. However, once you put in a JDBC connection, e-Spreadsheet will remember it for future use.


Figure 2. JDBC Connection Dialog


Once the data source is setup, now you need to create the query. Click on the newly created connection, and click on the “Add Query Button”. You will be given a dialog box with a large text field to type in the query. Put your respective query in. At this point, you can change the appearance of field names using the fields tab, change the query name (helpful if you have a large number of queries in your reports), or even preview the returned results. If the query is not valid, you will receive an error if you try to change tabs, or hit close. There is also an additional graphical query editor, however I never use it myself since typically my queries are not simplistic enough for it. You can also add parameters to the query to make things a little more dynamic.
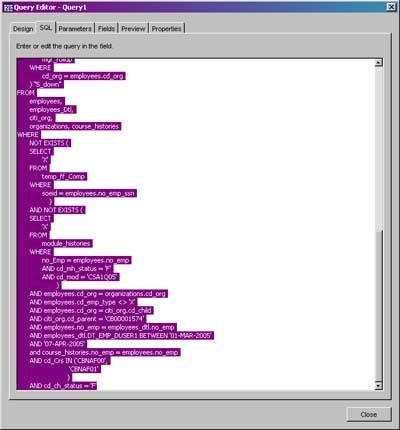

Figure 3: Query Editor

Once complete, I am now ready to put the Pivot Table into the report itself. To do this, Go up to the menu, and click on the Pivot Range Wizard. Choose External Data Source on the first prompt, as illustrated in Figure 4.


Figure 4: Pivot Range Source

The next prompt asks you to pick your external data source. Choose the query you just created and click Next. On the next screen it will ask you for the target for the pivot table to be inserted. I will keep the default range, and I will keep the options default. However, using the options dialog, you can remove grand total rows, insert values for cells with null or invalid data, disable the drilldown capabilities, and various other formatting options.


Figure 5: Target for Pivot Range

Once the wizard is complete, you will have a blank pivot table as indicated in Figure 6. To add to the pivot table, simply drag fields into it, in order of drill down hierarchy. In this example, I want to create a horizontal drill down with no vertical categories, so I will drag the levels of drill down over to the far left. The detail will be based on the individual employees, so I drag the ID number field to the main data field.
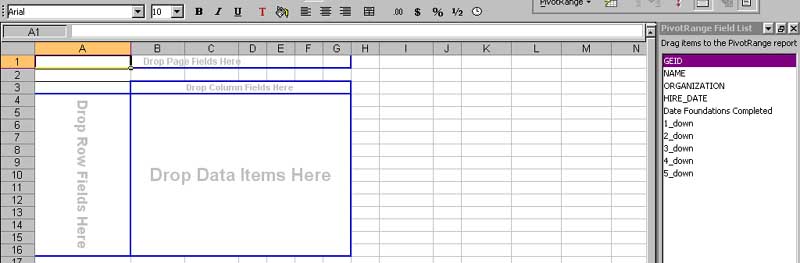

Figure 6: Empty Pivot Table

Now that the report is built, I can either run it by going up to the Data Menu, and clicking on Run Report, or posting to Actuate I-Server and retrieving from there. The advantage to I-Server is I can now schedule this report to run on regular intervals, save each report iteration using I-Servers CMS versioning scheme, and use custom URL’s to expose the report to users outside of the Active Portal and integrate it into my custom portal. The report will run from I-Server and display a Microsoft Excel spreadsheet, whereas if you run the report in the report designer, you will have to do a Save As to save as an Excel formatted file.
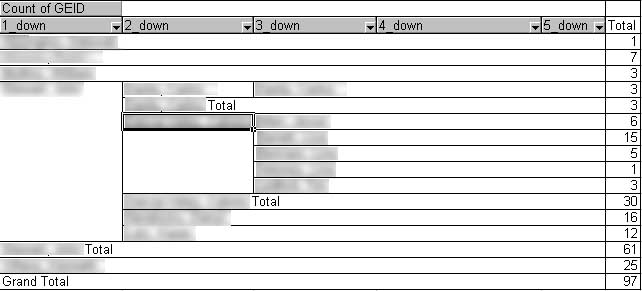

Figure 7: Completed Pivot Table

Figure 7 shows the completed report in Excel. As you can see I have drilled down on the 4th row. There are sub-totals for each level of the drill down. If I were to double click on the numbers in the total column, I would open up a separate worksheet detailing all of the employees represented by that number. This provides a quick and easy way for managers to quickly narrow down particular populations while still getting an accurate representation of the whole. The can also click on the drop down arrow on each column and remove items that they do not wish to view. Of course, using trickery with Actuate Active Portal, I-Server, and some custom programming, you can have a manger authenticate into a web portal, click on the report, and use their user id or granted roles to generate a custom report limiting the information they see. Of course, this is a little easier to accomplish in Actuate flagship product, Enterprise Report Designer, however you pay for the power in terms of ease of use.

Overall, I would about 95 percent of my current report generation is done using Actuates e-Spreadsheet and I-Server products. These are very powerful products to consider for any MIS manager whose target audience prefers reports in Excel format.

Monday, February 06, 2006

VMWare Server Beta Released

According to an article at OsNews.com, VMWare Server Beta is available for free, as previously speculated. This is an interesting move for VMWare, and I hope they generate enough revenue to support this endeavor. I personally like VMWare, and I hope this move doesn’t affect them in a negative way. As one person noted in the OSNews thread, virtualization is becoming a commodity item, with OSS alternatives, so this does provide a way for VMWare to hook companies into the larger ESX product, especially if they require support. I will have to download it and give it a whirl.

Friday, February 03, 2006

VmWare for Free?

Great news in the world of Virtual PC’s. VMWare plans on offering its GSX Server product for free, according to Cnets News.com. This is great news for people who love their legacy OS (old DOS apps anyone?), or who constantly experiment with the Linux distro of the month. In fact, I just recommended VMWare to someone this week when they hosed their XP install while playing around with hard drive encryption software. If they had experimented with the software in a Virtual Machine first, they would have saved themselves the headache of having to restore a disk image, and if it crashed, so what, delete the VM and try again. VMWare is another one of those products I consider to be best of breed, although there are plenty of OSS alternatives, such as Xen and Qemu, but IMHO, they are not nearly as strong as VMWares offerings.

In the past I’ve used VMWare to set up virtual networks to test out exploits and learn what their traffic looks like under Sguil, plus I have used it to set up MySql databases under Linux to test report capabilities with BIRT. Ill also sandbox new software installations to a dummy image first to insure it won’t hose my system and to test for malware and spyware by monitoring traffic coming from the virtual machine pre and post install. I intend on using VMWare to also test boot code I will write for experimentation purposes as indicated in this article (still have not gotten around to doing so, but I will).

I hope there is some truth to this, and not just hype. If so, this follows on the footsteps of VMWare offering the free VMWare Player, and can be a great asset to folks who would like to offer VM Images to students during classes.

Wednesday, February 01, 2006

Coldfusion Development Part 1

I see a lot of negative press towards Coldfusion, especially on web forums such as Slashdot. Truth of the matter is it really doesn’t matter which web platform you use, if you do not practice secure coding techniques in PHP, JSP, or ASP, they will all cause you security headaches just as well. Things such as input validation, leaving default passwords, and leaving default installations with sample applications can cause a world of hurt in Coldfusion and other web platforms, as stated in this Macromedia article about the top 5 Coldfusion securit. My personal feelings is that application servers shouldn’t be exposed to customer facing networks, but implementing solutions where these systems hide in a protected environment is costly and difficult to set up. But despite all this, Coldfusion is a great platform for putting out web applications very quickly, as I will demonstrate in the next few articles.

The application will take a users input for a Nomination Form, which is a request to take a class, and insert it into a table. There will be a separate Coldfusion script that will check for the presence of data in that table, pull it, email it to a predetermined email address, log it, and clear the table. The setup I am developing for is Coldfusion MX 6, using Macromedia Dreamweaver MX 2004 for development. This is in a totally trusted environment (if there is such a thing), so minimum of input validation will be used. The web forms used in this example were put together by a graphic artist, so I will have to modify her form, and based off this form, the fields for the table have already been defined. I will also use a tool called SecureCFM to check the source code afterwards, doing a small, cheap security audit of the source code.


Figure 1: The web form (modified)

Based on the fields in the form, I created this simple table (its flat, but that’s OK, not everything needs to be normalized, especially for something as simple as this).

create table nom_form
(
participant_f_name varchar2(50),
participant_m_name varchar2(50),
participant_l_name varchar2(50),
participant_soeid varchar2(10),
participant_igeid varchar2(15),
participant_e_mail varchar2(100),
participant_home_phone varchar2(30),
participant_job_title varchar2(50),
participant_start_date date,
participant_hire_date date,
participant_department varchar2(100),
participant_cost_number_checked number(1),
participant_cost_number varchar2(100),
participant_address varchar2(150),
participant_city varchar2(150),
participant_state varchar2(50),
participant_zip varchar2(20),
participant_interoffice varchar2(100),
participant_office_phone varchar2(20),
participant_office_Fax varchar2(20),
manager_name varchar2(100),
manager_id1 varchar2(15),
manager_phone varchar2(20),
manager_email varchar2(100),
class1_event_name varchar2(150),
class1_course_code varchar2(20),
class1_class_id number,
class1_class_date date,
class2_event_name varchar2(150),
class2_course_code varchar2(20),
class2_class_id number,
class2_class_date date,
class3_event_name varchar2(150),
class3_course_code varchar2(20),
class3_class_id number,
class3_class_date date,
class4_event_name varchar2(150),
class4_course_code varchar2(20),
class4_class_id number,
class4_class_date date,
date_processed date
);

With the table create, submitting the information into a form is simply a matter of building the appropriate insert statement, and setting the forms submit action. I will set this form to submit to itself, with a small URL variable indicating that the form has been filled out. Alternatively, I can check for the existence of one of the form field using the isdefined() function. A rough skeleton of the code will look like this:

<cfif not IsDefined("URL.Submit")>
<!--- Code to display form page would go here - - ->
<cfelse>
<cftry>
<!--- Data input validation code goes here -- ->
<!--- Insert statement will go here - - ->
<cfcatch type=”any”>
<!--- Error handeling code goes here - - ->
<cfabort>
</cfcatch>
</cftry>
</cfif>

The form page contains all the fields, named something meaningful (thankfully, my graphic artist did all this for me, and I didn’t even have to tell her). The actual cfquery tag with the insert statement will looks like this:

<cfquery name="insertEvent" datasource="datasource">
insert into nom_form
(
participant_f_name,
participant_m_name,
participant_l_name,
participant_soeid,
participant_geid,
participant_e_mail,
participant_home_phone,
participant_job_title,
participant_start_date,
participant_hire_date,
participant_department,
participant_fc_number_checked,
participant_fc_cost_number,
participant_address,
participant_city,
participant_state,
participant_zip,
participant_interoffice,
participant_office_phone,
participant_office_Fax,
manager_name,
manager_soeid,
manager_phone,
manager_email
<!--- Conditional for class, this will be changed later to be mandatory --->
<cfif form.classid1 neq "">
,
class1_event_name,
class1_course_code,
class1_class_id,
class1_class_date
</cfif>
<!--- Conditional for clas, these will be optional --->
<cfif form.classid2 neq "">
,
class2_event_name,
class2_course_code,
class2_class_id,
class2_class_date
</cfif>
<!--- Conditional for class --->
<cfif form.classid3 neq "">
,
class3_event_name,
class3_course_code,
class3_class_id,
class3_class_date
</cfif>
<!--- Conditional for class --->
<cfif form.classid4 neq "">
,
class4_event_name,
class4_course_code,
class4_class_id,
class4_class_date
</cfif>
)
values
(
<cfqueryparam value="#form.firstname#" cfsqltype="CF_SQL_VARCHAR" maxlength="50">,
<cfqueryparam value="#form.mi#" cfsqltype="CF_SQL_VARCHAR" maxlength="50">,
<cfqueryparam value="#form.lastname#" cfsqltype="CF_SQL_VARCHAR" maxlength="50">,
<cfqueryparam value="#form.soeid#" cfsqltype="CF_SQL_VARCHAR" maxlength="10">,
<cfqueryparam value="#form.geid#" cfsqltype="CF_SQL_VARCHAR" maxlength="15">,
<cfqueryparam value="#form.emailaddress#" cfsqltype="CF_SQL_VARCHAR" maxlength="100">,
<cfqueryparam value="#form.hmphone#" cfsqltype="CF_SQL_VARCHAR" maxlength="30">,
<cfqueryparam value="#form.positiontitle#" cfsqltype="CF_SQL_VARCHAR" maxlength="50">,
<cfqueryparam value="#form.positionstart#" cfsqltype="cf_sql_date">,
<cfqueryparam value="#form.hiredate#" cfsqltype="cf_sql_date">,
<cfqueryparam value="#form.department#" cfsqltype="CF_SQL_VARCHAR" maxlength="100">,
<!--- Need to determine if we are using a branch number or a cost center number --->
<cfif form.costfcselect eq "Cost Center Number">
0,
<cfelse>
1,
</cfif>
<cfqueryparam value="#form.costcenter#" cfsqltype="CF_SQL_VARCHAR" maxlength="100">,
<cfqueryparam value="#form.workstreet#" cfsqltype="CF_SQL_VARCHAR" maxlength="150">,
<cfqueryparam value="#form.workcity#" cfsqltype="CF_SQL_VARCHAR" maxlength="150">,
<cfqueryparam value="#form.workstate#" cfsqltype="CF_SQL_VARCHAR" maxlength="50">,
<cfqueryparam value="#form.workzipcode#" cfsqltype="CF_SQL_VARCHAR" maxlength="20">,
<cfqueryparam value="#form.interofc#" cfsqltype="CF_SQL_VARCHAR" maxlength="100">,
<cfqueryparam value="#form.fcphone#" cfsqltype="CF_SQL_VARCHAR" maxlength="20">,
<cfqueryparam value="#form.fcfax#" cfsqltype="CF_SQL_VARCHAR" maxlength="20">,
<cfqueryparam value="#form.mngrname#" cfsqltype="CF_SQL_VARCHAR" maxlength="100">,
<cfqueryparam value="#form.mngrsoeid#" cfsqltype="CF_SQL_VARCHAR" maxlength="15">,
<cfqueryparam value="#form.mngrphone#" cfsqltype="CF_SQL_VARCHAR" maxlength="20">,
<cfqueryparam value="#form.mngremail#" cfsqltype="CF_SQL_VARCHAR" maxlength="100">

<!--- Conditional for class --->
<cfif form.classid1 neq "">
,
<cfqueryparam value="#form.event1name#" cfsqltype="CF_SQL_VARCHAR" maxlength="150">,
<cfqueryparam value="#form.coursecode1#" cfsqltype="CF_SQL_VARCHAR" maxlength="20">,
<cfqueryparam value="#form.classid1#" cfsqltype="cf_sql_numeric">,
<cfqueryparam value="#form.classdate1#" cfsqltype="cf_sql_date">
</cfif>

<!--- Conditional for class --->
<cfif form.classid2 neq "">
,
<cfqueryparam value="#form.event2name#" cfsqltype="CF_SQL_VARCHAR" maxlength="150">,
<cfqueryparam value="#form.coursecode2#" cfsqltype="CF_SQL_VARCHAR" maxlength="20">,
<cfqueryparam value="#form.classid2#" cfsqltype="cf_sql_numeric">,
<cfqueryparam value="#form.classdate2#" cfsqltype="cf_sql_date">
</cfif>

<!--- Conditional for class --->
<cfif form.classid3 neq "">
,
<cfqueryparam value="#form.event3name#" cfsqltype="CF_SQL_VARCHAR" maxlength="150">,
<cfqueryparam value="#form.coursecode3#" cfsqltype="CF_SQL_VARCHAR" maxlength="20">,
<cfqueryparam value="#form.classid3#" cfsqltype="cf_sql_numeric">,
<cfqueryparam value="#form.classdate3#" cfsqltype="cf_sql_date">
</cfif>
<!--- Conditional for class --->
<cfif form.classid3 neq "">
,
<cfqueryparam value="#form.event4name#" cfsqltype="CF_SQL_VARCHAR" maxlength="150">,
<cfqueryparam value="#form.coursecode4#" cfsqltype="CF_SQL_VARCHAR" maxlength="20">,
<cfqueryparam value="#form.classid4#" cfsqltype="cf_sql_numeric">,
<cfqueryparam value="#form.classdate4#" cfsqltype="cf_sql_date">
</cfif>
)
</cfquery>

And that’s basically it for the form. I save this page as “nomination_form.cfm” and with the additional CFML tags inserted as indicated above, set the form action to point to “nomination_form.cfm?Submit=1”, and the main form page is ready to roll. Notice I use cfqueryparam tags instead of in-lining the values to be passed into the database. The main reason for this is that it is a little faster, maybe not in this case, but definitely in cases where the query will be run repetitively. It also forces the correct datatype into the database. So if a user tries to pass alphanumeric data into a numeric field, it will fail. This will provide some basic input validation to help prevent against SQL Injection attacks since parameters are bound as bind variables in Oracle, not parsed as string literals.

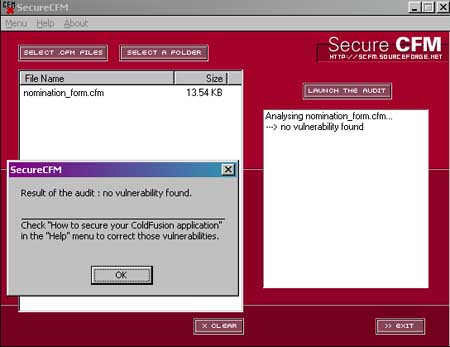
Next, since this page is complete, I run SecureCFM to see if there are any vulnerabilities in it (at least that this tool can detect, something like Nessus would probably be appropriate to use here as well). According to it, the page contains no detectable vulnerabilities.


Getting this up and going was incredible simple compared to a language like ASP or and of the .Net languages. I didn’t have to worry about things like object instantiation, creating ADO objects, commands, or recordsets. Coldfusion is great for getting applications up and running in a short amount of time. That is not to say that it is appropriate for all scenarios. Gauge the appropriate platform based on the requirements of the project.

The remainder of tasks for the project are add-ons, with the exception of the scheduled job that will email data to a pre-determined email address. Next article I will add buttons to lookup the employee information from a pop-up window and pass back the results to the main form. The same method will be used to lookup class information. This allows for the automation of as much information as possible, but allows the user to change information that may be incorrect in the employee database, such as phone numbers, or to allow them to use an alternative cost center or FC number.

Tuesday, January 31, 2006

BIRT 2.0 Installation

With the announcement of BIRT Release 2, I have been very excited to give it a run through. I finally got a chance to install it, and here is my experience upgrading from the previous version of BIRT to the version 2.0.

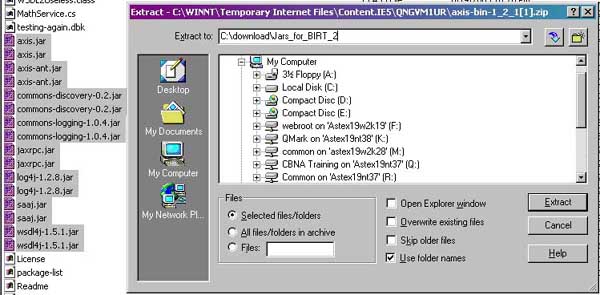
The first step is to get the additional prerequisite packages for BIRT. I already have the base Eclipse packages needed as outlined in the EclipseZone article. Additionally BIRT 2.0 will require Apache Axis, iText, prototype.js, and the BIRT 2.0 Framework. Apache Axis is the first of the prerequisite packages I retrieved. Fortunately only 6 files are needed for BIRT, so I open the file in WinZip, and sort by file type. I select all the “Executable JAR files” and extract to a temporary directory.


I will only keep the following 6 files:
axis.jar axis-ant.jar commons-discovery-0.2.jar jaxrpc.jar saaj.jar wsdl4j-1.5.1.jar

I extract the ZIP file to C:\Download\Jars_for_BIRT_2\. The 6 files were found under the following directory:
C:\download\Jars_for_BIRT_2\axis-1_2_1\lib

iText. was saved to C:\ Download\Jars_for_BIRT_2\iText

And finally I downloaded prototype.js and saved it to C:\ Download\Jars_for_BIRT_2\.

I downloaded the BIRT 2.0 Framework from here.

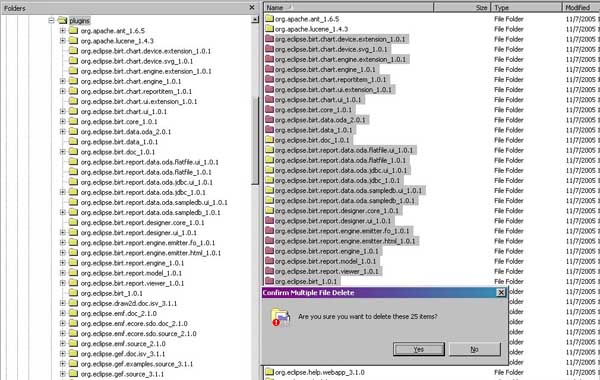
Now that I have the components downloaded, I need to remove my original BIRT installation before I begin installing 2.0. The first thing I do is locate my Eclipse folder, and delete all subfolders starting with org.eclipse.birt.


For grins, I also run “eclipse –clean” to clear out any old garbage relating to the old version of BIRT.

I do get an error message warning me about not being able to load my workbench (which was BIRT the last time I ran Eclipse), but it can be ignored. From there I close Eclipse.

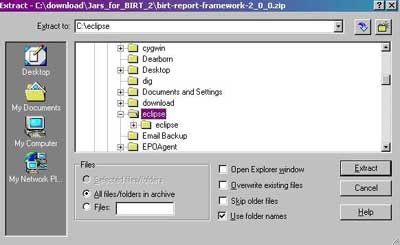
Next I open up my Zip file for the BIRT 2.0 Framework and extract to the folder containing Eclipse, with full directory options on.


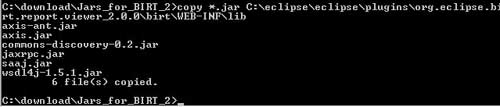
Now that the directory structure is created for BIRT, I copy the 6 files from Apache to the C:\eclipse\eclipse\plugins\org.eclipse.birt.report.viewer_2.0.0\birt\WEB-INF\lib


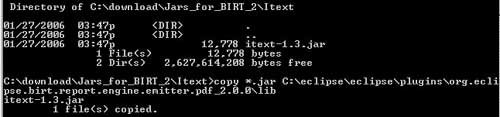
Then I copy iText over


And finally, I copy over prototype.js to the appropriate BIRT directory


Once done, I go into the Eclipse folder, and launch Eclipse with the –clean switch again.


I am stoked that I do not get the workspace error again, and I can open the Employees example I used for the EclipseZone article. The only thing I need to do is to load my JDBC driver for Oracle again. These steps are outlined in the EclipseZone article and in Sguil Incident Reporting using BIRT articles, so I will not repeat them here. (Note: I ran into a bug here while writing this article. If you go into manage drivers, cancel out, then go back into manage drivers, the dialog will not pop up. I did have a BIRT 1 report opened at the time which was expecting the JDBC driver, so no telling if that is the catalyst for this bug. Annoying, but not critical).

Once added, I was successfully able to run the Employee test report under BIRT. I will play around with the new features in 2.0 and report back what I find.

Thursday, January 26, 2006

Business Intelligence Role in NSM

Since I have been on a roll with the whole BI topic lately, I’ve decided to continue this trend, at least for a little while longer, and apply it to NSM. I have covered this before.

As it stands now, Sguils primary focus is providing facilities for the network security analyst, and it succeeds in that role admirably. In fact, I would go as far as to say it is the best tool for any serious network security monitoring operation. I consider Sguil to be the only tool that really facilitates the analyst’s portion of the NSM methodology as outlined by Richard Bejtlich, with capabilities such as session data, packet data, and full transcripts. But from a business perspective, the Sguil setup has great BI potential for NSM operations. In fact, I would say that the BI potential that NSM provides is one of its strongest, yet most overlooked, elements.

Consider this, the tools that Sguil is built on top of already provide the ability to collect data, and it already logs this data into a somewhat meaningful schema for further data analysis. Data is already stored in such a way that is can be categorized, grouped, and counted, thus providing the basis for real BI opportunities. In my opinion, this is one of the strongest points that separate NSM from other security practices. By being able to work with data, reports can be generated to help managers and stakeholders make informed decisions in regards to information security policies. If you are running a full Sguil setup, and data is collected that indicates a particular Internet facing host is frequently the target of attacks, then managers can make a decision regarding the necessity of this machines role to the companies infrastructure. The numbers will show that the machine is poses a potential problem, and management can address this and direct the IT staff. If the machine has outlived its usefulness, then it merely provides an avenue of attack, and management can decide to take this system offline. I myself have seen this in action with some of the clients that BATC had during my days working as a security analyst.

BI/MIS built on top of NSM data will allow managers to make informed decisions about network security, regardless of their understanding of security principles (although knowledge in this area are definitely beneficial). It doesn’t take an expert to understand the severity of a compromise, and with numbers to support it, the proof is in the pudding (sorry, I’ve been hearing that a lot lately, I’ve been looking for an excuse to use it). So while Sguils capabilities provide for an excellent platform to serve as a transactional system, I believe BIRT is the platform to serve as MIS in this setup, as I have stated previously in other articles.

It has been previously stated that IT staff should be given more authority to enforce security policies. I cannot stress how much I disagree with this belief. The extent of authority I would give IT staff is to remove machines that violate security policy from a network. Anything else is the responsibility of management and HR. IT staffs that I have encountered in the past are usually too busy to play network police, and they do not have proper “people skills” or “emotional intelligence”. Granting them that authority opens up companies to potential lawsuits, there is a reason why management has to undergo training for these sorts of tasks. The best way for IT to address these kinds of issues is to help facilitate better BI based off of NSM data.